
Liberty 4WD L4-2.4L DOHC VIN 1 (2005)
5. Remove the screw that secures the lower anchor/belt tension sensor to the bracket on the outboard side of the front seat cushion frame.
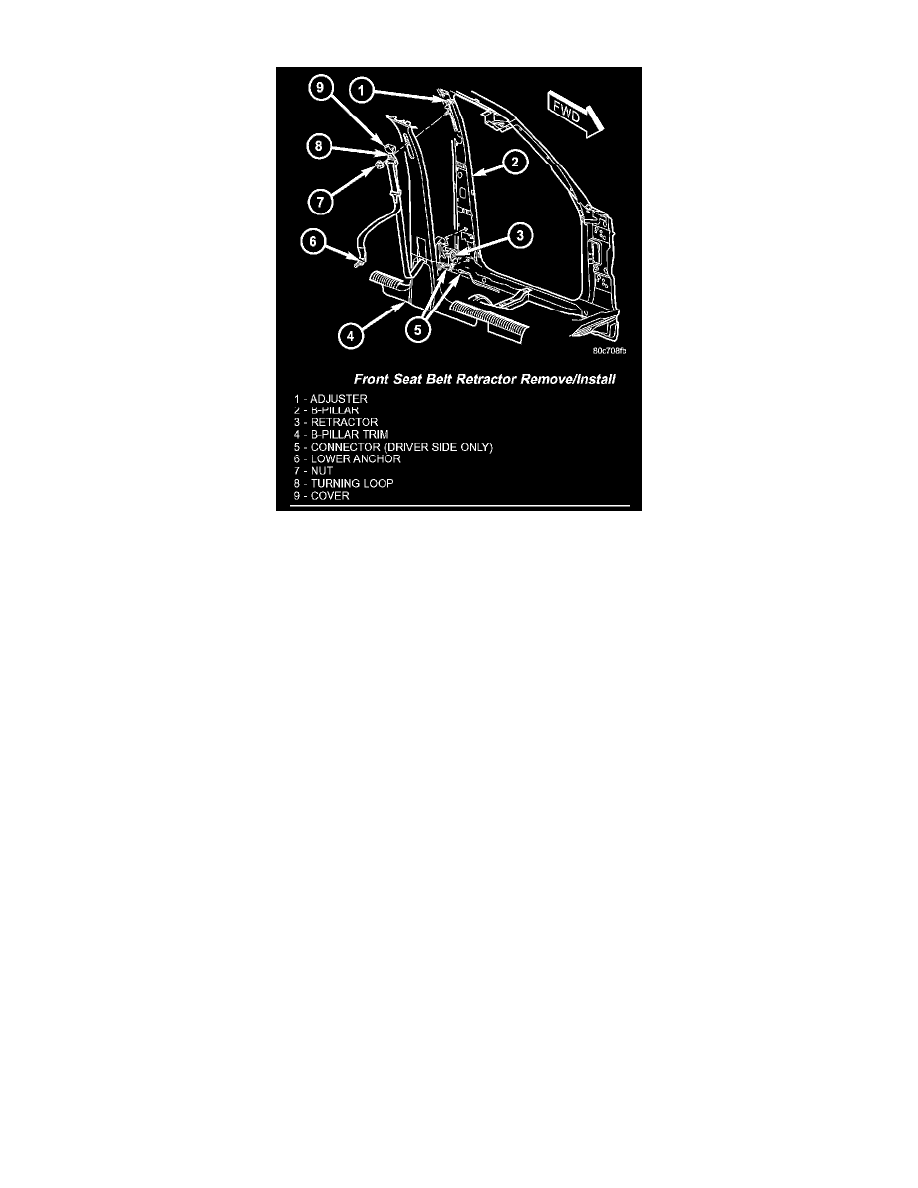
Front Seat Belt Retractor Remove/Install
6. Unsnap and lift the trim cover to access the nut that secures the front seat belt turning loop to the height adjuster on the upper B-pillar.
7. Remove the nut that secures the seat belt turning loop to the height adjuster stud on the upper B-pillar.
8. Remove the seat belt turning loop from the height adjuster stud.
9. Remove the upper trim from the inside of the B-pillar.
10. Remove the lower trim from the inside of the B-pillar.
11. Disconnect the body wire harness connector from the seat belt tensioner pigtail wire connector.
12. Remove the screw that secures the lower retractor bracket to the B-pillar.
13. Disengage the engagement tab on the upper retractor bracket/seat belt web guide from the engagement slot in the B-pillar.
14. Remove the front seat belt and retractor from the B-pillar as a unit.
INSTALLATION
1. Position the front seat belt and retractor to the B-pillar as a unit. Be certain to engage the engagement tab on the upper retractor bracket/seat belt
web guide into the engagement slot in the lower B-pillar.
2. Install and tighten the screw that secures the lower retractor bracket to the B-pillar. Tighten the screw to 43 N.m (32 ft.lbs.).
3. Reconnect the body wire harness connector to the seat belt tensioner pigtail wire connector.
4. Reinstall the lower trim onto the inside of the B-pillar.
5. Reinstall the upper trim onto the inside of the B-pillar.
6. Position the seat belt turning loop onto the height adjuster stud on the upper B-pillar.
7. Install and tighten the nut that secures the seat belt turning loop to the height adjuster stud. Tighten the nut to 34 N.m (25 ft.lbs.).
8. Fold and snap the trim cover back into place to conceal the nut that secures the turning loop to the height adjuster.
9. Position the front seat belt lower anchor/belt tension sensor to the bracket on the outboard side of the front seat cushion frame.
10. Install and tighten the screw that secures the lower anchor/belt tension sensor to the bracket on the outboard side of the front seat cushion frame.
Tighten the screw to 47 N.m (35 ft.lbs.).
11. On the passenger side only if the vehicle is equipped with the Occupant Classification System, reconnect the belt tension sensor pigtail wire
connector to the seat wire harness connector for the sensor.
12. Align the seat belt anchor cover to the opening near the rear of the outboard seat side shield. Using hand pressure, press firmly and evenly on the
cover until it snaps into place.
13. Do not reconnect the battery negative cable at this time. The supplemental restraint system verification test procedure should be performed
following service of any supplemental restraint system component.
14. On the passenger side front seat belt and retractor only if the vehicle is equipped with the Occupant Classification System, following successful
completion of the supplemental restraint system verification test procedure, perform the Occupant Classification System Verification Test using a
diagnostic scan tool and the Occupant Classification Seat Weight special tool. Refer to the appropriate diagnostic procedures.