
Liberty Sport 4WD L4-2.4L VIN 1 (2002)
Check Valve: Service and Repair
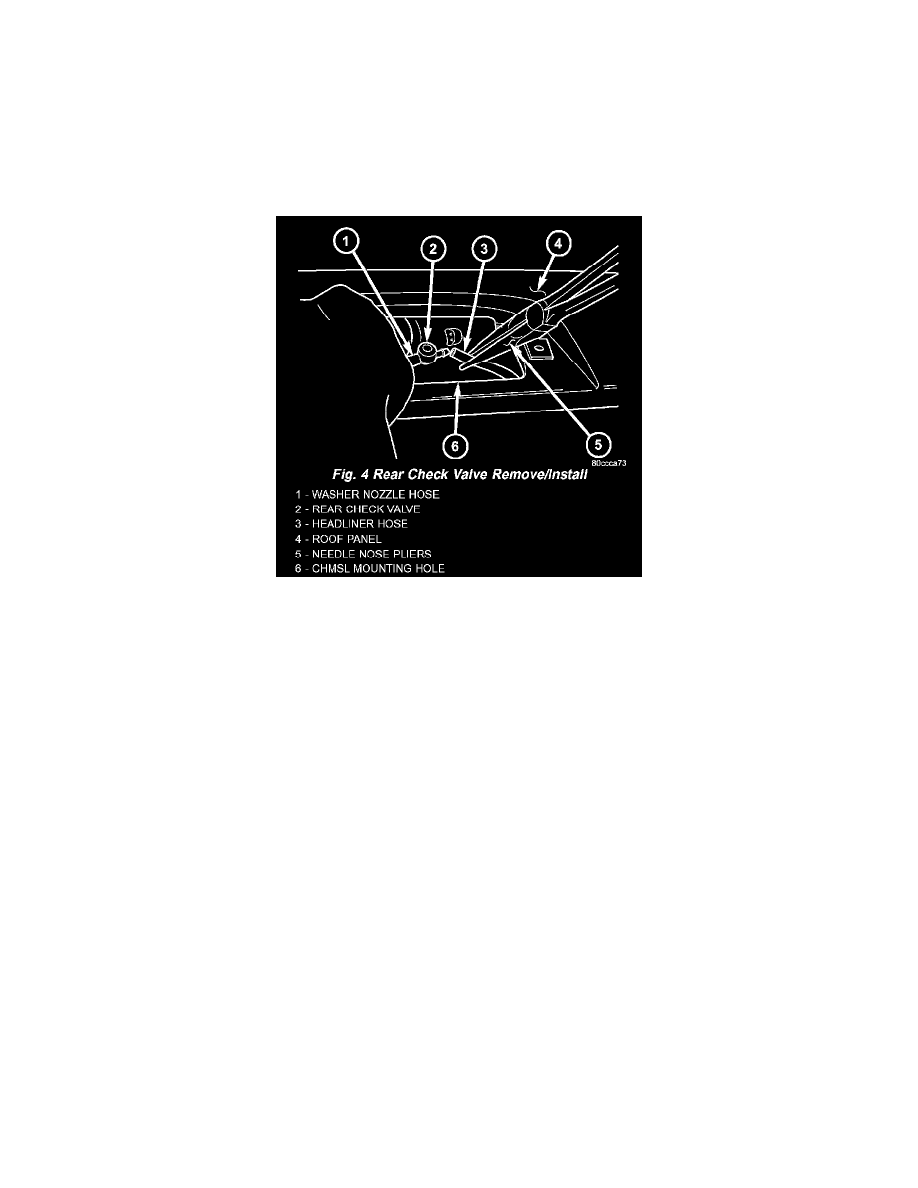
Rear Check Valve Replacement
REMOVAL
1. Disconnect and isolate the battery negative cable.
2. Remove the Center High Mounted Stop Lamp (CHMSL) unit from the rear of the roof panel. (Refer to LAMPS/LIGHTING -
EXTERIOR/CENTER HIGH MOUNTED STOP LAMP UNIT - REMOVAL).
WARNING: THE EDGES OF THE SHEET METAL AROUND THE CENTER HIGH MOUNTED STOP LAMP MOUNTING HOLE
IN THE ROOF PANEL. TAKE THE PROPER PRECAUTIONS TO AVOID PERSONAL INJURY.
Fig.4 Rear Check Valve Remove/Install
3. Reach through the CHMSL unit mounting hole in the rear of the roof panel to access and disconnect the rear washer hose at the barbed nipple of
the rear washer nozzle.
4. Pull the rear washer hose through the CHMSL unit mounting hole far enough to access and disconnect the headliner washer hose from the barbed
nipple of the rear check valve.
5. Remove the rear check valve and rear washer nozzle hose as a unit through the CHMSL mounting hole.
6. Disconnect the rear washer nozzle hose from the barbed nipple of the rear check valve.
INSTALLATION
1. Reconnect the rear washer nozzle hose to the barbed nipple of the rear check valve. Be certain that the flow direction arrow molded into the rear
check valve body is oriented towards the rear washer nozzle hose.
WARNING: THE EDGES OF THE SHEET METAL AROUND THE CENTER HIGH MOUNTED STOP LAMP MOUNTING HOLE
IN THE ROOF PANEL. TAKE THE PROPER PRECAUTIONS TO AVOID PERSONAL INJURY.
2. Reach through the CHMSL unit mounting hole in the rear of the roof panel to access and pull the headliner washer hose into the Center High
Mounted Stop Lamp (CHMSL) unit mounting hole.
3. Reconnect the headliner washer hose to the barbed nipple of the rear check valve.
4. Reach through the CHMSL unit mounting hole in the rear of the roof panel to access and reconnect the rear washer nozzle hose to the barbed
nipple of the rear washer nozzle.
5. Reinstall the CHMSL unit to the rear of the roof panel. (Refer to LAMPS/LIGHTING - EXTERIOR/CENTER HIGH MOUNTED STOP LAMP
UNIT - INSTALLATION).
6. Reconnect the battery negative cable.