
De-lamination of the headlining
- Make
- Land Rover
- Model
- Defender Technical Bulletins
- Section
- De-lamination of the headlining › De-lamination of the headlining
DE-LAMINATION OF THE HEADLINING
- Model
- Defender
- Affected vehicles
- All derivatives up to VIN 2A 626230
- Date
- 2002-01-30
- Reference
- Bulletin 0091, CDS ref L8688bu
Bulletin text
Defender
AFFECTED RANGE:
All derivatives up to VIN 2A 626230
PROBLEM:
DE-LAMINATION OF THE HEADLINING The headlining cover comes away from its foam backing due to a combination of heat and humidity.
CAUSE:
Inadequate material specification.
ACTION:
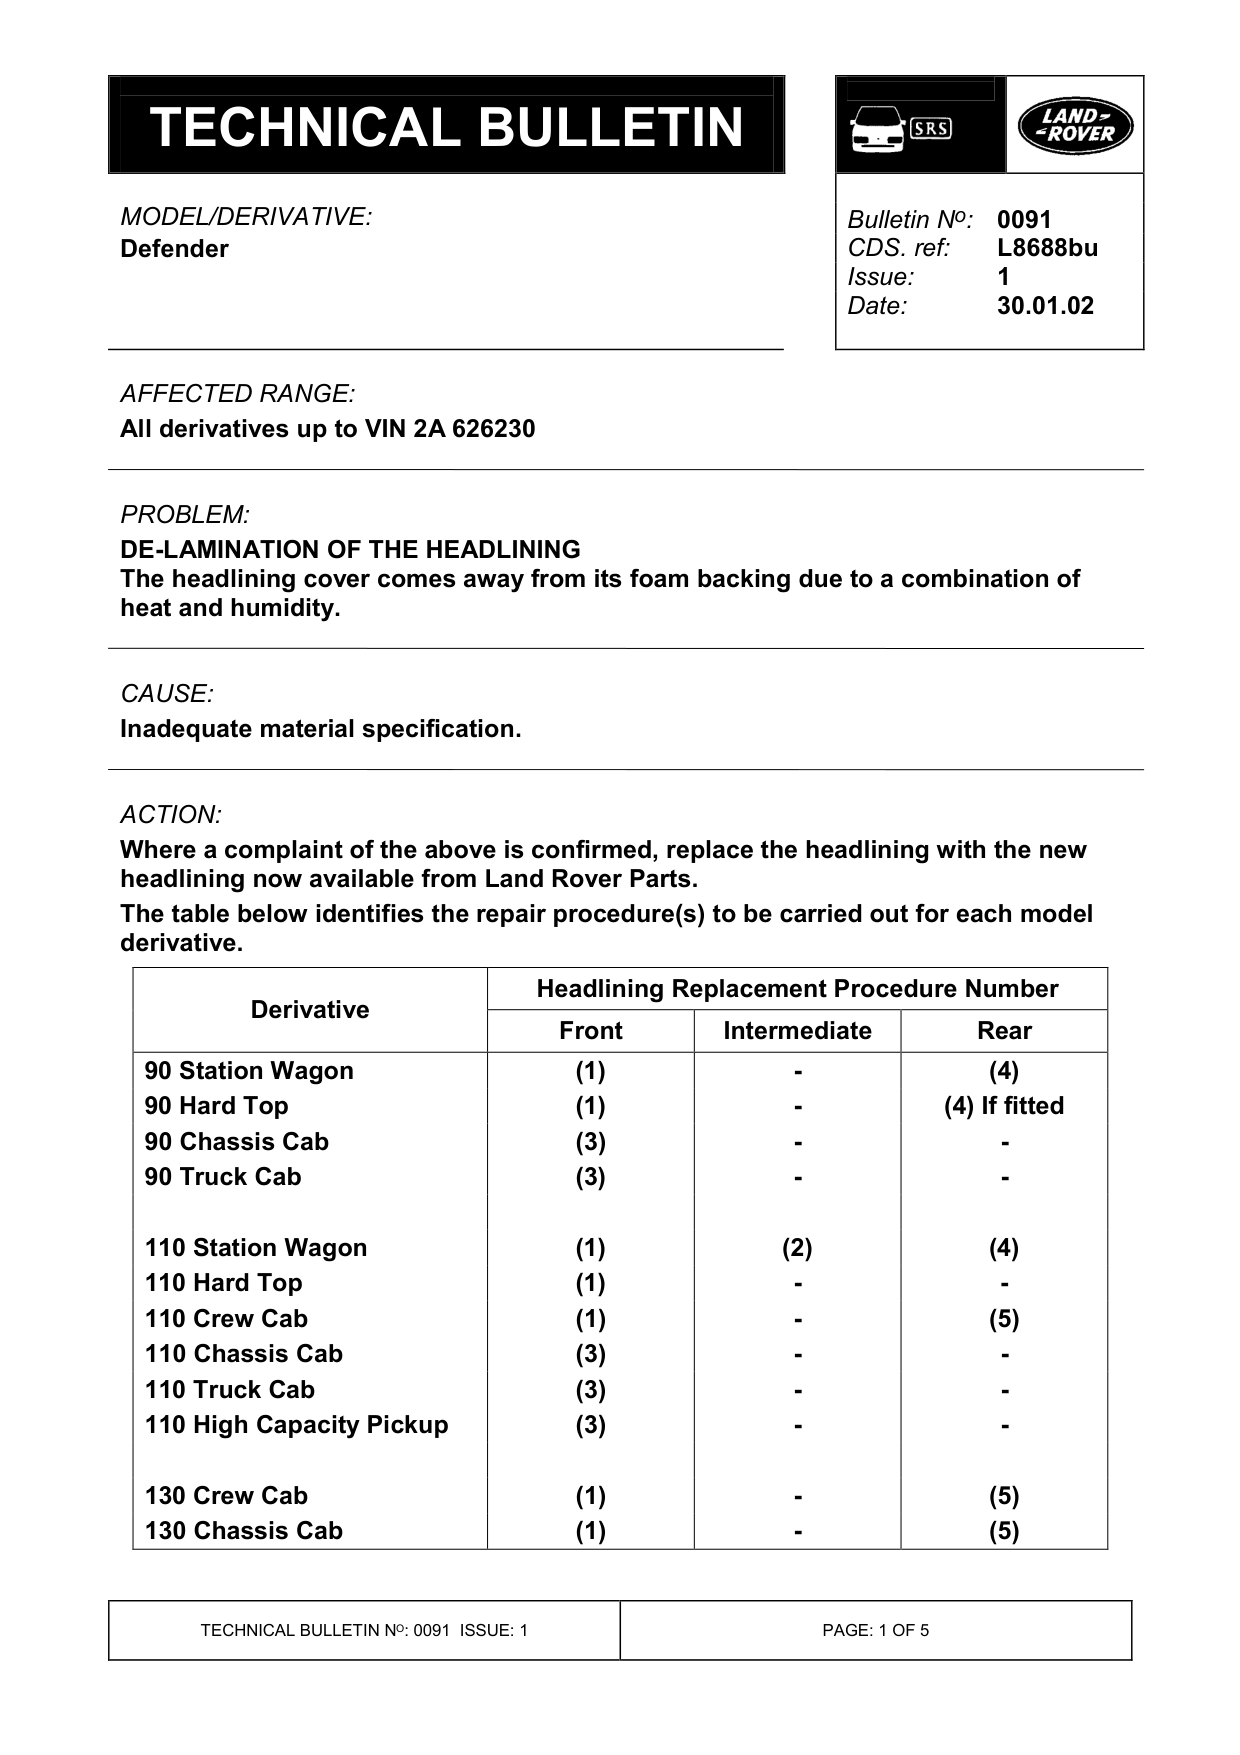
Where a complaint of the above is confirmed, replace the headlining with the new headlining now available from Land Rover Parts. The table below identifies the repair procedure(s) to be carried out for each model derivative.
Headlining Replacement Procedure Number Derivative
90 Station Wagon 90 Hard Top 90 Chassis Cab 90 Truck Cab
110 Station Wagon 110 Hard Top 110 Crew Cab 110 Chassis Cab 110 Truck Cab 110 High Capacity Pickup
130 Crew Cab 130 Chassis Cab
Bulletin N o : 0091
Front Intermediate Rear (1) (4) (1) (4) If fitted (3) (3) -
(1) (2) (4) (1) (1) (5) (3) (3) (3) -
(1) (5) (1) (5)
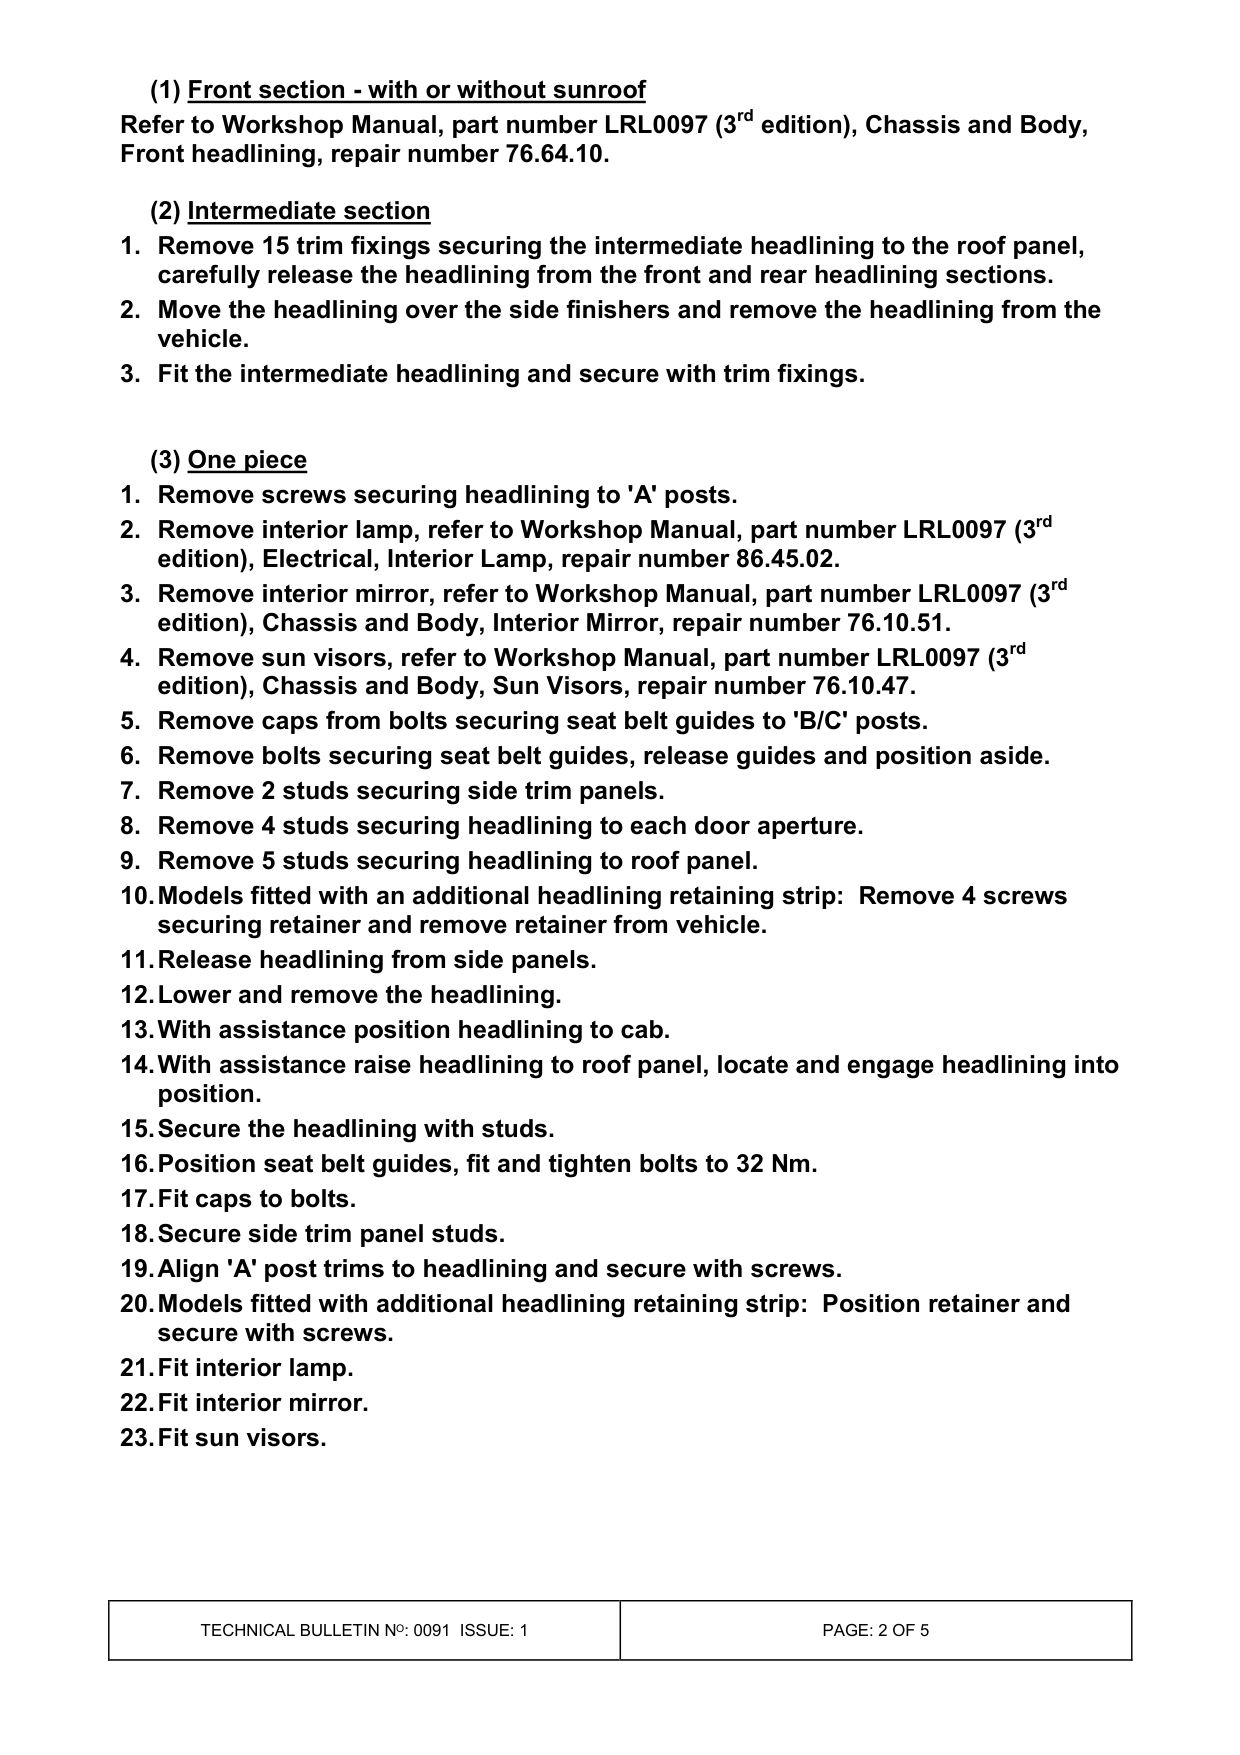
(1) Front section - with or without sunroof Refer to Workshop Manual, part number LRL0097 (3 rd edition), Chassis and Body, Front headlining, repair number 76.64.10.
(2) Intermediate section 1. Remove 15 trim fixings securing the intermediate headlining to the roof panel, carefully release the headlining from the front and rear headlining sections. 2. Move the headlining over the side finishers and remove the headlining from the vehicle. 3. Fit the intermediate headlining and secure with trim fixings.
(3) One piece 1. Remove screws securing headlining to 'A' posts. 2. Remove interior lamp, refer to Workshop Manual, part number LRL0097 (3 rd edition), Electrical, Interior Lamp, repair number 86.45.02. 3. Remove interior mirror, refer to Workshop Manual, part number LRL0097 (3 rd edition), Chassis and Body, Interior Mirror, repair number 76.10.51. 4. Remove sun visors, refer to Workshop Manual, part number LRL0097 (3 rd edition), Chassis and Body, Sun Visors, repair number 76.10.47. 5. Remove caps from bolts securing seat belt guides to 'B/C' posts. 6. Remove bolts securing seat belt guides, release guides and position aside. 7. Remove 2 studs securing side trim panels. 8. Remove 4 studs securing headlining to each door aperture. 9. Remove 5 studs securing headlining to roof panel. 10. Models fitted with an additional headlining retaining strip: Remove 4 screws securing retainer and remove retainer from vehicle. 11. Release headlining from side panels. 12. Lower and remove the headlining. 13. With assistance position headlining to cab. 14. With assistance raise headlining to roof panel, locate and engage headlining into position. 15. Secure the headlining with studs. 16. Position seat belt guides, fit and tighten bolts to 32 Nm. 17. Fit caps to bolts. 18. Secure side trim panel studs. 19. Align 'A' post trims to headlining and secure with screws. 20. Models fitted with additional headlining retaining strip: Position retainer and secure with screws. 21. Fit interior lamp. 22. Fit interior mirror. 23. Fit sun visors.
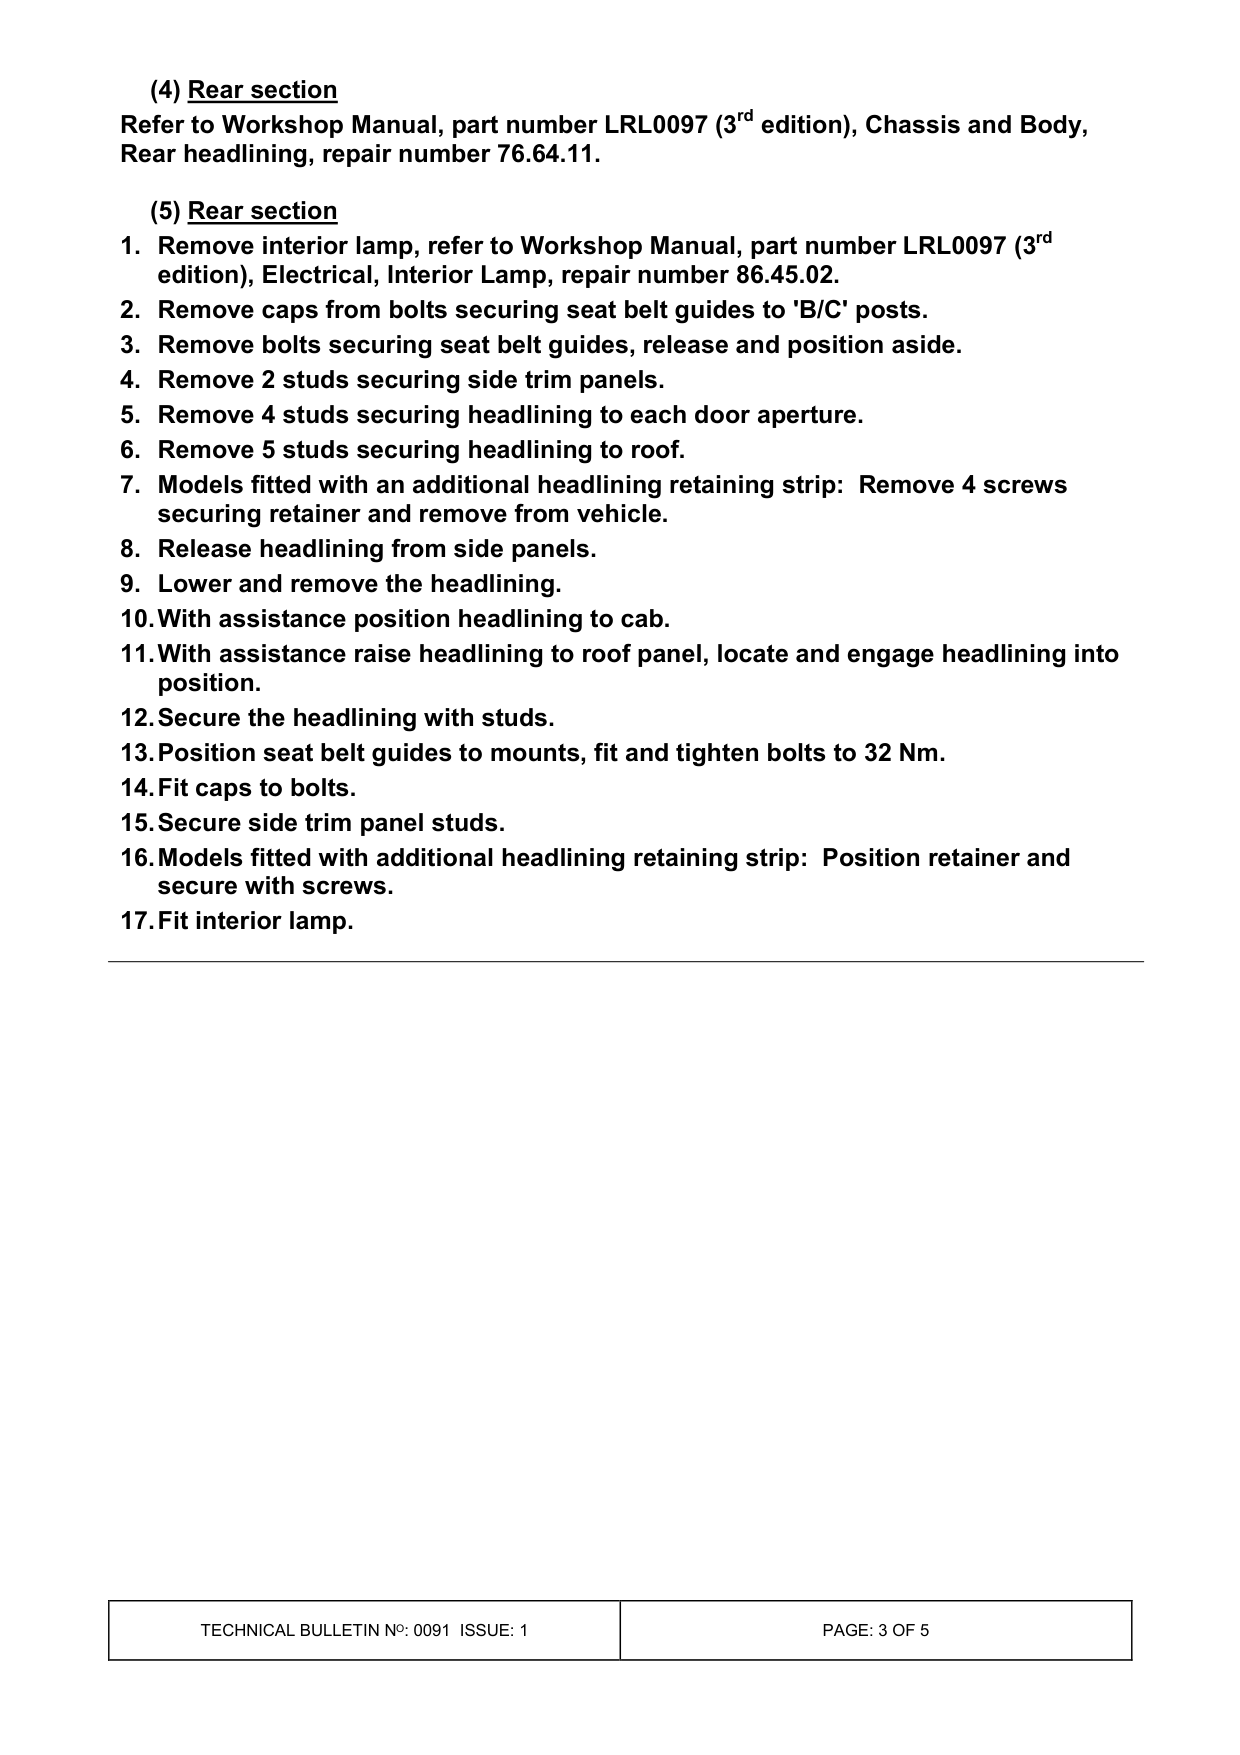
(4) Rear section Refer to Workshop Manual, part number LRL0097 (3 rd edition), Chassis and Body, Rear headlining, repair number 76.64.11.
(5) Rear section 1. Remove interior lamp, refer to Workshop Manual, part number LRL0097 (3 rd edition), Electrical, Interior Lamp, repair number 86.45.02. 2. Remove caps from bolts securing seat belt guides to 'B/C' posts. 3. Remove bolts securing seat belt guides, release and position aside. 4. Remove 2 studs securing side trim panels. 5. Remove 4 studs securing headlining to each door aperture. 6. Remove 5 studs securing headlining to roof. 7. Models fitted with an additional headlining retaining strip: Remove 4 screws securing retainer and remove from vehicle. 8. Release headlining from side panels. 9. Lower and remove the headlining. 10. With assistance position headlining to cab. 11. With assistance raise headlining to roof panel, locate and engage headlining into position. 12. Secure the headlining with studs. 13. Position seat belt guides to mounts, fit and tighten bolts to 32 Nm. 14. Fit caps to bolts. 15. Secure side trim panel studs. 16. Models fitted with additional headlining retaining strip: Position retainer and secure with screws. 17. Fit interior lamp.
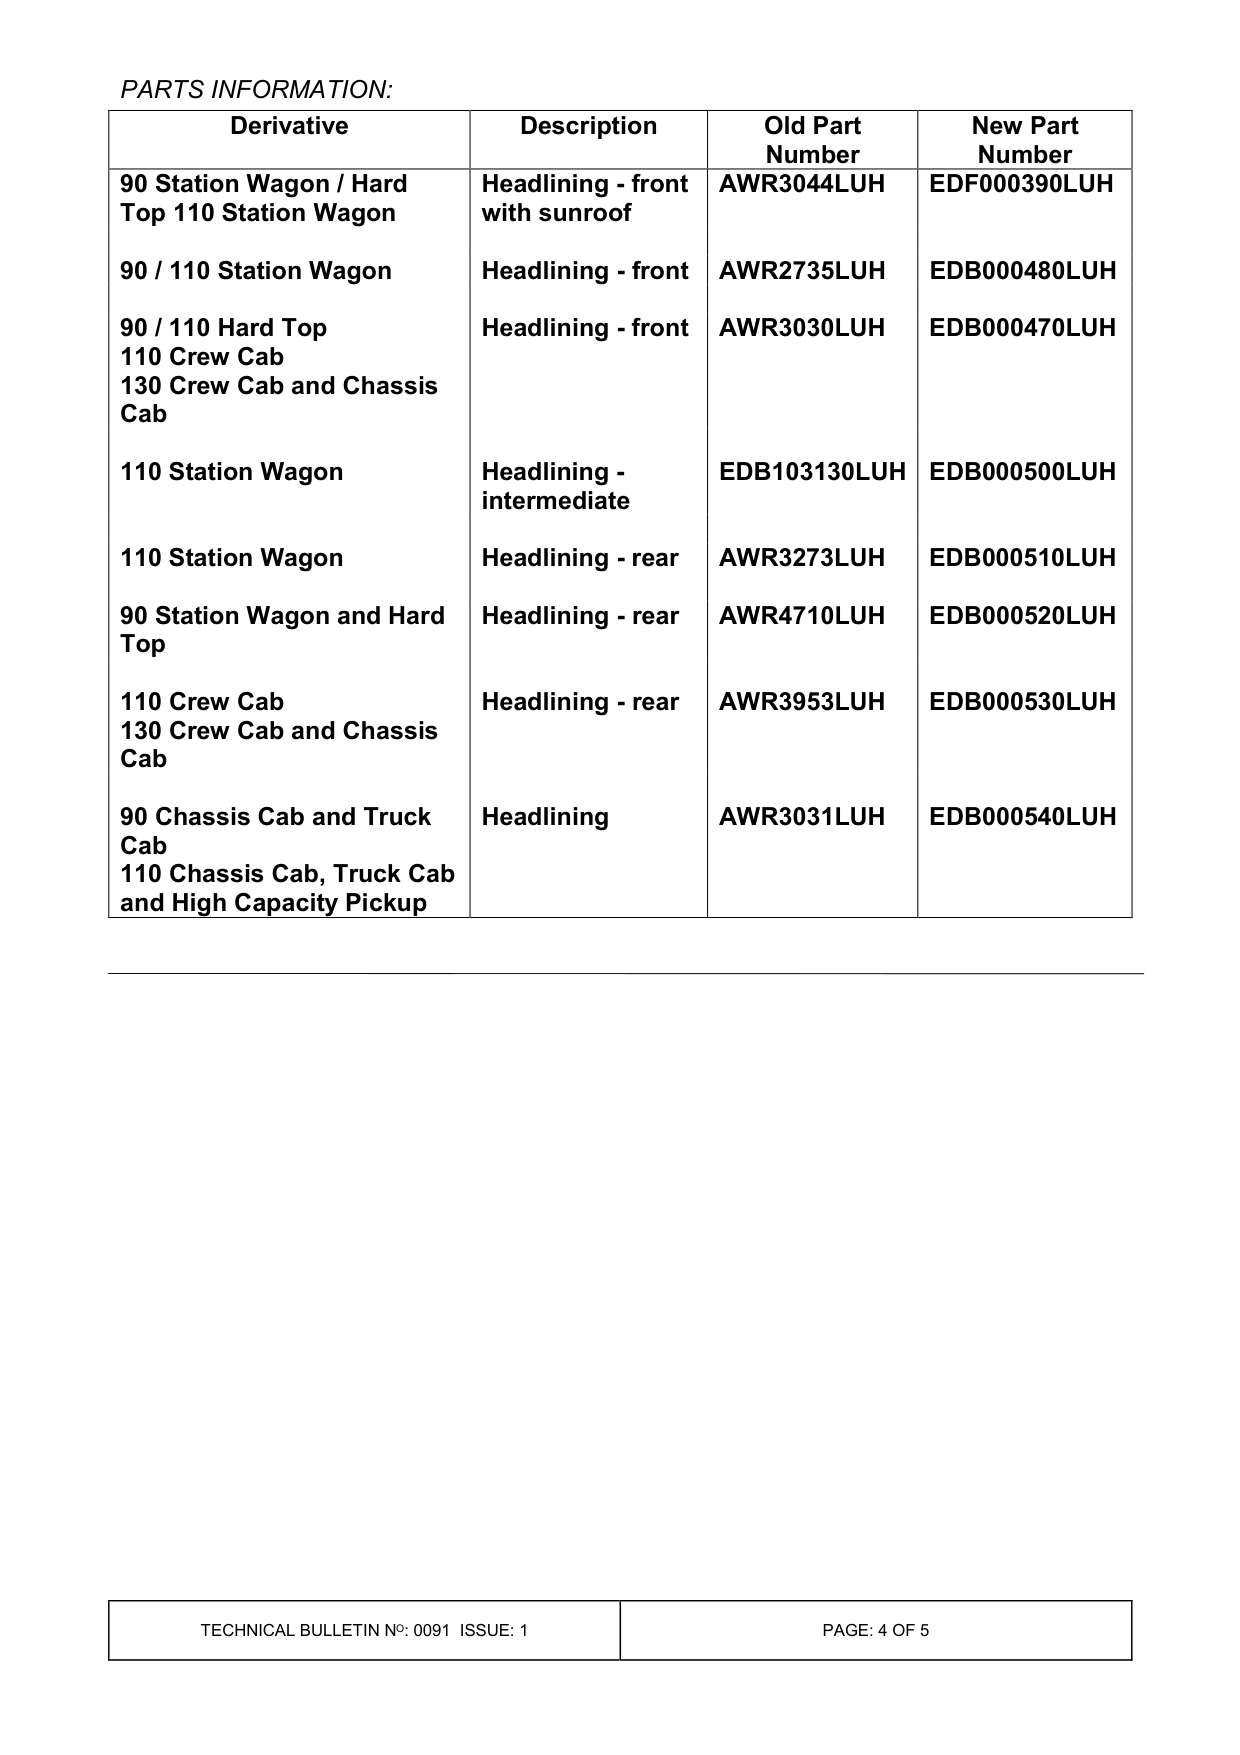
PARTS INFORMATION:
Derivative Description
90 Station Wagon / Hard Headlining - front Top 110 Station Wagon with sunroof
90 / 110 Station Wagon Headlining - front
Headlining - front 90 / 110 Hard Top 110 Crew Cab 130 Crew Cab and Chassis Cab
110 Station Wagon Headlining - intermediate
110 Station Wagon Headlining - rear
90 Station Wagon and Hard Headlining - rear Top
Headlining - rear 110 Crew Cab 130 Crew Cab and Chassis Cab
Headlining 90 Chassis Cab and Truck Cab 110 Chassis Cab, Truck Cab and High Capacity Pickup
Old Part New Part Number Number AWR3044LUH EDF000390LUH
AWR2735LUH EDB000480LUH
AWR3030LUH EDB000470LUH
EDB103130LUH EDB000500LUH
AWR3273LUH EDB000510LUH
AWR4710LUH EDB000520LUH
AWR3953LUH EDB000530LUH
AWR3031LUH EDB000540LUH
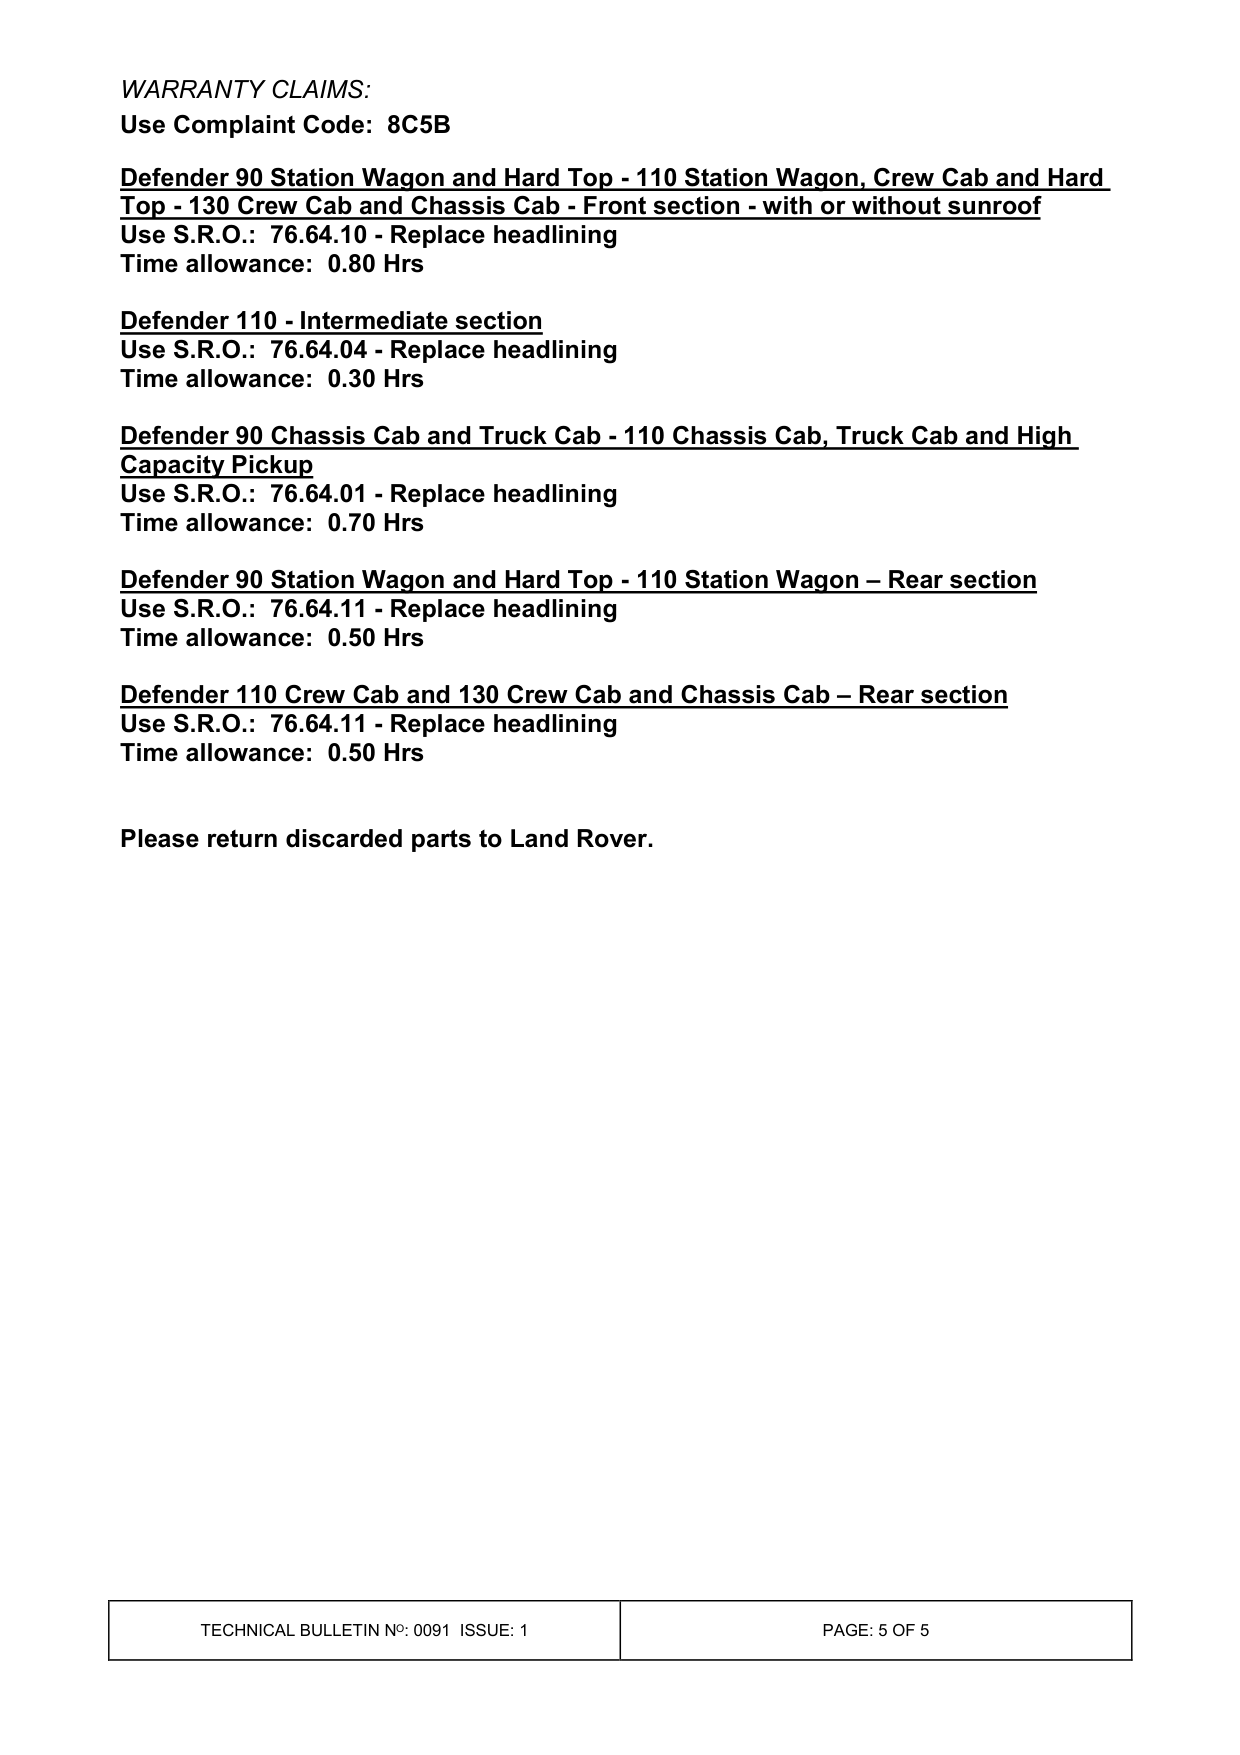
WARRANTY CLAIMS: Use Complaint Code: 8C5B
Defender 90 Station Wagon and Hard Top - 110 Station Wagon, Crew Cab and Hard Top - 130 Crew Cab and Chassis Cab - Front section - with or without sunroof Use S.R.O.: 76.64.10 - Replace headlining Time allowance: 0.80 Hrs
Defender 110 - Intermediate section Use S.R.O.: 76.64.04 - Replace headlining Time allowance: 0.30 Hrs
Defender 90 Chassis Cab and Truck Cab - 110 Chassis Cab, Truck Cab and High Capacity Pickup Use S.R.O.: 76.64.01 - Replace headlining Time allowance: 0.70 Hrs
Defender 90 Station Wagon and Hard Top - 110 Station Wagon - Rear section Use S.R.O.: 76.64.11 - Replace headlining Time allowance: 0.50 Hrs
Defender 110 Crew Cab and 130 Crew Cab and Chassis Cab - Rear section Use S.R.O.: 76.64.11 - Replace headlining Time allowance: 0.50 Hrs
Please return discarded parts to Land Rover.
Parts & tools for this job For Land Rover Defender
- TOOLOBD2 scanner with SRSSearch: OBD2 scanner ABS SRS
- TOOLTrim removal tool kitSearch: trim removal tool kit
Links open Amazon search results in a new tab. As an Amazon Associate I earn from qualifying purchases.