Range Rover P38

76
CHASSIS AND BODY
NEW RANGE ROVER
92
REPAIR
Refit
26. Carefully cut old sealer from body flange to
obtain a smooth surface, approximately 2mm
thick.
CAUTION: Do not cut down to painted
surface.
27. Position new quarter glass on felt covered
surface.
28. Apply cleaning solvent to sealing surface of
glass and body flange.
CAUTION: Do not touch cleaned or primed
areas with fingers.
29. Stick 4 self adhesive spacers on the inside edge
of glass at corners.
30. Shake primer tins for at least 30 seconds. Apply
body primer to sealing surface of body flange
using supplied applicator.
31. Apply glass primer to sealing surface of glass.
CAUTION: Use a separate applicator for
each primer.
32. Remove lid from sealer cartridge, remove
crystals, pierce membrane and fit pre-cut nozzle.
Fit cartridge to applicator gun.
NOTE: The profile of the nozzle must be
modified slightly to produce the required
bead section.
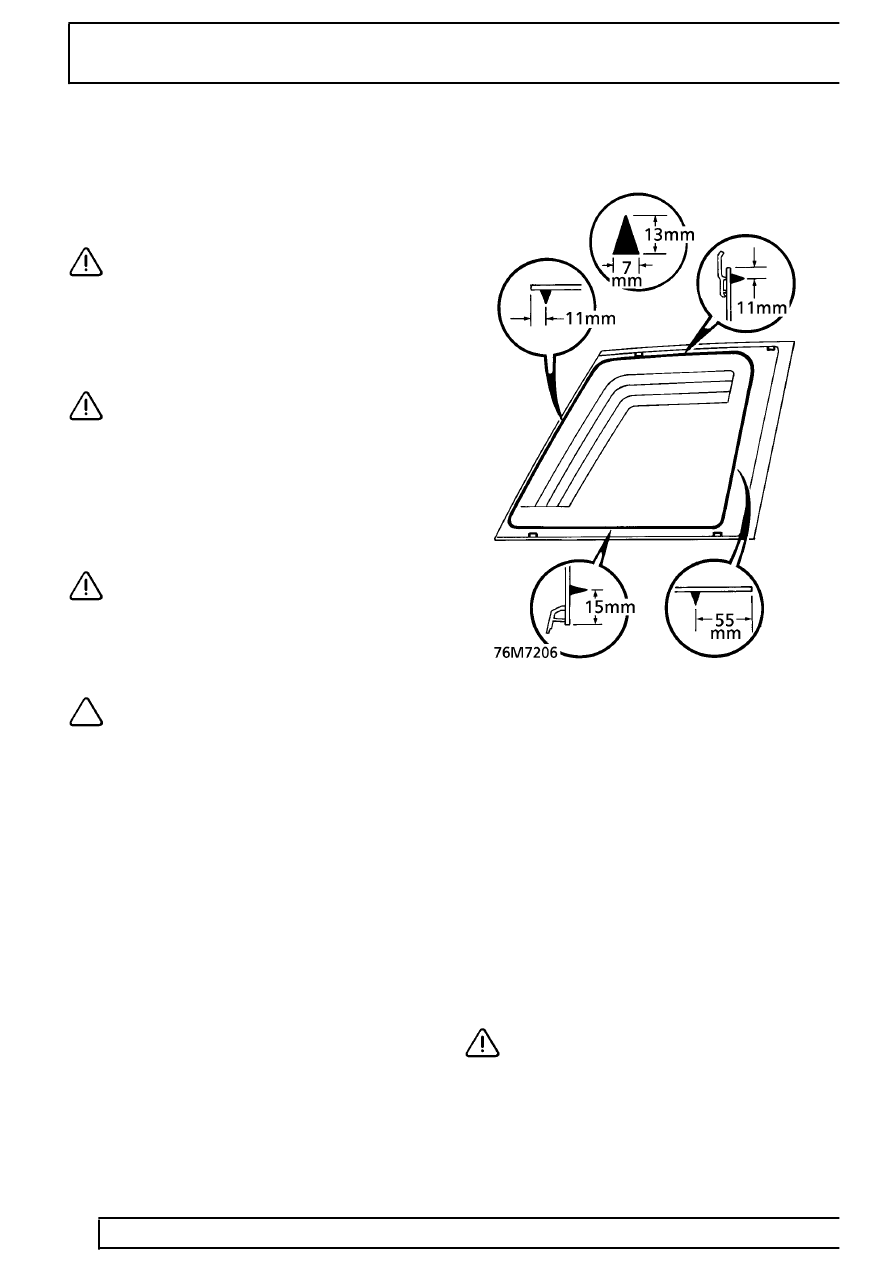
33. Apply a continuous bead of sealer to rear quarter
glass as shown.
34. Fit suction lifters to glass.
35. With assistance, fit glass and align to body. Seat
glass to spacer rubbers.
36. Remove protective tape.
37. Secure exterior trim to ’D’ post with screws.
38. Connect aerial amplifier plug.
39. R.H. glass only: Connect alarm receiver plug.
40. Position headlining and engage beneath tailgate
flip seal.
41. Secure headlining to ’E’ posts with trim studs.
42. Fit exterior ’E’ post finisher.
See this section.
43. Fit grab handle.
See this section.
44. Fit side interior lamp assembly.
See
ELECTRICAL, Repair.
45. Fit ’B’ post upper trim.
See this section.
46. Fit ’E’ post trims.
See this section.
47. Fit parcel tray support.
See this section.
CAUTION: A curing time of 6 hours is
recommended. During this time, leave the
windows open and DO NOT slam the
doors.
