
Supplementary restraint system-(SRS) harness replacement procedure
- Make
- Land Rover
- Model
- Range Rover Classic Technical Bulletins
- Section
- Supplementary restraint system-(SRS) harness replacement procedure › Supplementary restraint system-(SRS) harness replacement procedure
SUPPLEMENTARY RESTRAINT SYSTEM-(SRS) HARNESS REPLACEMENT PROCEDURE
- Model
- Range Rover Classic Discovery
- Affected vehicles
- 647645 onwards 081991 onwards
- Date
- 1996-03-20
- Reference
- 20/03/96
Bulletin text
SUBJECT Supplementary Restraint System - (SRS) Harness Replacement Procedure
MODEL
Range Rover Classic Discovery
DETAIL
In the event of a wiring harness replacement, the following procedure must be carefully followed to avoid any damage to the harness.
Possible reasons for harness replacement are as follows: 1. The car was involved in an accident. 2. TestBook diagnosis suggests harness replacement, eg during diagnosis an open circuit is detected in the harness.
Note: Dealers are requested to adhere strictly to the following procedure, ( Heating and Ventilation Air Conditioning Units (HVAC) and fascia must be removed in their entirety).
ACTION REQUIRED
Should an SRS harness require replacement the following procedures should be followed. References are given to the workshop manual for more detail and figures.
PARTS INFORMATION
Discovery/Range Rover Classic SRS Harness (quantity 1)
AMR 3993 Driver and passenger airbags left hand drive. AMR 3992 Driver and passenger airbags right hand drive. AMR 3995 Driver airbag only left hand drive AMR 3994 Driver airbag only right hand drive
PROCEDURE
NOTE: Review Safety Precautions regarding the SRS systems Air Conditioning System as outlined in the workshop manual sections 76 and 82
It should be noted that the following procedure includes all model derivatives, which may or may not have cruise control, or a number of other features fitted. When following this procedure please use instructions as applicable to model derivatives.
Continued.............................
20/03/96
76/04/96/EN
AFFECTED VEHICLES
LP LH 647645 onwards LJ 081991 onwards LD
WARRANTY
Normal warranty policy and procedure apply.
COMP. CODE
6T0Z
SRO
86.70.63 SRS Harness renew 6.35 hours. Discovery/Range Rover Classic.
SUBJECT Supplementary Restraint System (SRS) Harness Replacement Procedure
MODEL
Range Rover Classic Discovery
Procedure
1. Place vehicle on flat ground with road wheels in the straight ahead position. 2. Chock wheels on Automatics vehicles and place gear lever in the neutral position. 3. Ensure that the radio security code is available and disconnect both battery terminals. 4. Remove the closure panels in the top of each footwell, remove fir-tree fixings take care not to damage trim. 5. Connect and activate Air Conditioning refrigerant recovery equipment to discharge Air Conditioning system. Continue working, see section 82 (air conditioning) ‘adjustment’ pages 1,2,3,4
Remove Hinged Panels
6. Remove 4 bolts securing glovebox hinge to fascia and remove glovebox. 7. Remove 4 bolts securing fuse box cover hinge to fascia and remove fusebox cover. 8...Remove radio.
Remove Console See section 76 (chassis and body) ‘repair’ centre console pages 50 and 51 1. Discovery - Remove transfer box gear lever knob and gaiter. Range Rover Classic - remove transfer box gear lever knob only. 2. Manual Gearbox - remove gear lever knob and gaiter. Automatic - remove gear lever ribbon trim by lifting at front edge. 3. Discovery - remove rubber mat. Remove window switch trim. Unscrew 4 screws securing switch panel and disconnect switches. Range Rover Classic - remove wood insert. Disconnect window switches. Hint: To aid in re-assembly, record the position and colour of each window switch connector. 4. Slide hand brake boot up handle to expose hand brake handle assembly. 5. Remove parking brake cable clevis pin from handle assembly. 6. Remove 5 bolts securing centre console and remove. Disconnect cigarette lighter connections. 7. Remove bracket in front of transfer box shifter.
Airbag Modules
Driver Airbags
8. Remove 2 tamperproof torx screws at back of steering wheel. Disconnect and remove drivers module and store safely, see section 75 (SRS) ‘repair’ pages 1 and 2 - drivers airbag module.
Passenger Airbags 9. There is no need to remove the passenger airbag from the dash panel. lower glove box lid down by lifting the stop levers into the two cutouts. Disconnect the red 2-pin connector in between the relays.
Continued...................
20/03/96 76/04/96/EN
AFFECTED VEHICLES
LP LH 647645 onwards LJ 081991 onwards LD
SUBJECT Supplementary Restraint System (SRS) Harness Replacement Procedure
MODEL
Range Rover Classic Discovery
Remove Column Components
1. Mark position of the steering wheel to the shaft. Disconnect the cruise control switches and free wiring from clips (if fitted). 2. Unscrew steering wheel nut by 3 turns. Pull on steering wheel until free from the column splines. 3. Remove the nut. Remove the steering wheel while carefully feeding the rotary coupler wiring through the steering wheel, see section 75 (SRS) ‘repair’ steering wheel page 2, and ‘repair’ rotary coupler pages 3,4,5. 4. Remove ignition key from column lock. 5. Remove 3 screws securing column shroud to column. Pull halves of the shroud apart and remove. 6. Unplug connections to rotary coupler. Pull coupler from switch pack. 7. Remove electrical connections to switch assembly. Loosen switch assembly lock screw by 5 turns. Press in on screw until it is flush with the switch housing. Remove switch assembly by pulling it straight off.
Fascia Removal - Procedure
NOTE: The fascia is removed as an assembly with most of the components still attached. See section 76 (chassis and body) dash panel assembly page 53. There is no need to remove the passenger airbag exterior mirrors switch panel, coin tray, switch panel, clock.
1. Unscrew 4 torx bolts securing drivers knee bolster to A-frame. Remove knee bolster. 2. Disconnect 5 multi-pin connectors located to the left side of the heater box. 3. Disconnect single pin connector at the lower left corner of the fuse box. 4. Disconnect red 6 pin connector below steering column. Free this connector so that it hangs freely outside of the fascia opening. 5. Disconnect 18 pin connector from fuse box. 6. Remove 2 screws securing relay bracket below passenger airbag module. Move relay bracket aside. 7. Unscrew the 1 nut securing relay bracket in right footwell and swing bracket down. 8. Disconnect heater control cables from heater box. (2 right, 1 left). 9. Range Rover Classic - Unplug memory seat lead connector under passenger seat and feed the harness back up to fascia.
Remove fascia
1. Remove both kick panel finishers. 2. Remove the 2 bolts securing the fascia to the right A-pillar. 3. Loosen the 2 bolts securing the right A-pillar bracket to the fascia. Slide the bracket fully inward, and tighten the bolts. 4. Repeat steps 2 and 3 for left side. 5. Remove the 4 bolts (2 bolts per side) securing the fascia to the transmission tunnel. 6. Remove the strap between the A-frame and the left tunnel bracket. 7. Remove 4 bolts below the passenger airbag that secure the fascia to the firewall. 8. Remove 4 nuts below instrument pack. 9. Remove fascia assembly from vehicle.
Continued......................
20/03/96 76/04/96/EN
AFFECTED VEHICLES
LP LH 647645 onwards LJ 081991 onwards LD
SUBJECT Supplementary Restraint System (SRS) Harness Replacement Procedure
MODEL
Range Rover Classic Discovery
Heating and Ventilation Air-Conditioning (HVAC) unit
See section 82 (heating and ventilation) ‘repair’ heater and cooler unit page 8,9. 1. Disconnect 2 blower connectors (2 pin and 8 pin). 2. Remove bracket at the top of the blower unit. 3. Remove 2 nuts securing the bottom of the blower unit. Remove blower assembly from vehicle, see section 80 (heating and ventilation) ‘repair’ blower motor unit - heater and air conditioning page 6. 4 Release pressure from the cooling system. Disconnect the heater hoses and plug. Plug the heater core inlets. 5. Confirm that the Air Conditioning system is empty. Disconnect the refrigerant pipes from the evaporator. Plug openings to prevent dirt ingress. 6. Remove 2 rear footwell ducts. 7. Disconnect drain tubes on both sides of heater box. 8. Disconnect 10 pin connector to right of heater box. 9. Remove 5 heater box bolts. Remove heater box.
SRS Harness
The SRS harness can now be accessed. Replacement of the harness is straightforward with the following guidelines.
1. The Diagnostic Control Unit (DCU) connector is released by sliding the yellow locking device rearward. To connect, place the connector on the DCU as far as it will go and slide the locking device forward. 2. The crash sensor seal and anti-backout device may stick inside the sensor cavity upon removal. Remove these parts from the connector before fitting the new harness. 3. The under hood section of the harness is fed into the passenger compartment for removal. 4. The replacement SRS harness must be routed exactly as the original harness. 5. The harness must never be cut or repaired. 6. Remove 3 screws securing expansion tank and position expansion tank aside. 7. Disconnect multiplug from each crash sensor. 8. Release airbag harness from clips and ties along the bulkhead and each valance. 9. Displace airbag harness grommet to inside of bulkhead and feed harnessthrough bulkhead.
Continued.................
20/03/96 76/04/96/EN
AFFECTED VEHICLES
LP LH 647645 onwards LJ 081991 onwards LD
SUBJECT Supplementary Restraint System (SRS) Harness Replacement Procedure
MODEL
Range Rover Classic Discovery
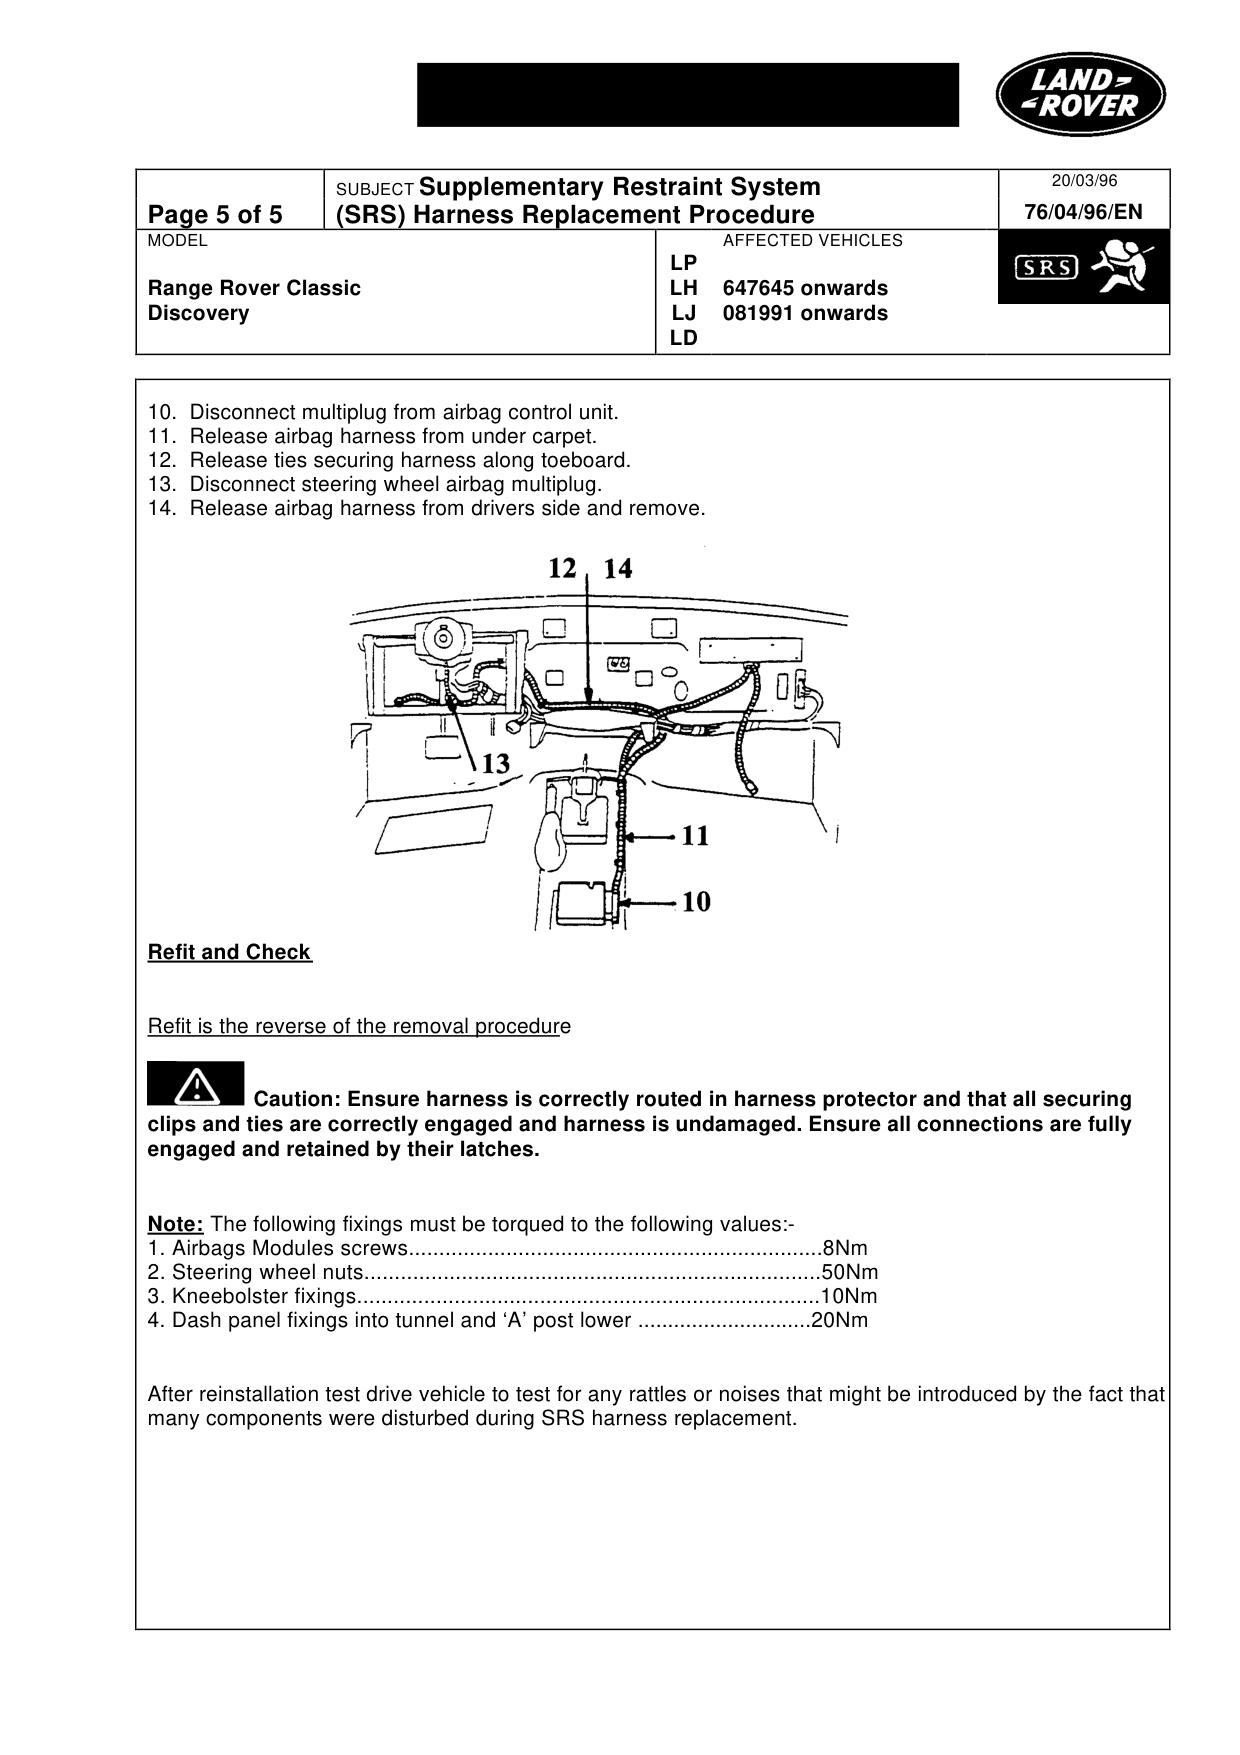
10. Disconnect multiplug from airbag control unit. 11. Release airbag harness from under carpet. 12. Release ties securing harness along toeboard. 13. Disconnect steering wheel airbag multiplug. 14. Release airbag harness from drivers side and remove.
Refit and Check
Refit is the reverse of the removal procedure
Caution: Ensure harness is correctly routed in harness protector and that all securing clips and ties are correctly engaged and harness is undamaged. Ensure all connections are fully engaged and retained by their latches.
Note: The following fixings must be torqued to the following values:1. Airbags Modules screws....................................................................8Nm 2. Steering wheel nuts...........................................................................50Nm 3. Kneebolster fixings............................................................................10Nm 4. Dash panel fixings into tunnel and ‘A’ post lower .............................20Nm
After reinstallation test drive vehicle to test for any rattles or noises that might be introduced by the fact that many components were disturbed during SRS harness replacement.
20/03/96 76/04/96/EN
AFFECTED VEHICLES
LP LH 647645 onwards LJ 081991 onwards LD
Parts & tools for this job For Land Rover Range Rover
- TOOLOBD2 scanner with SRSSearch: OBD2 scanner ABS SRS
- TOOLTrim removal tool kitSearch: trim removal tool kit
Links open Amazon search results in a new tab. As an Amazon Associate I earn from qualifying purchases.