Efficiently lap-in valves during V8 engine overhaul - 35, 39, 42

ENGINE
12
OVERHAUL
Valve seats and seat inserts - refacing
CAUTION: Renew worn valve guides and
seat inserts before refacing valve seats.
1. Check condition of valve seats and valves that
are to be re-used.
2. Remove carbon from valve seats.
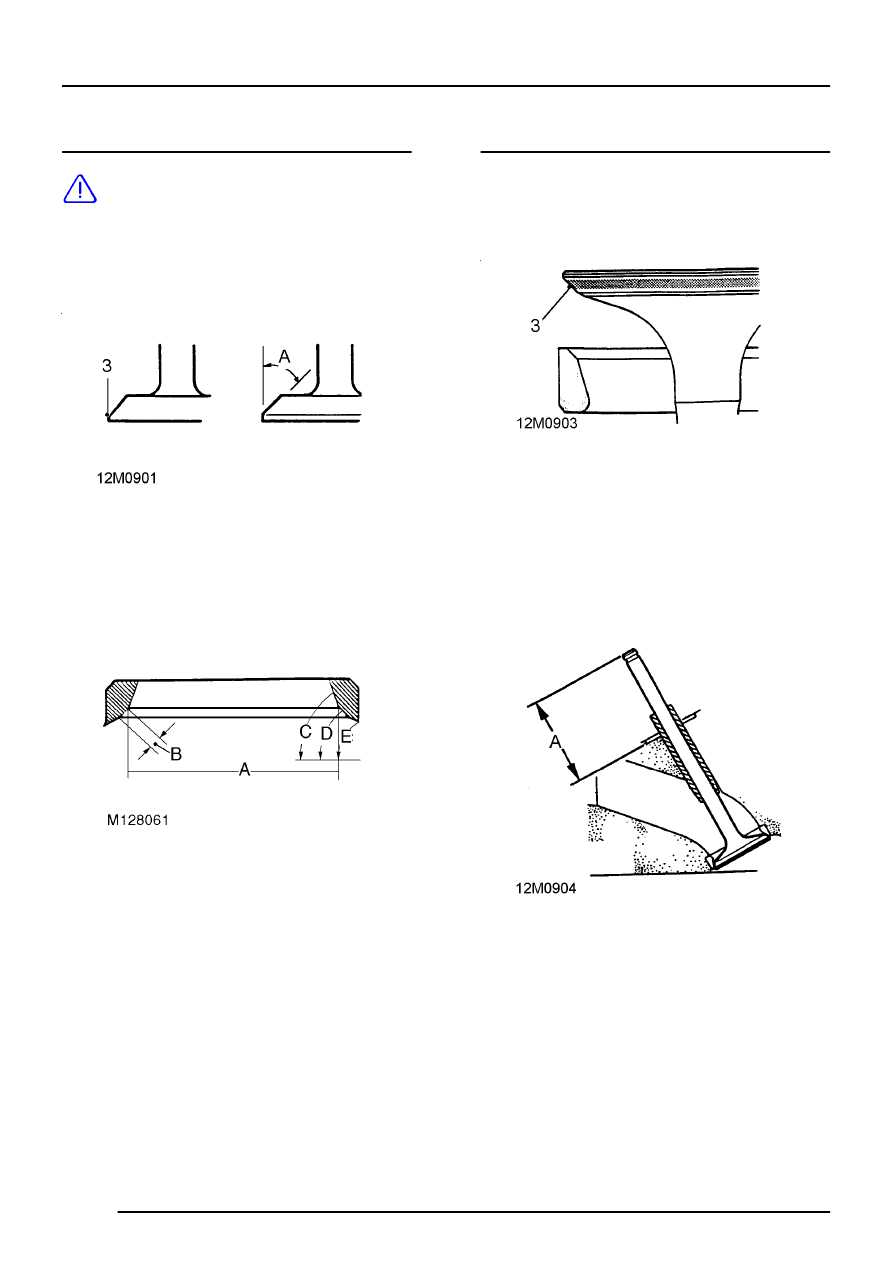
3. Reface valves as necessary. If a valve has to
be ground to a knife-edge to obtain a true seat,
replace valve.
Valve seating face angle A = 45
°
4. Using suitable piloted cutters cut valve seats to
the following dimensions:
Valve seat:
Width A:
Inlet = 36.83 mm (1.45 in)
Exhaust = 31.50 mm (1.24 in)
Seating width B:
Inlet = 0.89 to 1.4 mm (0.035 to 0.055 in)
Exhaust = 1.32 to 1.83 mm (0.052 to 0.072 in)
Angle C = 56
°
to 70
°
Angle D:
Up to’99 Model Year = 46
°
to 46
°
25’
’99 Model year onwards = 46
°
to 46
°
30’
Angle E = 20
°
Valves - lapping-in
1. Lap each valve to its seat using fine grinding
paste.
2. Clean valve and seat.
3. Coat valve seat with a small quantity of
engineer’s blue, insert valve and press it into
position several times without rotating. Remove
valve and check for even and central seating.
Seating position shown by engineer’s blue
should be in centre of valve face.
4. Check valve installed height A if valve seats
have been recut or new valves or valve seat
inserts have been fitted.
Valve installed height A:
Standard and carbon break exhaust valves -
Inlet and exhaust - Early engines = 47.63 mm
(1.9 in) - maximum
Modified valves - Inlet and exhaust - Later
engines = 44.16 to 45.29 mm (1.741 to 1.802
in) - maximum
5. Thoroughly clean cylinder head, blow out
oilways and coolant passages.
