
Refrigerant: Specifications (page 4 of 4)
- Make
- Nissan and Datsun
- Model
- Frontier 4WD
- Engine
- V6-3.3L (VG33E)
- Year
- 2003
- Section
- Fluids › Refrigerant
To prevent inaccurate or false readings, make sure there is no refrigerant vapor, shop chemicals or smoke in the vicinity of the vehicle. Perform the leak
test in a calm area (low air/wind movement) so that the leaking refrigerant is not dispersed.
1. Turn engine off.
2. Connect a suitable A/C manifold gauge set to the A/C service ports.
3. Check if the A/C refrigerant pressure is at least 345 kPa (3.52 kg//sq.cm 50 psi) above 16 °C (61 °F). If less than specification, recover/evacuate
and recharge the system with the specified amount of refrigerant. Refer to "HFC-134a (R-134a) Service Procedure".
NOTE: At temperatures below 16 °C (61 °F), leaks may not be detected since the system may not reach 345 kPa (3.52 kg//sq.cm 50 psi).
4. Conduct the leak test from the high side (compressor discharge a to evaporator f) to the low side (evaporator drain hose g to compressor suction
k). Refer to "Components". See: Heating and Air Conditioning/Diagrams/Exploded Views Perform a leak check for the following areas carefully.
Clean the component to be checked and move the leak detector probe completely around the connection/component.
-
Compressor
Check the fitting of high and low pressure hoses, relief valve and shaft seal.
-
Liquid tank
Check the pressure switch, tube fitting, weld seams and the fusible plug mounts.
-
Service valves
Check all around the service valves. Ensure service valve caps are secured on the service valves (to prevent leaks).
NOTE: After removing A/C manifold gauge set from service valves, wipe any residue from valves to prevent any false readings by leak
detector.
-
Cooling unit (Evaporator)
With engine OFF, turn blower fan on "High" for at least 15 seconds to dissipate any refrigerant trace in the cooling unit. Wait a minimum of
10 minutes accumulation time (refer to the manufacturers recommended procedure for actual wait time) before inserting the leak detector
probe into the drain hose. (Keep the probe inserted for at least ten seconds.) Use caution not to contaminate the probe tip with water or dirt
that may be in the drain hose.
5. If a leak detector detects a leak, verify at least once by blowing compressed air into area of suspected leak, then repeat check as outlined.
6. Do not stop when one leak is found. Continue to check for additional leaks at all system components and connection.
If no leaks are found, perform steps 7 through 10.
7. Start engine.
8. Set the heater A/C control as follows:
a. A/C switch ON
b. Face mode
c. Recirculation switch ON
d. Max cold temperature.
e. Fan speed high
9. Run engine at 1,500 rpm for at least 2 minutes.
10. Turn engine off and perform leak check again following steps 4 through 6.
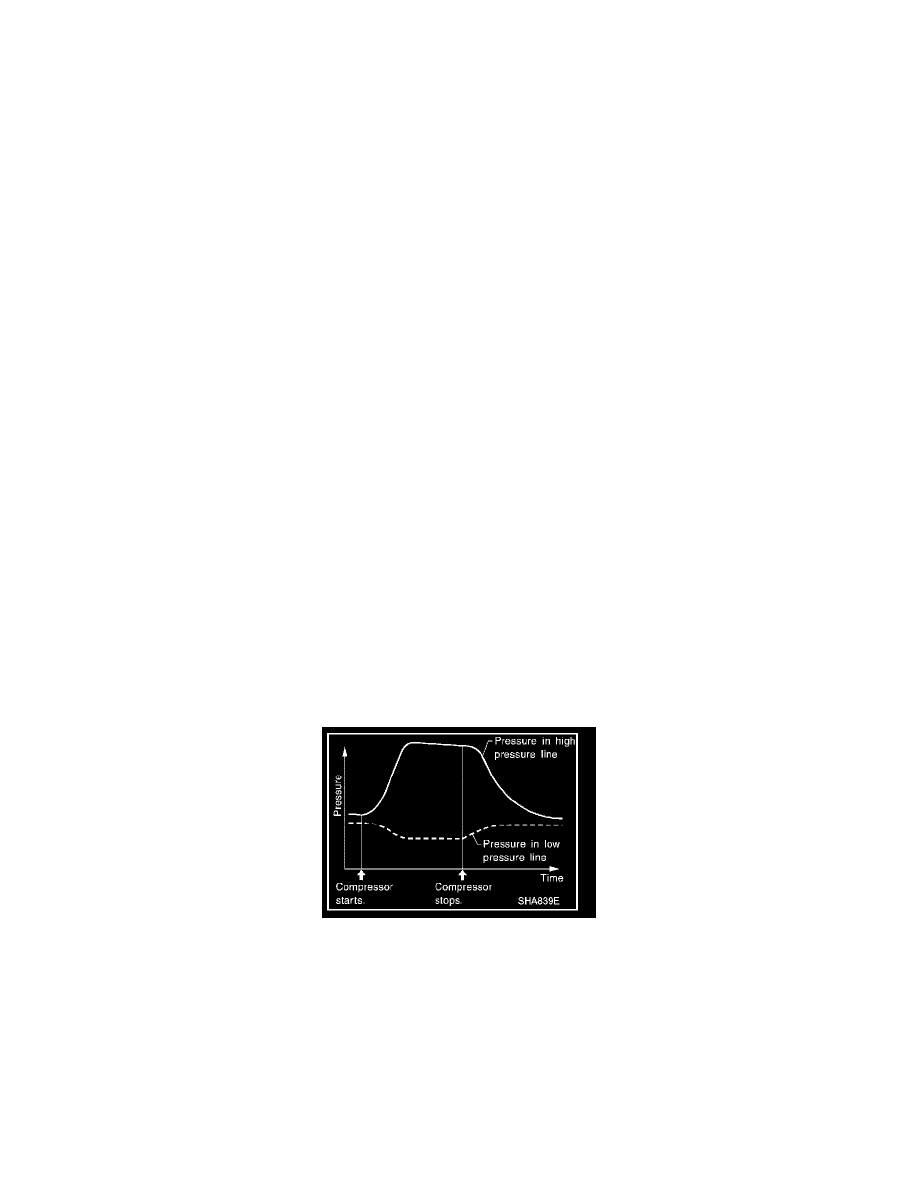
Refrigerant leaks should be checked immediately after stopping the engine. Begin with the leak detector at the compressor. The pressure on the
high pressure side will gradually drop after refrigerant circulation stops and pressure on the low pressure side will gradually rise, as shown in the
graph. Some leaks are more easily detected when pressure is high.
11. Before connecting ACR4 to vehicle, check ACR4 gauges. No refrigerant pressure should be displayed. If pressure is displayed, recover refrigerant
from equipment lines and then check refrigerant purity.
12. Confirm refrigerant purity in supply tank using ACR4 and refrigerant identifier. Refer to "Contaminated Refrigerant".
13. Confirm refrigerant purity in vehicle A/C system using ACR4 and refrigerant identifier. Refer to "Contaminated Refrigerant".
14. Discharge A/C system using approved refrigerant recovery equipment. Refer to "Discharging Refrigerant". Repair the leaking fitting or component
as necessary.
15. Evacuate and recharge A/C system. Refer to "Evacuating System and Charging Refrigerant". Perform the leak test to confirm no refrigerant leaks.
16. Conduct A/C performance test to ensure system works properly.
Pinch or Ctrl + scroll to zoom. Double-tap to reset.
The same page in: Frontier 2WD V6-3.3L (VG33E) (2003).
Parts & tools for this job For 2003 Nissan Frontier 3.3L
- TOOLA/C manifold gauge setSearch: AC manifold gauge set
- TOOLUV leak detection kitSearch: AC UV leak detection kit
- PARTCabin filterSearch: Nissan Frontier 2003 3.3L cabin filter
Links open Amazon search results in a new tab. As an Amazon Associate I earn from qualifying purchases.