
Achieva L4-144 2.4L DOHC VIN T SFI (1996)
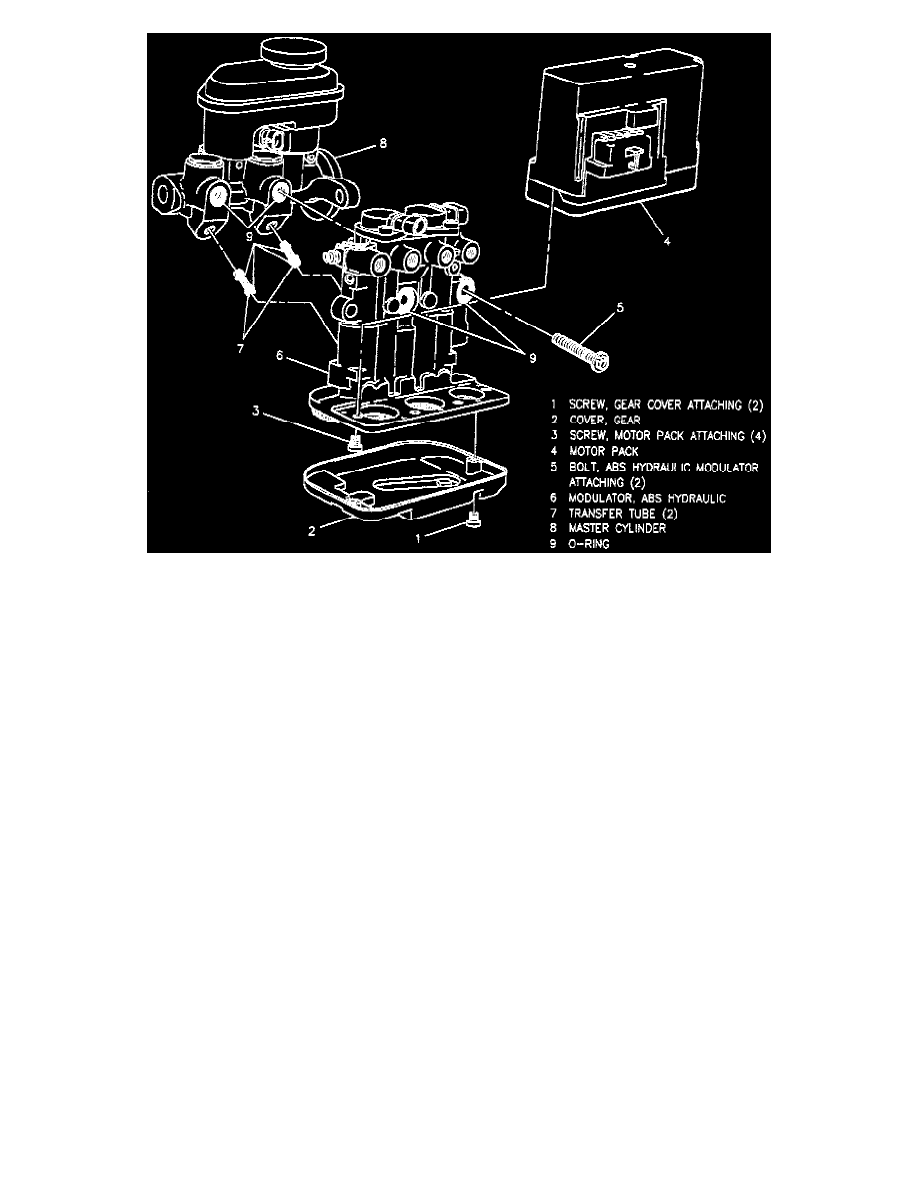
Hydraulic Modulator/Master Cylinder Assembly
DISASSEMBLE
1. Hydraulic modulator/master cylinder assembly.
2. Torx head screws attaching gear cover.
3. Remove gear cover.
4. Four Torx head screws attaching motor pack to hydraulic modulator.
5. Remove motor pack.
6. Two hydraulic modulator to master cylinder banjo bolts, separate hydraulic modulator from master cylinder.
7. Two transfer tubes with O-rings from master cylinder or hydraulic modulator.
8. Banjo bolt O-rings from master cylinder and hydraulic modulator.
IMPORTANT:
-
If hydraulic modulator is to be replaced, install the three gears in the same location on replacement hydraulic modulator. Refer to "Gear
Replacement".
-
No repair of the hydraulic modulator is authorized. Replace as an assembly.
-
Use new transfer tube assemblies when assembling the hydraulic modulator/master cylinder assembly. Make sure two O-rings are properly
installed on each transfer tube.
ASSEMBLE
1. Two transfer assemblies.
-
Lubricate transfer tube assembly O-rings with clean brake fluid.
-
Install transfer tube assemblies in ports in hydraulic modulator and push in by hand to bottom.
2. Lubricate new banjo bolt O-ring with clean brake fluid and install into the master cylinder and hydraulic modulator.
3. Hydraulic modulator to master cylinder.
-
Clamp mounting flange of master cylinder in a vise.
-
Hold hydraulic modulator and rock into position on master cylinder, inserting transfer tube assemblies into master cylinder ports.
4. Two modulator to master cylinder banjo bolts.
TIGHTEN
-
Banjo bolts to 24 Nm (18 lb. ft.).