
505 L4-2155cc N9te (1986)
a.
Pull out wiring loom for radio on left side.
b.
Pull out antenna lead on right side.
CAUTION: DO NOT PULL ON VACUUM HOSES FOR CLIMATE CONTROL ABOVE RADIO OPENING.
8.
Arrange "LEGO" connectors on wiring loom for radio into 3 groups of 2 connectors each.
9.
Arrange "LEGO" connectors on radio into 3 groups of 2 connectors each so that the colors will match when connected, e.g. orange plugs into
orange, white into white, etc.
10.
Plug connectors together and plug antenna lead into antenna radio receptacle.
11.
Using your hand, move wiring loom for radio to left side of opening and antenna lead to right side.
12.
Insert radio straight in until radio side clips touch opening for radio.
13.
Push radio in one side at a time. Do not force it. If problems are encountered, pull radio out and reposition wiring so that it does not interfere
with rear radio mounting "nipple".
14.
Install trim ring fully
15.
Place shift lever in: Neutral (Manual) Park (Automatic)
16.
Turn ignition on to accessory position and turn radio on:
a.
Check if antenna goes up
b.
Turn fader clockwise to front speaker position
c.
Turn balance left/right to check front speakers
d.
Turn fader counter-clockwise to rear speaker position
e.
Turn balance left/right to check rear speakers
Installation Instructions - 1985 Models Only
1.
Engage parking brake fully
2.
Place shift level in "1" (Automatic) "R" (Manual)
3.
Place fender cover (or equivalent) over console and gearshift lever to prevent scratching
4.
Remove old radio, holding radio so as to LIFT UP THE REAR OF THE RADIO to avoid dislodging of rubber bumper (that is used to support
weight of radio at its center)
5.
Unplug connectors and antenna
6.
Remove new radio, Owner's Manual, 85 model adapters and trim ring from box
7.
Write radio serial number on page 2 of Owner's Manual. Place Owner's Manual in glove box
8.
IMPORTANT: If "rubber bumper" is missing, install a new one (P/N 8221.03) to support weight of radio at its center
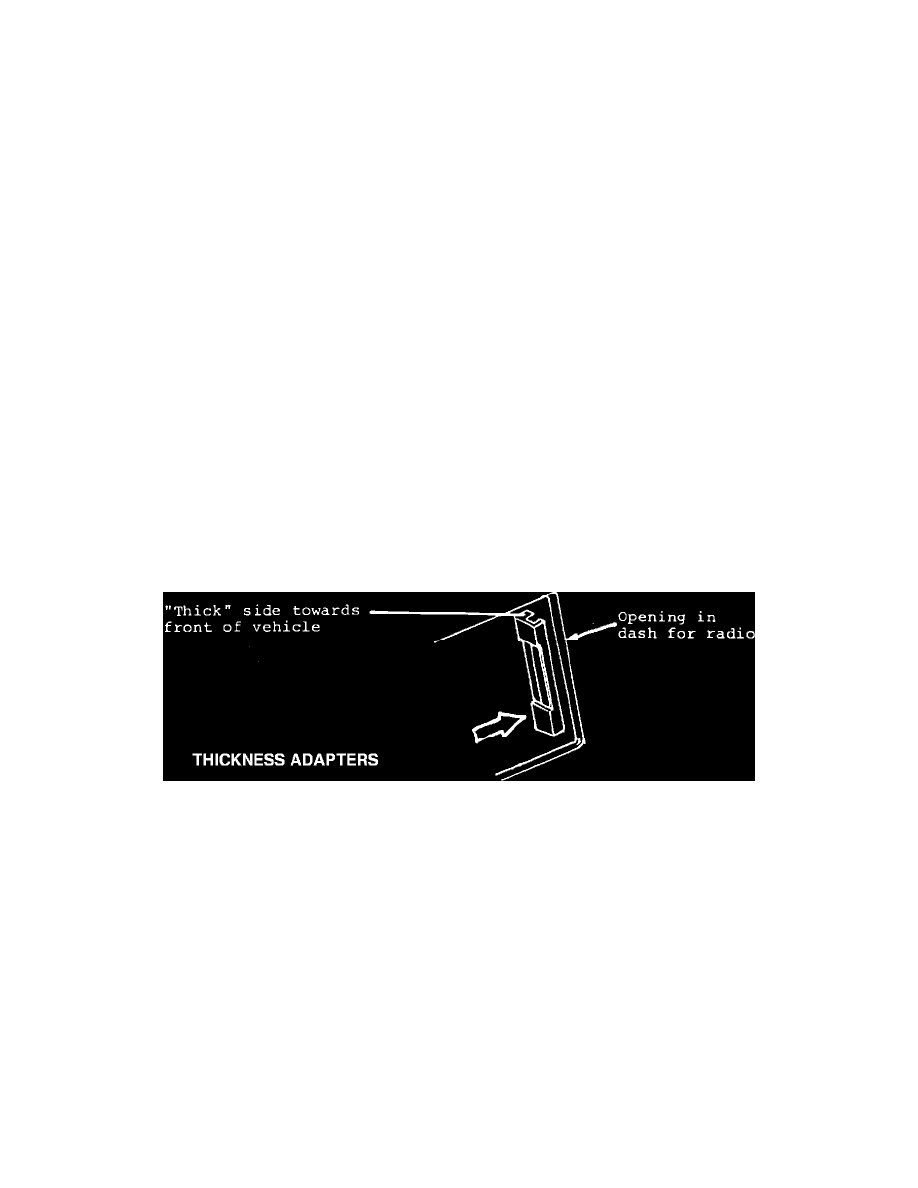
Thickness adapters
9.
Install 1985 model radio opening thickness adapters as shown below (1986 model radio dash is thicker)
10.
Arrange "LEGO" connectors on wiring loom for radio into 3 groups of 2 connectors each.
11.
Arrange "LEGO" connectors on radio into 3 groups of 2 connectors each so that the colors will match when connected, e.g. orange plugs into
orange, white into white, etc.
12.
Plug connectors together and plug antenna lead into antenna radio receptacle
13.
Using your hand, move wiring for radio to left side of opening and antenna lead to right side
14.
Insert radio straight in until radio side clips touch opening for radio
15.
Push radio in one side at a time. If problems are encountered, pull radio out and reposition wiring.
16.
Install trim ring fully
17.
Place shift lever in: Neutral (Manual) Park (Automatic)
18.
Turn ignition on to accessory position and turn radio on:
a.
Check if antenna goes up
b.
Turn fader clockwise to front speaker position
c.
Turn balance left/right to check front speakers
d.
Turn fader counter-clockwise to rear speaker position
e.
Turn balance left/right to check rear speakers