
Timing Belt: Adjustments (page 5 of 5)
- Make
- Plymouth
- Model
- Colt
- Engine
- L4-1753cc 1.8L SOHC
- Year
- 1989
- Section
- Timing Belt
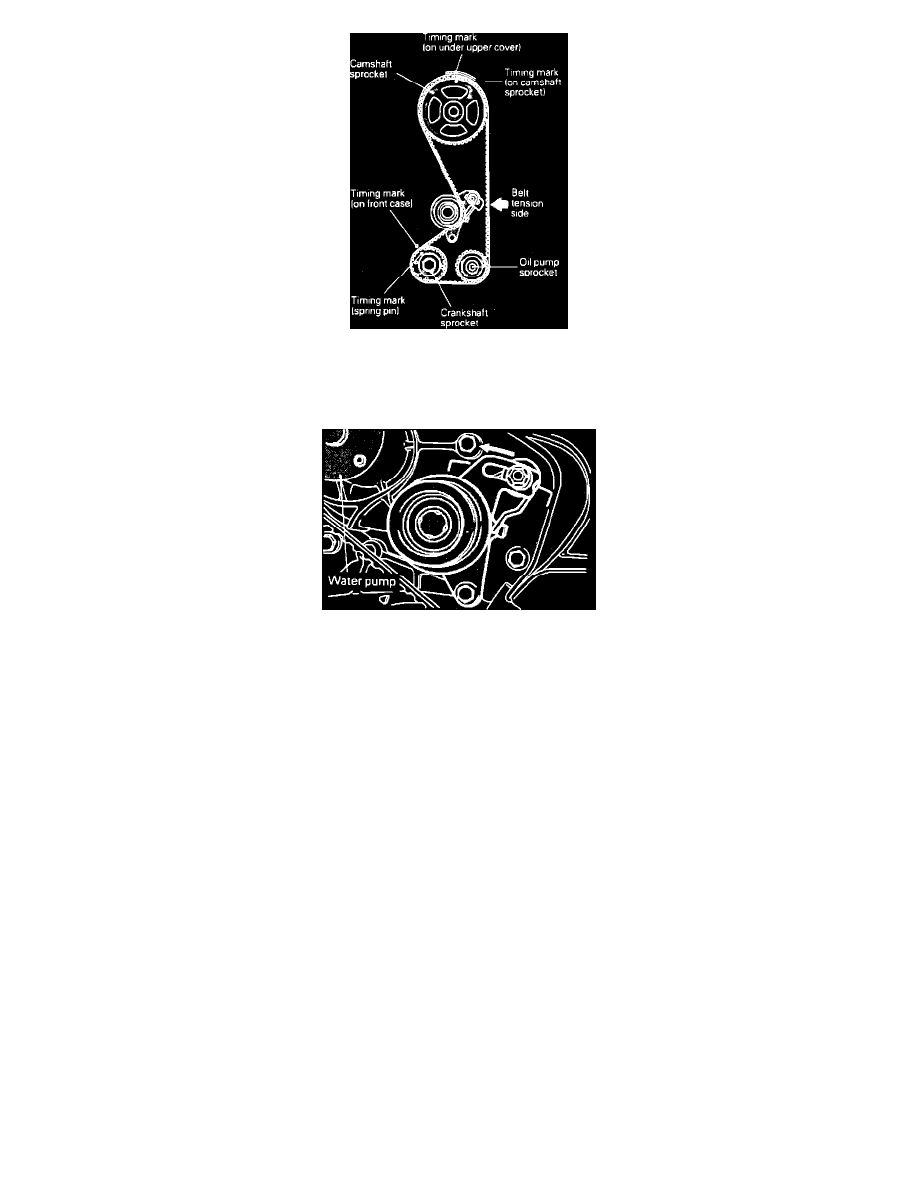
Fig. 6 Valve Timing Marks
5.
Rotate crankshaft in normal direction of rotation until No. 1 cylinder is at top dead center and camshaft and crankshaft timing marks are aligned,
Fig. 6.
Fig. 7 Positioning Timing Belt Tensioner
6.
Loosen tensioner bolt, then slide tensioner toward water pump and tighten bolt, Fig. 7.
7.
Mark direction of rotation on timing belt, then remove belt, Fig. 6.
INSTALLATION
1.
Install timing belt tensioner spring, then install tensioner and tighten adjusting nut. The tensioner spring should be positioned so that upper end of
spring is against water pump body. Push on tensioner to align mounting bolt holes, then install mounting bolt.
2.
Loosen tensioner mounting nut and bolt and push tensioner toward water pump as far as possible. Then tighten nut to secure tensioner in this
position.
3.
Check to ensure all timing marks are aligned, Fig. 6, and position timing belt over crankshaft sprocket. Then install timing belt over oil pump
sprocket and camshaft sprocket. When installing timing belt, ensure tension side of belt is tight.
4.
Loosen tensioner nut and bolt, then push tensioner toward adjusting nut to mesh belt and camshaft sprocket. Retighten nut and bolt.
5.
Check to ensure all timing marks are aligned, then rotate crankshaft one revolution in the normal direction of rotation. Crankshaft should be
rotated smoothly and timing belt should not be pushed or twisted while crankshaft is being rotated. This procedure is performed to apply tension to
the tension side of the timing belt.
6.
Loosen tensioner bolt and nut, then tighten tensioner adjusting nut and mounting bolt. This procedure is performed to apply tension to loose side
of timing belt.
7.
When center of tension side of timing belt and gasket line on undercover are held between thumb and forefinger, clearance between belt and
gasket should be .23 inch. If not, readjust as necessary.
8.
Install timing belt lower and upper front covers.
9.
Install crankshaft pulley.
Pinch or Ctrl + scroll to zoom. Double-tap to reset.
Parts & tools for this job For 1989 Plymouth Colt 1.8L
- PARTTiming belt kitSearch: Plymouth Colt 1989 1.8L timing belt kit
- TOOLEngine timing tool setSearch: Plymouth engine timing tool set
- TOOLTorque wrenchSearch: 3/8 inch torque wrench
Links open Amazon search results in a new tab. As an Amazon Associate I earn from qualifying purchases.