
Firebird V8-305 5.0L (1982)
PROCEDURE A (No Lefter On Idle Air Bleed Valve)
1.
Presetting The Idle Air Bleed Valve - (Only necessary if idle air bleed valve was serviced prior to on-vehicle adjustment.)
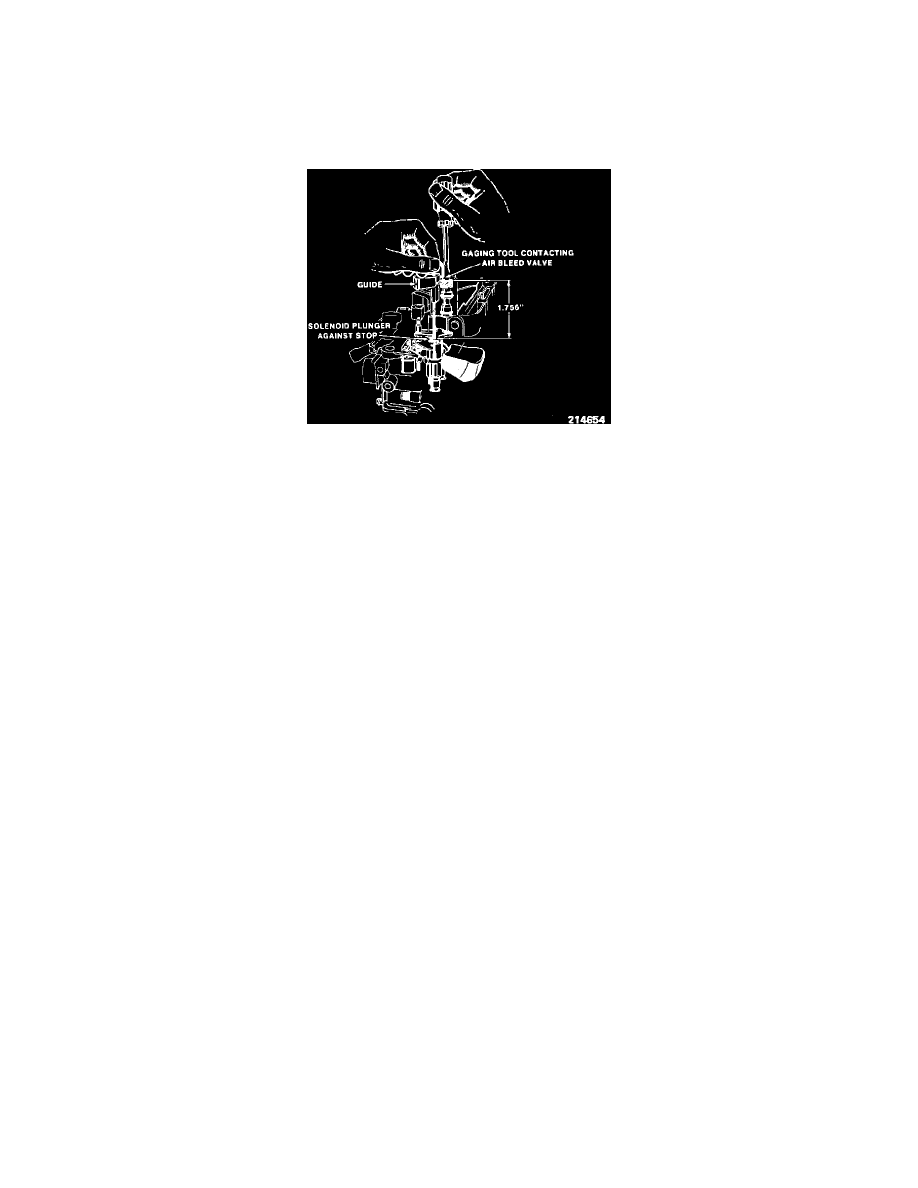
Install idle air bleed valve gaging tool (J-33815-2, BT-8253-B) or equivalent in "D" shaped vent hole of the air horn casting (see Figure 5). The
bottom end of the gaging tool should now be resting on the solenoid plunger. The upper end of the tool should be positioned over the open cavity
next to the idle air bleed valve.
FIGURE 6 - POSITIONING IDLE AIR BLEED VALVE
2.
Hold the gaging tool down lightly, so that the solenoid plunger is against the solenoid stop, and adjust the idle air bleed valve so that the gaging
tool will pivot over and just contact the top of the valve. The valve is now preset for on-vehicle adjustments (see Figure 6 on the following page).
3.
Remove gaging tool.
4.
Adjusting The Idle Air Bleed Valve - Block drive wheels, place transmission in park (automatic transmission) or neutral (manual transmission)
and set parking brake. Start engine and allow it to reach normal operating temperature in closed loop.
5.
While idling in drive (neutral for manual transmission), slowly turn the air bleed valve clockwise or counterclockwise, until the dwell reading
varies within the 25-30" range, attempting to be as close to 30~ as possible. The air bleed valve is very sensitive and should only be turned an 1/8
turn at a time.
6.
If the dwell reading does not vary and cannot be adjusted within the 25-30~ range, it may be necessary to adjust the idle mixture needles.
7.. Setting The Idle Mixture Needies (If Necessary) - Remove idle mixture, needle plugs. Use tool (J-29030-B, BT-7610B) or equivalent to turn both
idle mixture needles clockwise until they are lightly seated, then turn each mixture screw counterclockwise the number of turns specified on the attached
specifications.
8.
Readjusting Idle Air Bleed Valve - Start engine and run until fully warm and repeat Steps 4 and 5.
9.
If you are still unable to set the dwell between 25-30~, and the dwell is below 25~, turn both mixture needles counterclockwise one additional turn.
If the dwell is above 35~, turn both mixture needles clockwise one additional turn. Be sure to readjust the idle air bleed valve to obtain the
preferred dwell (Steps 4 and 5).
10.
Seal the idle mixture needle openings using silicone sealant (RTV). Sealing is required to prevent any fuel vapor loss.
11.
Perform Idle Speed adjustments as necessary.
PROCEDURE B (Letter On Idle Air Bleed Valve)
1.
Pre-Setting The Idle Air Bleed Valve - Install the air bleed valve gaging tool (J-33815-2, BT-8253-B) or equivalent in "D" shaped vent hole of the
air horn casting (refer to Figure 5). The bottom end of the gaging tool should now be resting on the solenoid plunger. The upper end of the tool
should be positioned over the open cavity next to the idle air bleed valve.
2.
Hold the gaging tool down lightly, so that the solenoid plunger is against the solenoid stop, and adjust the idle air bleed valve so that the gaging
tool will pivot over and just contact the top of the valve. The valve is now preset for on-vehicle adjustments (refer to Figure 6).
3.
Remove gaging tool.
4.
Adjusting The Idle Mixture Needies - Remove the idle mixture needle plugs. Use tool (J-29030-B, BT-7610-B) or equivalent to turn each idle