
Firebird V8-305 5.0L (1982)
Canister Purge Control Valve: All Technical Service Bulletins
Canister Control Valve - Diagnosis Procedure
Number 86-6(Gasoline)-82
Date 10/87
Subject:
CANISTER CONTROL VALVE DIAGNOSIS ON VEHICLES
1982-86 GRAND PRIX, FIREBIRD AND BONNEVILLE MODELS EQUIPPED WITH 3.8L V6 (VIN CODE A) OR 5.0L V8 (VIN
CODES G OR H) CARBURETED ENGINES
Some four port canister control valves have been replaced as a result of fuel found in the valve or in the carb bowl vent line.. The presence of fuel found
in this area does not necessarily indicate a faulty valve. The function of the valve can easily be checked on the vehicle by following the service procedure
outlined below:
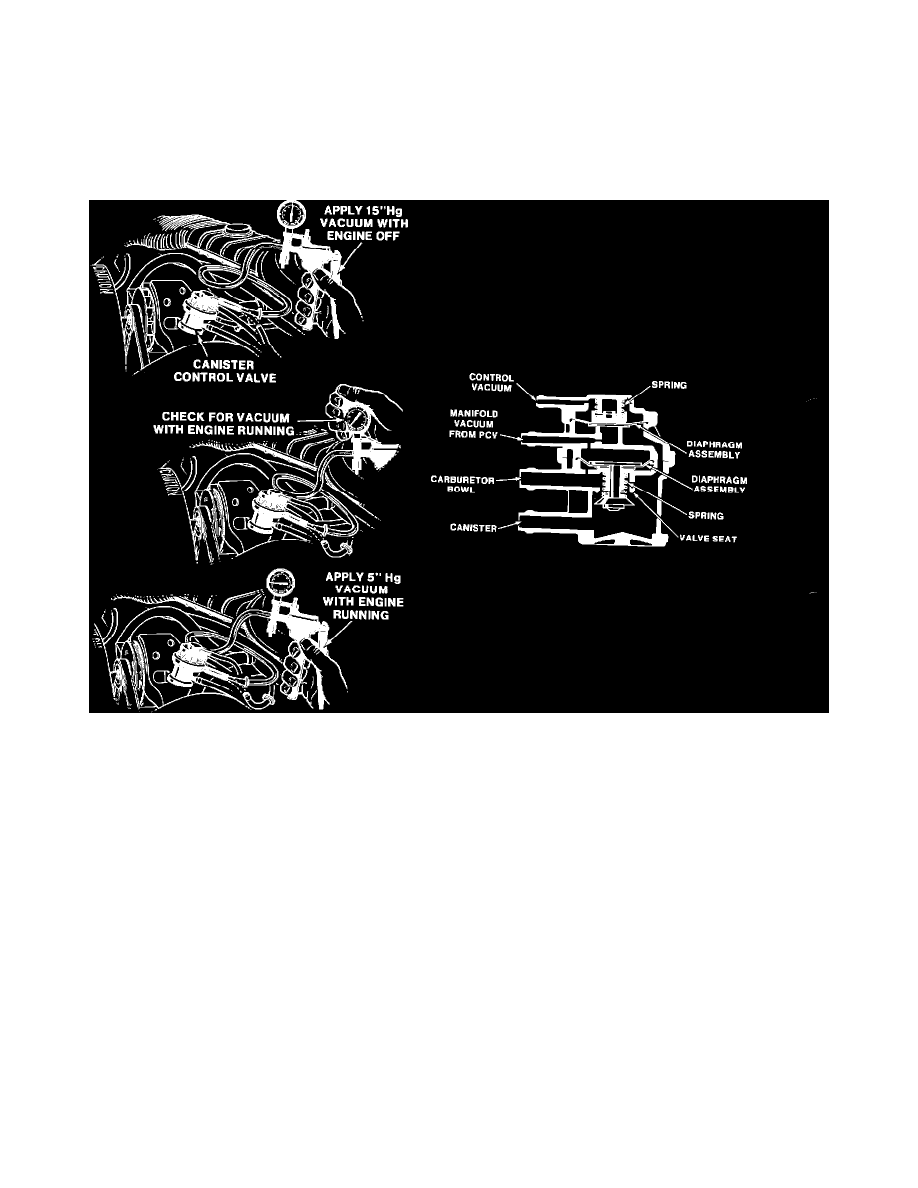
On Vehicle Diagnosis
1.
Remove the hose connected to the control vacuum port (small top port) on the canister control valve.
2.
Connect a hand vacuum pump to the port and apply 15" Hg. vacuum. If the diaphragm holds vacuum for at least 20 seconds, reconnect the hose
and proceed to step 3. If the valve fails to hold vacuum replace the valve.
3.
Start the engine and warm it up to normal operating temperature.
4.
Disconnect the carb bowl vent line at the canister control valve and connect a hand vacuum pump to the carb bowl line port on the valve. Allow
the engine to continue to run for 30 seconds and observe if, vacuum builds up on the gage. If so, replace the valve.
5.
With the engine still running and the vacuum pump still connected, apply 5" Hg. vacuum and observe the gage. If the valve doesn't hold vacuum
for at least 20 seconds, replace the valve. Otherwise, the valve is functional.
If driveability symptoms still exist, please refer to section 6E1-B of the appropriate service manual for additional diagnostic information.