
Firebird V8-305 5.0L (1982)
16.
Remove valve assembly by grasping stub shaft and pulling out.
17.
Remove worm, lower thrust bearing and races from upper end of housing.
Disassemble Housing
1.
Remove pitman shaft outer dust seal retaining ring.
2.
Remove outer dust seal.
3.
Remove seal (double lip) by inserting offset screwdriver between seal and back-up washer and prying out of housing.
4.
Remove back-up washer.
5.
Remove seal (single lip) by cutting and collapsing seal.
6.
Remove pitman shaft needle bearings (if necessary) with a suitable driver.
7.
If connectors are to be removed, tap threads in holes of connectors using 5/16-18 NF tap. Remove connectors by using threaded bolt into tapped
holes with washer and nut as extractor.
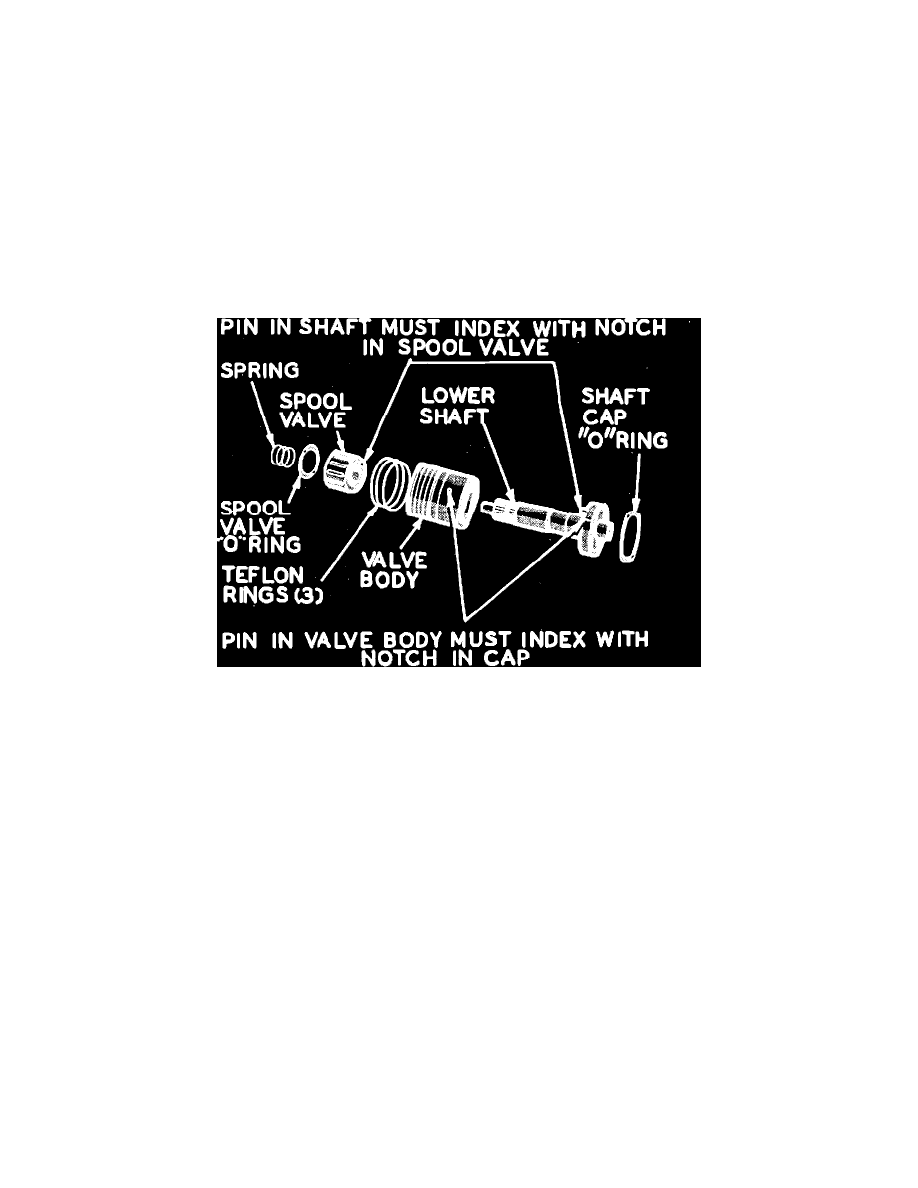
Disassemble Rotary Valve
Fig. 9 Rotary valve parts
1.
If used, work spool spring onto bearing diameter of stub shaft and remove spool spring.
2.
Tap end of stub shaft gently against workbench to remove valve spool.
Because of the slight clearance between valve body and spool, the
slightest cocking of spool may jam it in valve body. If slight cocking occurs, make a gentle attempt to reverse removal procedure. If this
does not free spool, it has become cocked in valve body bore and may be removed later.
3.
Remove and discard valve spool dampener O-ring.
4.
Remove stub shaft, torsion bar (small diameter bar extending through stub shaft) and valve cap by tapping end of torsion bar lightly with a plastic
hammer. This will dislodge cap from valve body cap pin,
Fig. 9. Do not disassemble stub shaft as these parts are pinned together and serviced only
as an assembly.
5.
If valve spool has become cocked as mentioned above, first inspect parts to determine in which direction the spool is cocked. A few very light taps
with a plastic hammer should align and free the spool in the bore. Remove and discard O-ring dampener seal from spool.
6.
Carefully remove valve body Teflon rings and ring back-up O-ring seals.
Replacing Valve Spool Dampener O-Ring
The rotary valve assembly includes the valve body, valve spool and stub shaft assembly. All these parts are precision units and are hydraulically
balanced at the factory. Under no circumstances are parts in this unit to be replaced or interchanged with other parts or units. If unit parts are scored or
damaged the entire rotary valve assembly is to be replaced.
1.
To replace the valve spool dampener O-ring, work spool spring into bearing diameter of stub shaft and remove spool spring.
2.
Tap end of stub shaft gently against workbench to remove valve spool. The diametrical clearance between the valve body and spool may be as low
as .0004 inch. The slightest cocking of the spool may jam it in the valve body.
3.
Remove valve spool dampener O-ring.
4.
Install new O-ring in valve spool groove, then lubricate seal in automatic transmission fluid. Do not allow seal to twist in groove.