seat Workshop Repair Guides

SEAT Workshop Service and Repair Manuals

Torque converter > < Filling amount
General instructions for gearbox repairs
To achieve a perfect and successful repair of the gearbox, it is imperative to keep everything scrupulously clean and use the correct tools in perfect working order. When carrying out repairs, bear in mind basic safety rules.
Here is a summary of general instructions for certain repair jobs, which would otherwise appear several times in the different sections of this Workshop Manual. Thus, these instructions must be taken into account for this Workshop Manual.
Gear change
t  Before fitting the gearbox to the engine, make sure that the dowel pegs between both elements are in good condition and correctly seated
t  Clean contact surfaces on fitting blocks, supports or waxed components. The surfaces must be completely free from wax or grease
t  If the automatic gearbox has been replaced, check and top up with ATF if necessary. Filling amounts and oil type specifications → Chapter
Oil seals
   
t  Before fitting the radial oil seals, fill the space between the sealing lips with grease
t  Replace O-rings
t  After fitting, check the ATF fluid level and top up if necessary
Sealing paste
t  Clean contact surfaces thoroughly and apply -D 176 404 A2- sealing paste
t  Note the use-by date of the sealant.
t  After applying the sealing paste, bolt up the components within 5 minutes
t  After assembly, the sealant should be dry in approx. 30 minutes Then fill with ATF
Safety locks
t  Renew all safety rings, taking care not to stretch them excessively when fitting
t  The safety rings must be perfectly seated in their groove
t  Renew all split pins
  N32-0001
t  
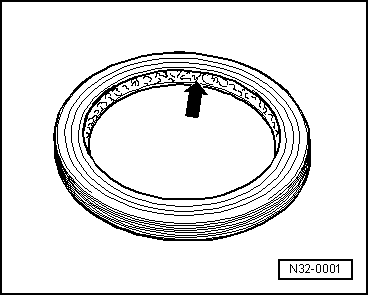
On fitting split pins, the expansion groove should be facing the direction of power transmission, as seen in the illustration
Bolts, nuts
t  Always loosen and tighten nuts and bolts on covers and casing in diagonal sequence
t  For delicate parts, e.g. the slide box , always loosen and tighten the bolts in stages and in diagonal sequence
t  Tightening torques are specified for nuts and bolts without lubrication
t  Always replace any self-locking nuts and bolts
t  Bolts with torque and stretch specifications must always be renewed
t  If the bolt threads have remains of locking paste, clean with a wire brush. Then insert the bolts with -AMV 185 100 A1-
t  The bolts and nuts of all threaded joints will be waxed when fitted (if necessary)
Bearings
t  Partially lubricate all gearbox bearings with ATF fluid before fitting
t  Fit new roller bearings as supplied, without lubrication, especially the conical bearings
t  Place the axial needle bearings in their correct position → Chapter
t  Bearings corresponding to the same shaft will be all replaced together, especially conical bearings. If possible, use parts from the same manufacturer
t  Do not mix up the inner and outer rings of the same size bearings. The bearings come in matched pairs
t  Heat the inner roller bearing ring to 100°C before press fitting
Removal of outer rings of roller bearings and bearing bushes with tool set -T20140-
Remove the outer rings of the roller bearings or the bearing bushes as follows:
–  Measure (if possible) the internal diameter of the external ring of the roller bearing or the bearing bush.
–  Select the correct clamp from the tool set according to:
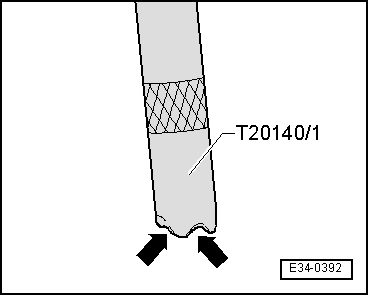
If the diameter measured is less than 30 mm:
–  Fit the plunger for small clamps/10 and the correct clamp for internal diameters.
If the diameter measured is more than 30 mm:
–  Fit the plunger/28 and clamp /29 and the correct claws for the internal diameter.
–  Screw nut /5 and washer on the plunger.
–  Place the tool on the outer ring of the roller bearing or the bearing bush and fit the threaded legs so that they are firmly secured.
  Note!
  V34-1515
The legs of bridge /1 have different-sized cut-outs -arrows- to facilitate support on surfaces with different heights, edges or ribs.
–  Adjust the threaded legs of the bridge /1 so that the bridge is parallel to the surface of the casing.
–  Open the clamps until the bar is housed below the exterior roller bearing or the bearing bush.
–  Action the extractor until the outer ring of the roller bearing or bearing bush is extracted.
  Note!
Due to the fact that on some occasions the space for the claw is minimal, a first extraction should be carried out to remove the bush, and then open the claws as far as possible to ensure the maximum contact surface. Then continue with the extraction.
Piston rings
t  Do not open excessively when removing or fitting
Shims
t  Before fitting shims, check thickness measuring several points of the surface with a micrometer
t  The existence of different thicknesses allows the exact calibration of the thickness of the shim needed
t  Check they have no lips and that they are not damaged. Only fit shims in perfect state
Clutches and brakes
t  Clutches K1, K2 and K3 should be dismantled for cleaning; assign the faulty components (e.g. outer and inner discs) according to the gearbox code.
t  Before fitting the piston, coat the sealing lips and oil seals with ATF
  E34-0392
t  After fitting the clutches or brakes, it should be possible to turn the piston in both directions by hand -arrow-. If this is not the case, perhaps the sealing lips or oil seals are incorrectly fitted or damaged.
–  If this is the case, remove the piston again.
–  Check for damage in the sealing lips or oil seals and replace if necessary.
–  Refit the piston and check again.
Slide box
t  If any control elements are burnt, the slide box should be replaced
Inner discs
  N38-0127
t  Fit the new inner discs, before fitting soak in ATF for 15 minutes.
Self-diagnosis
t  Before carrying out repairs in the automatic gearbox, the possible cause of the problem should be determined with precision: → VAS 5051; Vehicle self-diagnosis
  N00-0390

Torque converter > < Filling amount