seat Workshop Repair Guides

SEAT Leon Workshop Service and Repair Manuals

Adjustment chart > < Differential crown: removing and installing|Installation
Differential: adjustment
   
Differential: adjustment
Special tools and workshop equipment required
t  Gearbox repair set -U-40200-
t  Gearbox repair set -U-40300-
t  Universal dial gauge bracket -T20020-
t  Torque spanner -SAT 8010-

Adjust the differential when one of the following elements has been replaced:
t  Gearbox casing
t  Clutch housing
t  Differential casing
t  Differential roller bearings
Refer to Adjustment chart → Chapter
   
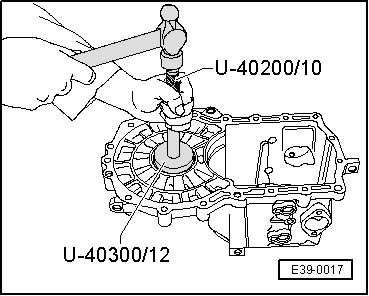
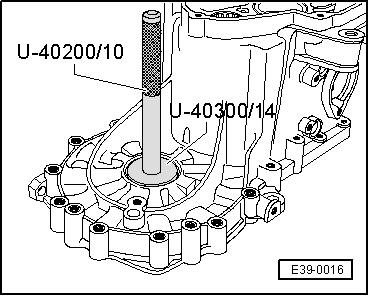
–  Remove the differential outer roller bearing track from the gearbox casing, with tool -U-40200/10- and tool -U-40300/14-.
  Note!
t  The procedure and tools needed to remove the outer tracks of the roller bearings are identical for the gearbox and clutch casings.
t  To remove the outer track of the clutch casing, previously remove the articulation flange oilseal bush → Chapter, Gearbox casing and clutch casing: repairing.
t  The roller bearings and their corresponding outer tracks are matched pairs. Do not mix with other bearings.
  E39-0016
–  Install the differential outer roller bearing track from the gearbox casing, with tool -U-40200/10- and tool -U-40300/12-.
  Note!
The procedure and tools needed to install the outer tracks of the roller bearings are identical for the gearbox and clutch casings.
–  Place the differential on the clutch housing.
–  Fit the gearbox casing onto the clutch housing and tighten the securing bolts to 25 Nm + 90°.
  E39-0017
–  Fit tool -T20020- on the gearbox casing with a dial gauge. Locate the end of the gauge on the differential, interplacing tool -U-40300/13-.
–  Adjust the dial gauge to “0” with a pre-tension of 1 mm.
–  Move the differential alternately in the -direction of the arrows-.
–  Take note of the measurement obtained (e.g. 0.70 mm).
  Note!
When measuring do not turn the differential, because the roller bearings may settle and the reading would be erroneous.
Shim calculation table
The pre-tension of the bearing is obtained by adding a constant pressure value (0.4 mm) to the obtained measurement value (in the example: 0.70 mm).
Example:
  E39-0010
Average value0.70 mm
+ Pressure (const. value)0.40 mm
Thickness of shim1.10 mm

The shim needed will be determined by the following table:
   
Thickness (mm)Spare no.
0.65
0.70
0.75
02A 409 210
02A 409 210 A
02A 409 210 B
0.80
0.85
0.90
02A 409 210 C
02A 409 210 D
02A 409 210 E
0.95
1.00
1.05
02A 409 210 F
02A 409 210 G
02A 409 210 H
1.10
1.15
1.20
02A 409 210 J
02A 409 210 K
02A 409 210 L
1.2502A 409 210 M

The existence of different tolerances allows the exact calibration of the thickness of the washer needed.
If the thickness needed is greater than those indicated on the table, two shims can be used that add to the determined value.
–  Once the necessary shim has been determined, remove the dial gauge.
–  Remove the bolts that secure both casings and separate the gearbox casing.
–  Separate the differential.
   
–  Remove the differential outer roller bearing track of the gearbox casing, with tool -U-40200/10- and tool -U-40300/14-.
–  Fit the shim of the correct thickness (in this case 1.10 mm) into the housing in the outer track of the differential roller bearing in the gearbox casing.
–  If it is necessary to fit two shims, place the thickest one first.
  E39-0016
–  Fit the differential outer roller bearing track to the gearbox casing, with tool -U-40200/10- and tool -U-40300/12-.
–  Place the differential on the clutch housing.
–  Fit the gearbox casing onto the clutch housing and tighten the securing bolts to 25 Nm + 90°.
  E39-0017

Adjustment chart > < Differential crown: removing and installing|Installation