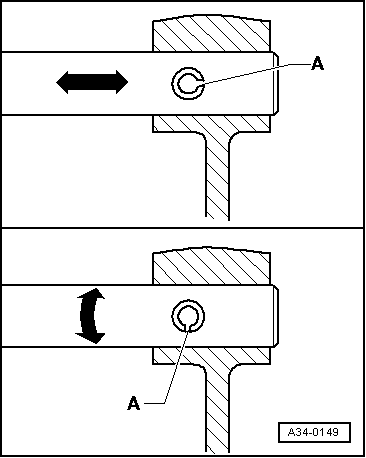
seat Workshop Repair Guides

SEAT Workshop Service and Repair Manuals

Overview - power transmission > < Repair notes
General repair instructions
Introduction
Extremely careful way of working as well as the highest possible cleanliness are necessary to ensure the trouble free repairing of the gearbox. Furthermore, the tools must be in perfect condition. Obviously, the basic rules for safety also apply during repair work.
A number of generally applicable instructions for the various repair procedures - which were previously repeated at numerous places in the Workshop Manual - are summarised here. They apply for this individual Workshop Manual.
Special tools
For a complete list of special tools used in this Workshop Manual → Workshop equipment and special tools.
Gearbox
t  When installing, ensure that the dowel sleeves between the engine and gearbox are correctly located.
t  When installing mounting brackets or waxed components, clean the contact surfaces. The contact surfaces must be free of wax and grease.
t  Allocate bolts and other components using the → Electronic parts catalogue (ETKA).
t  After installing, check oil level → Chapter.
t  Gear oil → Electronic parts catalogue (ETKA)
t  Capacity → Chapter
Gaskets, seals
Renew seals and gaskets.
After removing gaskets and seals, always inspect contact surface of housing or shaft for burrs resulting from removal or for other signs of damage.
   
Before installing radial shaft seals, lightly oil outer diameter and half-fill space between sealing lips -arrow- with sealing grease -G 052 128 A1-.
The open side of the oil seals faces toward the side with fluid filling.
After installing, check oil level and top up → Chapter.
Lightly lubricate O-rings before installation to prevent them from being trapped and damaged during assembly.
Sealant
t  Thoroughly clean housing joint surfaces before applying sealing paste.
t  Apply sealing paste -AMV 188 200 03- evenly and not too thickly.
Safety locks
  N32-10016
t  Do not overstretch retaining rings.
t  Fitting location of several securing rings: the ring is »tighter in the upper area« as well as its fitting location. This make it possible for the pliers to gain a better grip during removal and installation.
t  Always renew circlips which have been damaged or over-stretched.
t  The retaining rings must locate properly in the grooves.
  N30-10172
t  
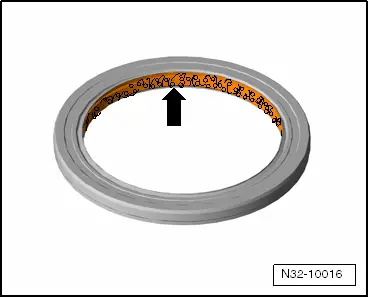
Replace the support sleeves. Fitting position: the groove-A- must remain parallel to the direction of the flow of pressure -arrow-.
Bolts, nuts
t  Loosen and tighten securing bolts and nuts for covers and housings diagonally.
t  Especially delicate parts, such as clutch pressure plates, must not be distorted. Loosen and tighten bolts and nuts in stages in diagonal sequence.
t  Specified torques given are for unlubricated nuts, bolts and screws.
t  Always renew self-locking nuts and bolts.
t  Ensure with threaded connections that contact surfaces as well as nuts and bolts are rewaxed only after assembly, if necessary.
t  Use thread tap to remove remains of locking fluid from all threaded holes in which self-locking bolts are to be screwed. Otherwise there is a danger of the bolts shearing off the next time they are removed.
t  Check pitch of thread, to ensure correct thread chaser is used to clean threads and to ensure the threads are not damaged.
Support
t  Lubricate all bearings with gear oil before installing.
t  Use inductive heater -VAS 6414- to heat the inner races of the conical roller bearings to approx. 100°C before installing. Engage to stop without allowing axial clearance.
t  Do not interchange the outer and inner ring of a conical roller bearing with those of another with the same size. The bearings come in matched pairs.
t  Conical roller bearings fitted into one same shaft must be replaced together. They must have the same manufacturer.
t  
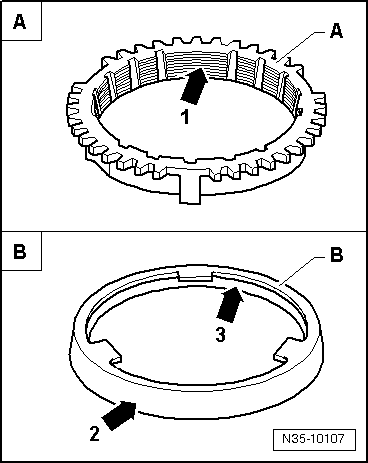
Install needle bearings, ball sleeves and roller sleeves with lettered side (thicker metal) towards fitting tool.
  A34-0149
Shims
t  Measure shims at several points with a micrometer. The various thicknesses make it possible to achieve the exact shim thickness required.
t  Check that it is not burred or damaged.
t  Only fit shims in perfect state.
Synchromesh rings
t  Do not interchange! When reusing synchro-rings, always fit to the same selector gear.
t  Check for wear and renew if necessary.
  N30-10156
t  Check grooves -arrow 1- of synchro-ring -A- and inner ring for flat spots (worn grooves).
t  Make sure that the coating of coated synchro-rings is not damaged.
t  If an intermediate ring -B- is installed, check the outer friction surface -arrow 2- and inner friction surface -arrow 3- of this intermediate ring for »scoring« and »signs of abnormal wear«.
t  Check the cone of the synchromeshed gear for »scoring« and »signs of abnormal wear«.
t  Lubricate synchro-rings with gear oil before installing.
Gears and synchro-hubs
t  Use inductive heater -VAS 6414- to heat the synchronising hub to approx. 100°C before installing. Engage to stop without allowing axial clearance.
t  Use inductive heater -VAS 6414- to heat the camshaft wheels to approx. 100°C before installing. Engage to stop without allowing axial clearance.
t  Note correct installation position.
mobile pinion
t  After assembly, check synchromeshed gears for slight play, or for freedom of movement.
Coupling unit
t  Ensure that the pressure plate is kept straight: loosen and tighten bolts in a diagonal sequence and in several gradual stages.
t  If the clutch has burnt out, thoroughly clean the clutch housing and the friction surface of flywheel with a cloth to reduce the smell of burnt linings.
  N35-10107

Overview - power transmission > < Repair notes