seat Workshop Repair Guides

SEAT Workshop Service and Repair Manuals

Safety precautions > < Motronic injection and ignition system
Motronic injection and ignition system
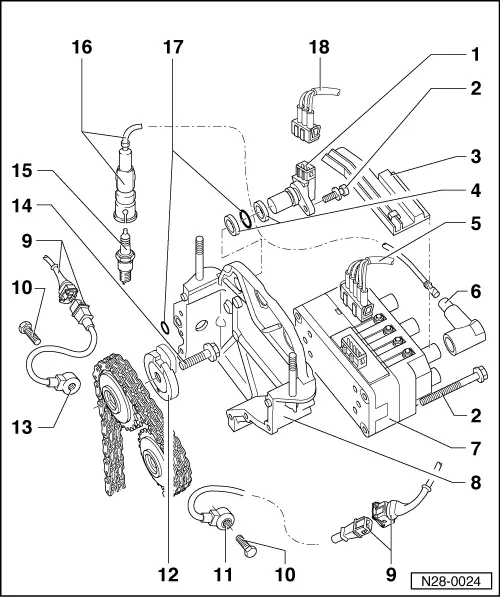
Servicing ignition part

Notes:

  • ◆ Only the components which specifically relate to the ignition system are dealt with here. For the other components of the injection and ignition system:

=> Repair group 24

  • ◆ The injection and ignition system control unit is equipped with self diagnosis.
  • ◆ Components marked with a * are checked via the self diagnosis.
  • ◆ Before carrying out repairs and for fault finding, interrogate fault memory , interrogating and erasing fault memory
  • ◆ For trouble-free operation of the electrical components, a voltage of at least 11.5 V is necessary.
  • ◆ If the engine starts, runs for a short period and then stops, after fault finding, repairs or component tests, then the fault may lie with the immobilizer which is blocking the engine control unit. The fault memory must be interrogated and if necessary the control unit matched => Page 24-84.
  • ◆ During some checks it is possible that the control unit will recognise and store a fault. Therefore after completing all checks and repairs the fault memory must be interrogated and if necessary erased.
    => Page 01-10, interrogating fault memory

Safety precautions => Page 28-8

Test data, spark plugs => Page 28-9

 
N28-0024

Note:

Motronic control unit (J220)* with connector => Page 24-8, item. 1 and 2.

  • Hall sender (G40)*
    • ◆ Checking => Page 28-10
    • ◆ Note spacer rings item 4
    • ◆ To remove unclip cable duct for ignition transformer item 3
  • 10 Nm
  • Cable duct
    • ◆ For ignition transformer (N152) item 7
  • Spacer ring
  • Connector
    • ◆ Black, 5 pin
    • ◆ For ignition transformer (N152)
 
N28-0024
  • Suppressor
    • ◆ 0.6...1.4 kω
  • Ignition transformer (N152)
    • ◆ With ignition cable identification, do not interchange
    • ◆ Checking => Page 28-16
  • Camshaft sprocket cover
    • ◆ Removing and installing

=> Repair group 15; removing and installing cylinder head

  • 3 pin connector
    • ◆ For knock sensor 1: White
    • ◆ For knock sensor 2: Black
    • ◆ Contacts gold plated
  • 20 Nm
    • ◆ Tightening torque influences the function of the knock sensor
 
N28-0024
  • Knock sensor 2 (G66)*
    • ◆ Fitting location: Cylinder block intake side
    • ◆ Checking wiring to knock sensor => Page 28-13
  • Sender wheel
    • ◆ For Hall sender (G40)
    • ◆ Contact surface of timing chain and sender wheel must be dry when installing
    • ◆ If the sender wheel has been removed, after installing check timing:

=> Repair group 13; dismantling and assembling engine; adjusting timing

  • Knock sensor 1 (G61)*
    • ◆ Fitting location: Cylinder block exhaust side
    • ◆ Checking wiring to knock sensor => Page 28-13
 
N28-0024
  • 100 Nm
    • ◆ To remove and installing counter-hold with 24 mm OJ spanner on camshaft
    • ◆ Oil bolt head contact surface when installing
  • Spark plug, 25 Nm
    • ◆ Remove and install with 3122B
    • ◆ Type and electrode gap
      => Page 28-9, test data, spark plugs
  • Spark plug connector
    • ◆ Remove air cleaner upper part to remove No. 1 Cyl. spark plug connector
      => Page 24-22, item 1
    • ◆ Use 3277 A when pulling off and pressing on
    • ◆ 4...6 kω
 
N28-0024
  • O ring
    • ◆ Renew
  • Connector
    • ◆ Black, 3 pin
    • ◆ Hall sender (G40)

Safety precautions > < Motronic injection and ignition system