
Leon Mk1
| Expansion valve: removal |
 Note!
Note!| t | First remove the refrigerating agent with the unit -SAT 4006B- |
| t | It is possible to continue using the service instruments used to date → V.A.G and SAT workshop equipment filing cabinet |
| t | Security measures when working on the coolant agent circuit, once the agent has been extracted → Chapter |
| t | Parts marked with an asterisk (*) can be replaced without opening or emptying the circuit |
| t | All the coolant agent circuit components that are open must be closed off with plugs in order to prevent moisture from entering |
| t | The O-rings for the circuits of the coolant agent R134a are not distinguishable by color now. From now on only black and coloured rings will be used indistinctively |
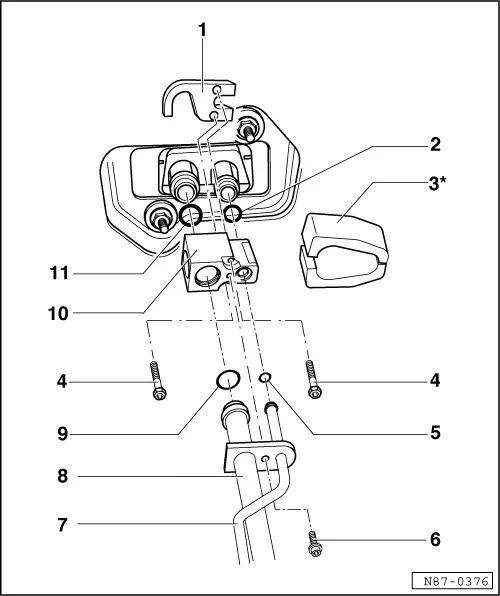
| 1 - | Perforated plate |
| 2 - | O-ring |
| q | 10.8 mm; 1.8 mm |
| 3 - | Heat protection* |
| 4 - | Bolts |
| q | 8 Nm |
| q | 2 units |
| 5 - | O-ring |
| q | 7.6 mm; 1.8 mm |
| 6 - | Screw |
| q | 7 Nm |
| 7 - | Coolant agent hose |
| q | From the drier tank to the expansion valve |
| 8 - | Coolant flexible hose |
| q | From the expansion valve to the compressor |
| 9 - | O-ring |
| q | 16.7 mm; 1.8 mm |
| 10 - | Expansion valve |
| q | In the engine bay, on the left |
| q | The path should be hermetically sealed against splashing water |
| 11 - | O-ring |
| q | 14 mm; 1.8 mm |
| Removal |
Note!| It is prohibited, by law, to release coolant agent into the athmosphere. |
| – | Remove the heat protection → Item |
| – | Remove the screw → Item |
| – | Remove the coolant agent hose → Item and the flexible coolant agent hose → Item |
| t | Replace the O-rings → Item and → Item |
| – | Unscrew bolts → Item |
| – | Remove the expansion valve → Item |
| t | Replace the O-rings → Item and → Item |