
Leon Mk1
| Vehicle interior heating |
 Caution
|
 Note!
Note!| t | Before disconnecting the battery check anti-theft coding on the radio |
| t | If the battery is reconnected check the vehicle equipment (radio, clock, electric comfort system, etc.), following the indications in the Workshop Manual and/or the Operating Instructions |
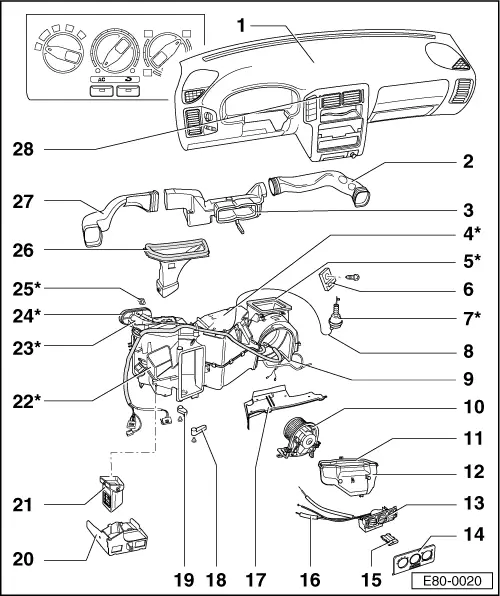
| 1 - | Instrument panel |
| q | Removal and installation → General body repairs - Assembly work, interior; Rep. Gr.70 |
| q | Removing and installing difusers → Chapter; Difusers: removing and installing |
| 2 - | Right duct |
| q | Removal and installation: dismount previously the object tray or the airbag unit of the passenger → General body repairs - Assembly work, interior; Rep. Gr.69 |
| 3 - | Duct distributor, upper part |
| q | Removal and installation: remove central difuser → Item and the duct distributor, lower part → Item |
| 4 - | Box for the evaporator |
| q | With evaporator |
| 5 - | Air intake shaft |
| q | With fresh air flap and air recirculation |
| 6 - | Fresh air blower with overheating fuse series resistor -N24- |
| q | Removal and installation → Fig. |
| 7 - | Depressant for fresh air flap and air recirculation |
| q | Connection plan for vacuum hoses → Chapter |
| 8 - | Vacuum line |
| q | Connection plan for vacuum hoses → Chapter |
| 9 - | Gasket |
| q | Renew |
| 10 - | Fresh air blower -V2- |
| q | Removal and installation → Chapter |
| 11 - | Gasket |
| q | Renew |
| 12 - | Duct distributor, lower part |
| q | Removal: remove central difuser → Item |
| q | Assembly → Fig. |
| 13 - | Control unit for heating and air conditioning |
| q | Removal and installation → Chapter |
| q | Dismantling and assembling → Chapter |
| 14 - | Trim for control unit |
| 15 - | Air conditioning switch -E35- and fresh air and air recirculation flap switch -E159- |
| q | With illuminating lamp for the air conditioning switch -L43- |
| q | With illuminating light for the fresh air and air recirculation flap switch -L86- |
| q | Removal → Chapter |
| 16 - | Cables |
| q | Removal: previously remove the central position difuser → Item, the difuser of the footwell zone → Item and → Item and the driver's side shelf |
| q | Mounting and adjusting → Chapter |
| 17 - | Lining |
| q | In the footwell zone of passenger's side |
| 18 - | Central flap lever |
| q | Removal: previously remove the foowell zone difuser item → Item and → Item |
| q | Installation position → Fig. |
| q | Adjusting actioning cable → Fig. |
| 19 - | Temperature flap lever |
| q | Removal and installation: previously remove the footwell zone difuser → Item and → Item |
| 20 - | Footwell zone difuser, lower part |
| q | Removal and installation → Chapter |
| 21 - | Footwell zone difuser, upper part |
| q | Removal and installation → Chapter |
| 22 - | Distributor box |
| q | With temperature flap |
| q | With central flap |
| q | With flap for the footwell zone/deicer |
| q | Do not continue to take apart |
| 23 - | Heat exchanger |
| q | Removal → Chapter, Heating unit: dismantling and assembling |
| q | Install the tube for the vacuum line → Fig. |
| q | After the dismount you should renew all the coolant |
| 24 - | Heat exchanger gasket/bulkhead |
| q | Note the fitting position → Fig. |
| q | Renew |
| 25 - | Tube for vacuum line |
| q | Mount → Fig. |
| 26 - | Deicing intermediate piece |
| q | With gasket |
| q | Removal: previously dismount the panel switch frame → Chapter, Difusers: removing and installing; Central difuser: removing and installing |
| 27 - | Left duct |
| q | Removal: |
| – | Removing steering wheel → Running gear, axles, steering; Rep. Gr.48 |
| – | Dismantling instrument panel → Electrical systems; Rep. Gr.90 |
| – | Dismount the driver's side difuser → Chapter, Difusers: removing and installing; Driver's side difuser: removal |
| 28 - | Central difuser |
| q | Remove → Chapter, Difusers: removing and installing; Central difuser: removing and installing |
|

|