seat Workshop Repair Guides

SEAT Workshop Service and Repair Manuals

Cooling system: checking for leaks > < Coolant pump: Removing and installing
Coolant thermostat: Removing and installing
t  Removing → Anchor
t  Installing → Anchor
Special tools and workshop equipment required
   
t  Tray -T20173-
  W00-2455
t  Securing tool -T20174-
Removing
  Note
First replace seals and gaskets.
–  Drain coolant → Chapter.
–  Remove the Poly V-belt → Chapter.
  W00-2456
–  Screw out bolts -arrows- and remove alternator.
–  Remove the alternator → Electrical system; Rep. gr.27 .
–  Disconnect the hoses for the cooling liquid from the connection hose.
  A13-0375
–  Unbolt securing bolts -1- of connecting sleeve -2- and remove connecting sleeve -2- with coolant thermostat -4-.
  N19-0257
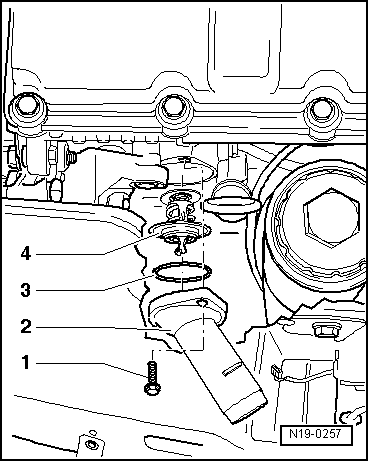
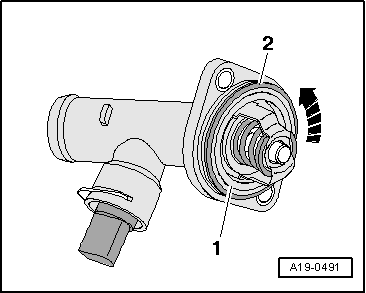
–  Turn coolant thermostat -Pos. 1- approx. 90° (1/4 turn) anti-clockwise and remove it from the connecting support.
–  Remove O-ring -2-.
Installing
Installation is carried out in the reverse order of removal while noting the following:
  Note
Renew O-ring.
–  Clean or smoothen the contact surface for O-ring.
–  Moisten new O-ring -3- with coolant.
–  Install the thermostat with new O-ring.
l  Fitting position: The thermostat retainer should be in a vertical position.
–  Attach the coolant thermostat into the connecting support and turn approx. 90° (1/4 turn) to the right.
–  Insert connection -2- with thermostat for cooling liquid -4- in engine block.
  A19-0491
–  Tighten the attachment bolts -1- to a torque of 15 Nm.
–  Fill up coolant → Chapter.
  N19-0257

Cooling system: checking for leaks > < Coolant pump: Removing and installing