seat Workshop Repair Guides

SEAT Workshop Service and Repair Manuals

Toothed belt system > < Inlet and exhaust valves
Removing and installing cylinder head
  Note
t  If an exchange cylinder head is installed, all the contact surfaces between the supporting elements, roller rocker fingers and the running surfaces of the camshaft must be oiled before the cylinder head cover is installed.
t  The plastic packing pieces for protecting the open valves must not be removed until immediately before fitting cylinder head.
t  When fitting a new cylinder head or cylinder head gasket, drain off all the old coolant and re-fill with new coolant.
t  
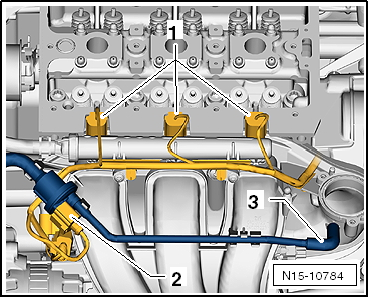
Cylinder head is being removed together with intake manifold.
   
Special tools and workshop equipment required
t  Support bracket -10 - 222 A-
t  Engine support bracket, basic set -T40091-
t  Assembly tool -T10476-
t  Locating bolt -T10340-
t  Camshaft clamp -T10477-
t  Torque wrench -V.A.G 1332-
t  Adapter -10-222 A/31-2- (not illustrated)
t  Support -10-222 A/31-3- (not illustrated)
t  Adapter -10-222 A/31-5- (not illustrated)
t  Square tube -T40091/1- (not illustrated)
t  Connector -T40091/3- (not illustrated)
t  Shackle -10-222 A/32-1- (not illustrated)
t  Support -T10358-

Requirements
l  The engine must be no more than warm to touch.
Removal:
–  Remove camshaft housing → Chapter
–  Unscrew securing bolts -1-.
  W00-10513
–  Unscrew fastening bolt from catalytic converter and remove bracket -2-.
  N10-10661
–  Remove securing nuts -arrows- and pull catalytic converter off stud bolts.
–  Unscrew intake manifold support securing bolt -arrow-.
  N10-10662
–  Unclip wiring harness -1- under intake manifold.
  N15-10782
–  Remove rocker fingers -1- and -2- and place them on a clean surface.
–  Disconnect connectors -1- from injectors.
  N15-10783
–  Disconnect connectors -2- from activated charcoal filter solenoid valves 1 -N80-.
–  Also disconnect connectors -arrow- from oil pressure switch and intake manifold.
–  Disconnect hose -3- from intake manifold and unclip cable of activated charcoal filter solenoid valves 1 -N80-.
  N15-10784
–  Loosen cylinder head bolts -1- through -8- in sequence given and then remove completely.
–  Remove cylinder head together with intake manifold.
–  Remove cylinder head gasket.
Installation
  Note
t  Do not remove the new cylinder head gasket from its packing until immediately before its installation.
t  Handle new gasket extremely carefully. If damaged, leaks may result.
–  Place clean cloths in cylinders so that no dirt or emery cloth particles can get in between cylinder wall and piston.
–  Also prevent dirt and emery cloth particles from getting into coolant.
–  Carefully clean sealing surfaces of cylinder head and cylinder block. Ensure that surfaces are not scored or scratched (if abrasive paper is used, grade must not be less than 100).
–  Carefully remove metal particles, emery residue and cloths.
–  Set No. 1 cylinder piston to top dead centre and then turn crankshaft back slightly.
  N15-10785
–  Place new cylinder head gasket -1- onto centring bushes -arrows-. Inscription (Part No.) -2- must be readable.
–  Fit cylinder head, install 8 new cylinder head bolts and tighten by hand.
  N15-10787
–  Tighten cylinder head bolts -1- through -8- in sequence given.
–  Tighten all bolts to 30 Nm.
–  Then turn all bolts 90° further using a rigid wrench.
–  Then turn all bolts 90° further again.
  Note
When camshaft is turned, crankshaft must not be at TDC. Avoid damage to valves and piston crowns.
–  Install camshaft housing → Chapter.
–  Adjusting valve timing → Chapter.
–  Install coolant pump → Chapter.
–  Fill up with coolant → Chapter.
Further assembly is basically the reverse of the dismantling sequence.
  N15-10786

Toothed belt system > < Inlet and exhaust valves