seat Workshop Repair Guides

SEAT Workshop Service and Repair Manuals

Lambda probe > < Removing and installing intake air temperature sender, intake manifold pressure sender
Removing and installing intake manifold pressure senderG71 with intake air temperature senderG42
Removing and installing intake manifold pressure sender -G71- with intake air temperature sender -G42-
Special tools and workshop equipment required
   
t  Torque wrench -V.A.G 1783-
Carry out the following work:
Removal:
  W00-0990
–  Press locking lugs -arrows- and pull intake connection off -1- in -direction of arrow-.
  N15-10721
–  Disconnect hose -1- at air cleaner housing.
–  Pull air filter housing upwards off studs at positions -2- and -3-.
  N15-10722
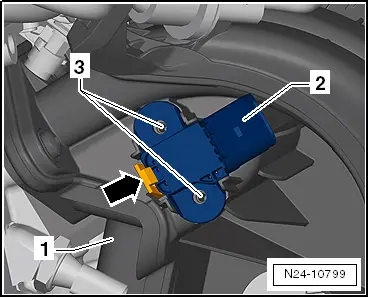
–  Unlock and disconnect connector from intake manifold pressure sender -G71- with intake air temperature sender -G42-
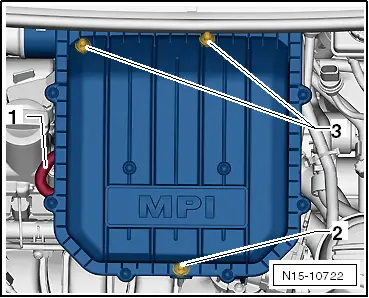
–  Unlock locking tab -arrow- in order to remove intake manifold pressure sender -G71- with intake air temperature sender -G42--2-.
  Note
The intake manifold pressure sender -G71- with intake air temperature sender -G42- may also be bolted to intake manifold -2-. In this case unscrew the bolts from holes -3-.
Installation
Installation is in the reverse sequence of removal. Note the following:
–  Check seal for damage and renew if necessary.
Ensure that intake manifold pressure sender -G71- with intake air temperature sender -G42- is properly seated and securely engaged.
  Note
t  The intake manifold pressure sender -G71- with intake air temperature sender -G42- may also be bolted to intake manifold -2-.
t  Observe allocation of bolts → Electronic parts catalogue (ETKA).
  N24-10799
Tightening torque:
ComponentSpecified torque .
Intake manifold pressure sender -G71- with intake air temperature sender -G42- to intake manifold3 Nm


Lambda probe > < Removing and installing intake air temperature sender, intake manifold pressure sender