
Leon Mk1
| Dismantling and assembling engine |
| I → Anchor |
| II → Anchor |

| Part I |

| 1 - | Toothed belt guard - upper part |
| 2 - | Toothed belt |
| q | Mark D.O.R. before removing |
| q | Check for wear |
| q | Do not kink |
| q | Removing, installing and tensioning → Chapter |
| 3 - | 20 Nm |
| 4 - | Toothed belt guard - coolant pump |
| 5 - | 20 Nm + 1/4 turn (90 °) further |
| q | Renew |
| q | The turning further can be done in several stages |
| q | The angle which must be turned further can be measured with protractor -T20030- |
| 6 - | Camshaft sprocket |
| q | Note position when installing the toothed belt → Chapter |
| 7 - | 10 Nm |
| q | Install with -D6- |
| 8 - | 10 Nm |
| 9 - | Rear toothed belt guard |
| 10 - | Coolant pump |
| q | With integrated seal |
| q | Seal must not be separated from coolant pump |
| q | Replace damaged or leaking coolant pump together with seal |
| q | Check for ease of movement |
| 11 - | Tensioner |
| q | Checking → Chapter |
| q | Removing, installing and tensioning → Chapter |
| 12 - | 20 Nm |
| 13 - | Console |
| 14 - | Crankshaft toothed belt sprocket |
| q | Note position when installing the toothed belt → Chapter |
| 15 - | 40 Nm + 1/4 turn (90 °) further |
| q | Renew |
| 16 - | 12 Nm |
| q | Renew |
| 17 - | Belt pulley |
| q | When installing note fixing arrangement |
| 18 - | 20 Nm |
| 19 - | Ribbed belt |
| q | Mark direction of rotation before removing |
| q | Removing and installing ribbed belt → Chapter |
| 20 - | 90 Nm + 1/4 turn (90 °) further |
| q | Renew |
| q | Oil threads |
| q | The turning further can be done in several stages |
| q | The angle which must be turned further can be measured with protractor -T20030- |
| 21 - | Toothed belt guard - lower part |
| Part II |
 Note!
Note!| t | Servicing the clutch: |
| t | → Rep. Gr.30 |
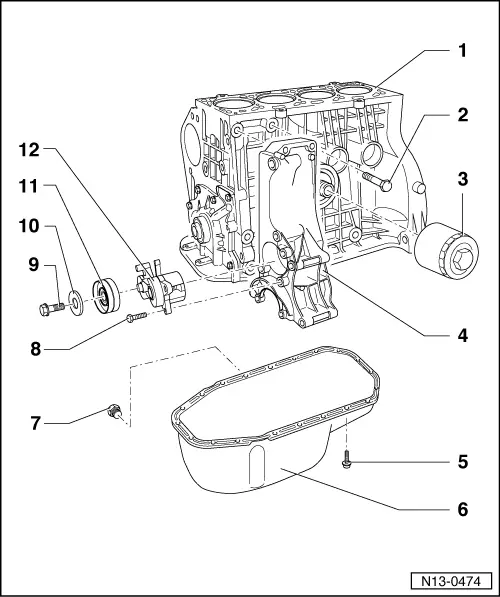
| 1 - | Cylinder block |
| q | Dismantling and assembling aluminium cylinder block → Chapter |
| q | Dismantling and assembling pistons and conrods → Chapter |
| 2 - | 45 Nm |
| q | Renew |
| 3 - | Oil filter |
| q | Loosen at hexagon bolt head |
| q | Tighten by hand |
| q | Note instructions on filter when installing |
| 4 - | Compact bracket |
| q | For vane pump and alternator |
| q | Removing and installing compact bracket on vehicles with air conditioner: → Heating, Air conditioning; Rep. Gr.87 |
| 5 - | 15 Nm |
| q | Loosen and tighten the bolts on the flywheel side only using socket insert -U-40051- |
| 6 - | Sump |
| q | Removing and installing → Chapter |
| 7 - | Oil drain plug, 30 Nm |
| q | With attached seal |
| q | Renew |
| 8 - | M8: 20 Nm + 1/4 turn (90 °) further |
| 9 - | 45 Nm |
| 10 - | Washer |
| 11 - | Tensioning roller |
| 12 - | Tensioning element |