Leon Mk1
|

| 1 - | Upper protection element for the notched belt |
| 2 - | Notched belt |
| q | Mark direction of rotation before removing |
| q | check wear |
| q | Do not bend the belt |
| q | removing, installing and tensioning → Chapter |
| 3 - | 10 Nm |
| q | replace |
| 4 - | 25 Nm |
| q | 3x |
| 5 - | 100 Nm |
| 6 - | Cogwheel for timing belt |
| 7 - | Hub |
| q | With generator wheel |
| q | Use retention tool -T10051- to loosen and tighten |
| q | For removal use the extraction tool -T10052A- |
| q | removing and fitting → Chapter |
| 8 - | Rear notched belt guard |
| 9 - | Filler cap |
| q | If this is damaged, replace it |
| 10 - | Hall sender -G40- |
| q | For the position of the crankshaft |
| q | For removing, remove the cap position → Item from the rear part of the notched belt protection |
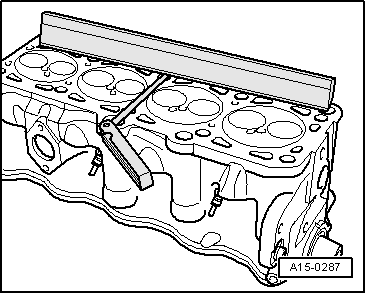
| 11 - | Cylinder head bolt |
| q | Respect the loosening and tightening sequence → Chapter |
| q | Before fitting, fit the washers to the cylinder head → Item |
| 12 - | Cylinder head cover: |
| q | Before fitting, clean thoroughly the seal surface of the cylinder head using a clean cloth |
| 13 - | Pressure limiting valve |
| q | For engine block ventilation |
| 14 - | To turbocharger |
| 15 - | Filler cap |
| q | Replace gasket if it shows signs of damage. |
| 16 - | Seal collaret |
| q | If this is damaged, replace it |
| 17 - | 10 Nm |
| q | 13 pieces |
| q | Follow the correct tightening order → Chapter |
| 18 - | Cylinder head cover gasket |
| q | If this is damaged, replace it |
| 19 - | 20 Nm |
| 20 - | Attachment rings |
| 21 - | Injector-pump: |
| q | removing and fitting → Chapter |
| 22 - | 10 Nm |
| 23 - | Central connection |
| q | for the injector pump |
| 24 - | of the brake servo |
| 25 - | Tandem pump: |
| q | For fuel feed and low pressure |
| q | check → Chapter |
| q | removing and fitting → Chapter |
| 26 - | Intake hose |
| q | From the fuel filter |
| q | White or white mark |
| q | Check for secure seating. |
| q | Immobilise with spring clips |
| 27 - | Return hose |
| q | To the fuel filter |
| q | Blue or with blue marking |
| q | Check for secure seating. |
| q | Immobilise with spring clips |
| 28 - | Seal |
| q | replace |
| 29 - | 20 Nm |
| 30 - | Cylinder head |
| q | removing and fitting → Chapter |
| q | Renew coolant after replacing cylinder head gasket |
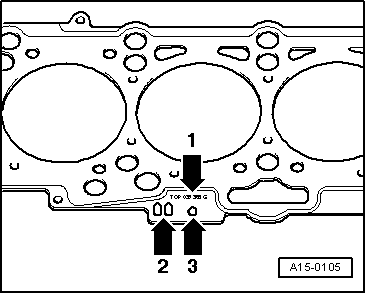
| 31 - | Cylinder head gasket |
| q | replace |
| q | Note the identification |
| q | Renew coolant after replacing cylinder head gasket |
| 32 - | Glow plug, -15 Nm |
| q | check → Chapter |
| 33 - | Tensioning roller |
| 34 - | 20 Nm + 1/8 turn (45°) further |
| q | To avoid significant damage to the engine apply correct tightening torques |
 Note
Note
|
|