seat Workshop Repair Guides

SEAT Workshop Service and Repair Manuals

Assembly mountings - exploded view > < Attaching engine to repair stand
Engine: fitting
Engine: fitting
  Note
t  When performing repair work, renew self-locking nuts and bolts.
t  Renew oil seals, gaskets, O-rings and bolts which are tightened by turning through a specified angle.
t  Hose connections and hoses for charge air system must be free from oil and grease before fitting.
t  Secure all screw joints with serial hose clips → Spare parts catalogue.
t  Fit the cable clamps in the same position as they were.
Vehicles with manual gearbox:
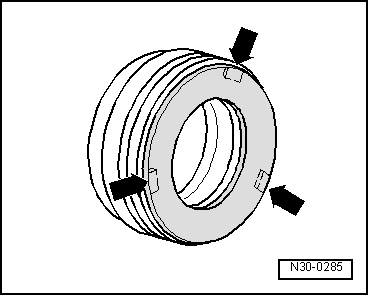
–  When fitting a new clutch plate in conjunction with a used SAC pressure plate (self-adjusting pressure plate), the adjuster ring in the pressure plate has to be reset by turning it back as far as it will go. If you do not reset the adjuster ring, the pressure plate will operate with reduced clamping force (clutch will then slip) → Rep. gr.30.
  Note
t  If the clutch plate is not replaced, the adjuster ring must not be rotated back.
t  The new clutch pressure plates SAC are preset and need no further adjustment.
–  Clean the ribs on the input shaft and, if the clutch plate is worn, the teeth in the hub; remove rust and grease lightly → Parts catalogue for teeth. Do not grease guide sleeve.
–  If applicable, check centring of clutch plate.
–  Check clutch release bearing for wear and make sure that plastic ring is securely seated; renew clutch release bearing if necessary .
If the plastic rung of the clutch releasing device is loose:
   
–  Stick the plastic ring of the clutch releasing device with the adhesive → Spare parts catalogue on the bearing race.
l  Three square lugs -arrows- on the plastic ring engage in the recesses in the bearing race.
l  If there are ridges with a depth over 0.5 mm, the releasing device must be replaced.
–  A needle bearing must be fitted in the crankshaft on vehicles with manual gearbox. Fit it if necessary → Chapter.
Vehicles with automatic gearbox:
–  Clean gearbox input shaft splines and damper unit splines on flywheel. Remove corrosion and apply only a very thin coating of grease -G 000 100- to the splines. Excess grease must be removed.
Continued for all vehicles
–  Check that dowel sleeves for centralising engine/gearbox are in the cylinder block; install if necessary.
  N30-0285
–  Check that the intermediate plate is held in the sealing flange and fitted on the adjustment bushes -arrows-.
–  Push intermediate plate between engine and gearbox onto dowel sleeves.
–  Attach engine to gearbox and screw in one bolt finger-tight.
–  Leave the engine and at the same time introduce the stay bolts of the engine bearings in their brackets.
  Note
t  Tightening torques apply only to lightly greased, oiled, phosphated or black-finished nuts and bolts.
t  Other lubricants can be used, such as engine or gear oil; however, do not use oils containing graphite.
t  Use is never to be made of degreased parts.
t  Tolerance for specified torques is ± 15%.
  A13-0682
Fitting engine/manual gearbox
  A37-10065
ItemBolt.Nm
1, 6M12x10565
2, 4M12x8065
3M12x9065
5, 7M12x9565
8M10x5045
9, 10, 11M10x4545
ACentering handles

   
Securing engine to multitronic gearbox
  A37-10065
ItemBolt.Nm
1M12x6765
2M10x7045
3, 4, 5, 7M12x7565
6M12x10565
8M10x6045
9, 10, 11M10x4545
ACentering handles

All vehicles (continued):
The remaining installation steps are carried out in reverse sequence - note the following points:
–  Install the exhaust system, and adjust it without tension → Chapter.
–  Install air conditioner compressor → Heating, air conditioning; Rep. gr.87.
–  Fit the pump for steering assist: → Running gear, shafts, direction; Rep. gr.48.
–  Install poly V-belt → Chapter.
–  Assemble the lock carrier with attachments → Bodywork - Exterior assembly work ; Rep. gr.50.
Tightening torque → Chapter „Assembly mountings - exploded view“
   
–  The torque reaction support must set itself on its rubber stop by means of its self weight, then tighten the nuts -arrows-.
–  Fit the front bumper cover → Exterior body installation work; Rep. gr.63.
–  Electrical connections and routing → Current flow diagrams, Electrical fault finding and Fitting locations.
–  Take all the necessary precautionary measures when connecting the battery → Electrical system; Rep. gr.27.
  Caution
Do not use a charger as a starter aid! The control units of the vehicle may be damaged.
–  Check oil level → Chapter.
–  Fill up with coolant → Chapter.
  Note
t  The drained coolant can only be reused if the cylinder head or the cylinder block have not been replaced.
t  Contaminated or dirty coolant must not be used again.
–  Check the oil level: → Running gear, shafts, direction; Rep. gr.48.
–  Check headlight adjustment → Booklet 301.
Tightening torques
  Note
t  Tightening torques apply only to lightly greased, oiled, phosphated or black-finished nuts and bolts.
t  Other lubricants can be used, such as engine or gear oil; however, do not use oils containing graphite.
t  Use is never to be made of degreased parts.
t  Tolerance for specified torques is ± 15%.
  A10-10298
Components:Nm
Bolts/nutsM69
 M820
 M10:40
 M1265
Except for the following: 
Electrical wire to starter16
Electrical wire to alternator16
Heat shield of the drive shaft on the gearbox23
Hose clips (9 mm wide)3
Hose clips (13 mm wide)5,5


Assembly mountings - exploded view > < Attaching engine to repair stand