
Leon Mk1
| Catalytic converter and attachment parts - Assembly overview (Altea, Altea XL, Leon) |

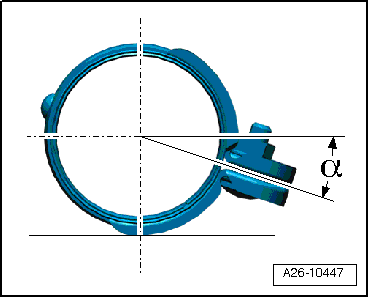
| 1 - | Lambda probe -G39-, 50 Nm |
| q | Only grease the thread with „G 052 112 A3“. |
| q | The „G 052 112 A3“ must not reach the probe body grooves. |
| q | Removing and installing with the wrench kit -3337- |
| 2 - | 23 Nm |
| q | Renew. |
| q | Lubricate the studs of the exhaust manifold with high-temperature lubricant. |
| q | Tightening torque and sequence → Fig. |
| 3 - | Catalytic converter with exhaust pipe |
| q | removing and installing → Chapter |
| 4 - | Gasket |
| q | Renew. |
| 5 - | Gasket |
| q | Renew. |
| 6 - | Exhaust pipe |
| 7 - | Double clamp, 25 Nm |
| q | Mounting position and specified torque → Chapter. |
| q | Tighten bolted connections evenly. |
| 8 - | 25 Nm |
| q | Renew. |
| 9 - | Exhaust pipe |
| q | With flexible connection (de-coupling element). |
| q | Do not bend the coupling element by more than 10°. It could be damaged. |
| 10 - | Mounting |
| 11 - | 25 Nm |
| 12 - | 25 Nm |
| q | Renew. |
| 13 - | Gasket |
| q | Renew. |
| 14 - | Stage I 18 Nm, Stage II 12 Nm, Stage III 12 Nm |
 Caution
|
| q | Observe tightening sequence → Chapter. |
| q | Tightening torque of the studs in the cylinder head. 18 Nm (assemble using oil) |
| 15 - | 20 Nm |
| 16 - | Support |
| 17 - | Turbocharger |
| q | With the charge pressure actuator -V465- |
| q | removing and installing → Chapter |
 Note
Note| The turbocharger can only be replaced completely with the exhaust manifold and the charge pressure actuator -V465-. |
| 18 - | Heat shield |
| q | When assembling, first tighten the fastening bolts by hand |
| 19 - | 10 Nm |
| q | When assembling, first tighten the fastening bolts by hand |
| 20 - | Heat shield |
| q | When assembling, first tighten the fastening bolts by hand |
| 21 - | 10 Nm |
| q | When assembling, first tighten the fastening bolts by hand |
| q | Tightening torque and sequence → Fig. |
| 22 - | 10 Nm |
| q | When assembling, first tighten the fastening bolts by hand |
| q | Tightening torque and sequence → Fig. |
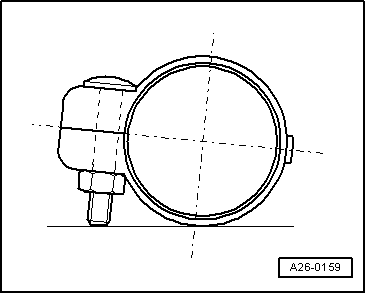
| 23 - | Lambda probe after catalytic converter -G130- |
| q | Specified torque: 50 Nm |
| q | Only grease thread with „G 052 112 A3“. The „G 052 112 A3“ must not reach the probe body grooves |
| q | If seal is leaking, nip open and renew. |
| 24 - | 10 Nm |
| q | When assembling, first tighten the fastening bolts by hand |
| 25 - | 25 Nm |
| q | Tightening torque and sequence → Fig. |
Note
|
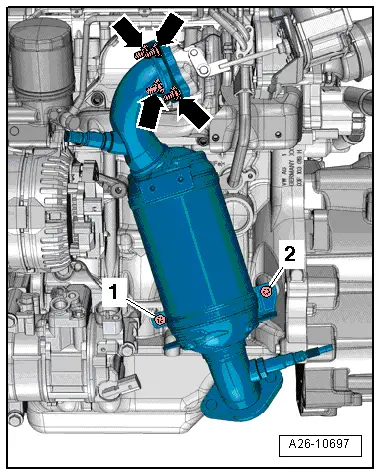
|
| Stage | Bolts/nuts | Specified torque . |
| 1. | -arrows- | Screw in by hand until it stops. |
| 2. | -1- | 25 Nm |
| 3. | -2- | 25 Nm |
| 4. | -arrows- | 23 Nm |
|
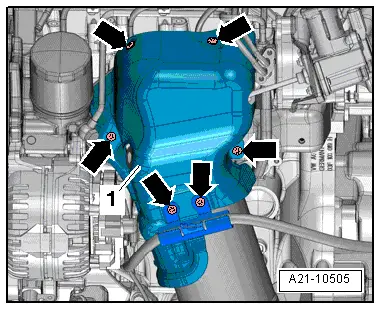
|
| Stage | Bolts | Specified torque . |
| 1. | -arrows- | Screw in by hand until it stops. |
| 2. | -arrows- | 9 Nm |
|
|
|
|