
Leon Mk2
| Gear drive mechanism: dismantling and fitting (vehicles from 07.00 onwards) |

| 1 - | Gear lever knob |
| q | Dismantling and fitting → Chapter |
| 2 - | Trim sleeve |
| 3 - | Frame |
| q | Remove with the plastic lever -U-30800-. Be careful with the edges of the frame as they are sharp and can cut |
| 4 - | Cover |
| q | Dismantling → Chapter |
| q | Do not dismantle |
| 5 - | Gasket |
| 6 - | Bolt |
| 7 - | Protective cover |
| 8 - | Bolt |
| 9 - | Bolt |
| 10 - | Selector lever |
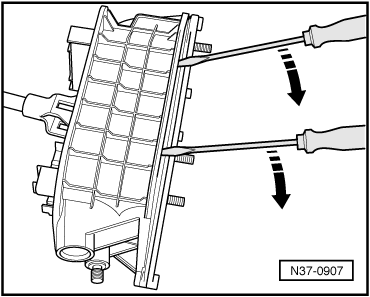
| q | Separate the selector lever from the protective box → Fig. |
| 11 - | Cover |
| 12 - | Bolt |
| q | 25 Nm |
| q | 4 units |
| 13 - | Nut |
| q | 15 Nm |
| q | 3 units |
| q | Always renew |
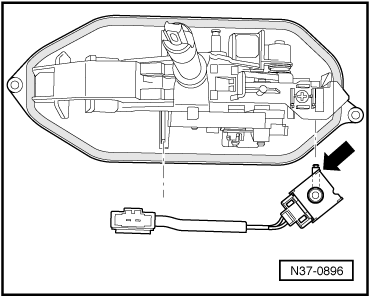
| 14 - | Electromagnet for gear lever locking -N110- |
| q | To remove, separate the selector lever from the protective box → Fig. |
| q | Checked on the vehicle by self-diagnosis → VAS 5051; Vehicle self-diagnosis |
| q | Fitting → Fig. |
| 15 - | Safety washer |
| q | Safety washer |
| 16 - | Nut |
| q | 15 Nm |
| q | Always renew |
| 17 - | Bush |
| q | Always renew |
| 18 - | Support |
| q | To secure the selector lever cable to the sub-frame |
| 19 - | Hexagon bolt |
| q | 6 Nm |
| 20 - | Support |
| q | To secure the gear selector cable in the engine bay |
| 21 - | Hexagon bolt |
| q | 6 Nm |
| 22 - | Selector lever cable |
| q | Dismantling and fitting → Chapter |
| q | Do not kink or bend; before fitting, grease the ring and the ends of the cable lightly |
| q | Check and adjust → Chapter |
|
|
|
|