seat Workshop Repair Guides

SEAT Workshop Service and Repair Manuals

General overview for the all adjustments to the planet gear > < Planet gears up to 06.00: assembly
Planet gears from 07.00 onwards assembly
Place the axial needle bearing in installation position → Chapter.
   
–  Assemble the drive sprocket and the ring wheel.
Take note of assembly position when placing the free sprocket → Chapter.
  N37-0936
–  Fit the free sprocket together with thrust washers -B-.
–  Secure the free sprocket with the safety ring -A-.
–  Place the drive sprocket with the ring wheel.
–  Place a new safety plate fitting its tabs into the gearbox casing recesses.
  E37-0060
–  Using tool -T10003-, tighten securing bolt to a torque of 60 Nm.
–  Secure the securing bolt with the safety plate.
  E37-0086
–  Insert satellite carrier -B- into the ring wheel, and at the same time, into the free sprocket.
–  Place the axial needle shoulder -A- on top of satellite carrier -B-, in such a way that the dark surface remains visible.
–  Checking action of free sprocket. The satellite carrier can only be turned in an anti-clockwise direction.
  E37-0058
–  Fit discs -B1- in the following manner:
–  Place a support disc -5- of the corresponding thickness on top of the safety ring -6-.
–  Insert inner discs -7- and outer discs -4- of -B1-.
–  Place on top of thrust disc -3-.
–  Insert the springs from plate -2- according to the installation position (the large diameters face each other).
–  Fit safety ring -1-.
–  Verify the measurement of the reverse gear brake -B1- → Chapter.
  N38-0106
–  Assemble the clutch -A- for the 3rd and 4th gear.
–  Place the gearbox casing O-rings -arrows-.
  E37-0057
–  Fit the spring cage into the guide pivots for piston -B1-.
One of the guide pivots -A- is thicker than the others, supporting in this way the spring cage.
–  Completely fill the axial needle bearing -B- with ATF, so that the bearing adheres when it is installed onto the cover for the gearbox casing.
Place the axial needle bearing onto the cover in accordance with the correct installation position (the dark surface remains visible).
  N37-0619
–  Cut the tube nozzle off at the front mark (nozzle diameter: approx. 3 mm).
–  Apply silicone sealing compound -D 176 404 A2- onto the clean sealing surface of the cover. The bead should be 3-4 mm thick.
  N17-0019
–  Place the gearbox casing cover, turning it in the counterclockwise to the arrow in order to avoid the support for column -AR-2203A-.
–  Tighten the bolts uniformly and in diagonal sequence to a torque of 20 Nm.
–  Turn the gearbox 180°.
  E37-0056
–  Insert the pinion attack shaft -1-.
  N37-0580
–  Place large planet gear -B- into the gearbox casing.
–  Place the axial needle bearing -A- onto the large planet gear -B- in accordance with the correct installation position (the smooth surface remains visible).
  N37-0579
–  Insert the input shaft -2- into the large planet gear.
–  Place the axial needle bearing -1- onto the input shaft in accordance with the correct installation position (the dark surface remains visible).
  N37-0578
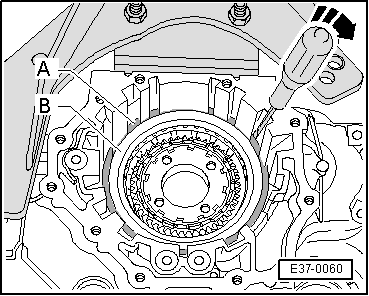
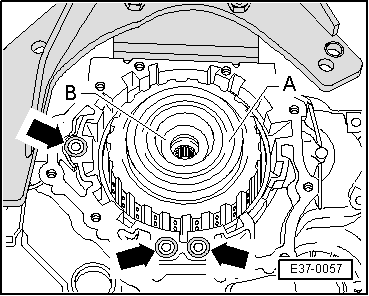
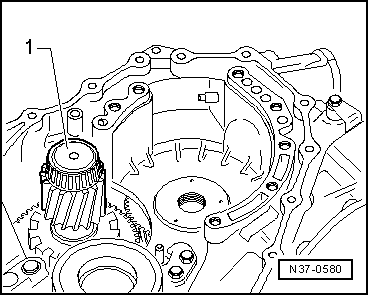
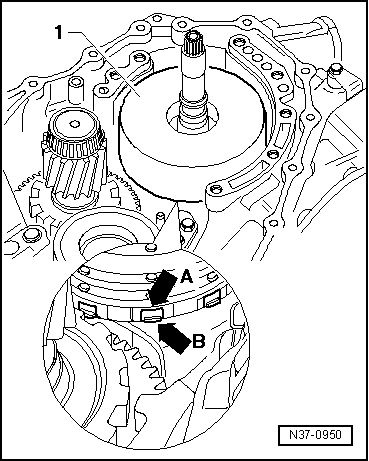
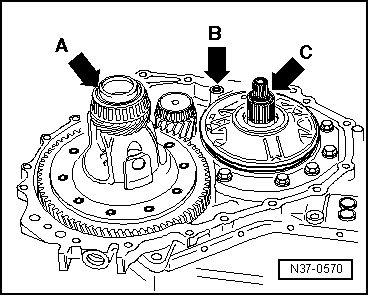
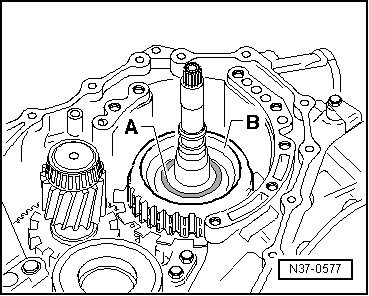
–  Insert the clutch for the 1st and 3rd gear -B-.
  Note!
When inserted, the input shaft must completely enter the clutch for the 1st and 3rd gear. If necessary, fit them together before inserting them into the casing.
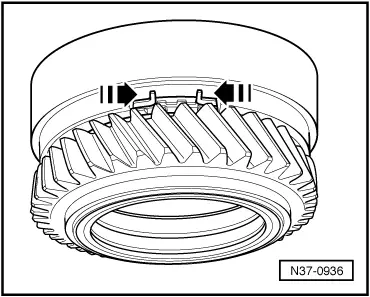
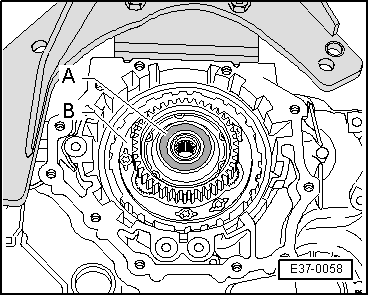
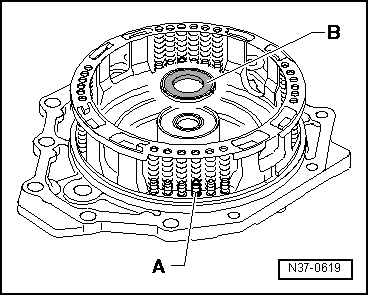
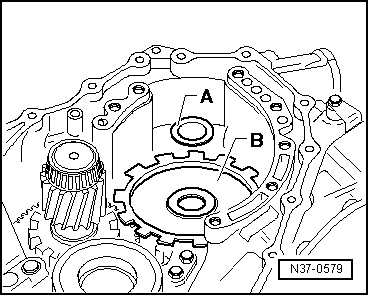
–  Place the axial needle bearing -A- on the clutch for the 1st and 3rd gear in accordance with the correct installation position (the dark surface remains visible).
When replacing individual components of the planet gears, the axial needle bearings must be calibrated anew → Chapter, Adjust the clearance for the clutch.
  N37-0577
–  Place the reverse gear clutch -1-.
Recesses -A- must be placed on top of lugs -B-.
  N37-0950
–  Place shim -2- on top of the reverse gear clutch -K1-.
When replacing individual components of the planet gears, the shim must be calibrated anew ⇒ page → Chapter, Adjust the clearance for the clutch.
–  Fit gasket -1- of the ATF pump.
  N37-0574
–  Fit the brake strap in the following manner:
–  Place the new adjusting screw -2- with counter nut -1- in the gearbox.
Do not yet screw in the covered part of the screw threads. The screw must be fitted after fitting the ATF pump → Chapter , Adjusting the brake strap.
–  Install brake strap -3-.
–  Line up the ATF pump to the gearbox casing. Take note of the position of the shim, the ATF pump gasket, and the ATF pump's piston segments when installing.
  E37-0055
–  Tighten the ATF pump bolts -arrows- to a torque of 20 Nm.
  N37-0573
–  Enter the differential -arrow A-.
–  Place the new O-rings -arrow B- into the gearbox casing and -arrow C- into the turbine shaft.
–  Apply silicone sealing compound -D 176 404 A2- onto the clean sealing surface of the converter casing. The bead should be 3-4 mm thick.
–  Place the converter housing onto the gearbox casing; to do so, take note of the adjusting bolt and ATF pump O-ring.
–  Tighten the converter casing bolts to a torque of 30 Nm.
  N37-0570
–  Install the left and right articulation flanges -arrow- → Chapter, Articulation flange oil seals: removal and fitting.
–  Install the connectors together with the solenoid valve wiring harnesses.
  E37-0054
–  Fit the new O-rings -A- into the gearbox casing.
  N37-0617
–  Place the slide box on top and insert the securing disc bolt into the groove of the selected -4- slide box.
–  Take into account the length of the screws:
A - M6×80 mm
B - M6×68 mm
C - M6×40 mm
–  Tighten the screws to a torque of 9 Nm.
–  Install solenoid valve connectors -2- and hook the cables into the support -3-.
–  Attach ATF temperature sender -5-.
–  Fit solenoid valve connector -1-.
Apply sealant paste -D 176 404 A2- to the oil sump in the following manner:
  E37-0053
–  Cut the tube nozzle off at the front mark (nozzle diameter: approx. 3 mm).
–  Apply silicone sealing compound -D 176 404 A2- onto the clean sealing surface of the cover. The bead should be 3-4 mm thick.
–  Assemble the oil sump and tighten the securing nuts in diagonal sequence to a torque of 8 Nm.
  N17-0019
–  Fit the ATF radiator -arrow- into the gearbox and tighten the bolt to a torque of 25 Nm.
–  Install the torque converter → Chapter.
–  Fitting the gearbox → Chapter.
–  Fill ATF, then check the level of ATF and top up → Chapter.
  E37-0052

General overview for the all adjustments to the planet gear > < Planet gears up to 06.00: assembly