seat Workshop Repair Guides

SEAT Workshop Service and Repair Manuals

Differential: Adjust > < Differential: Assembly survey
Differential: assembly and disassembly
Check the tool and equipment equivalence table according to the applicability between Seat / VW / Audi / Skoda → Chapter.
   
Special tools and workshop equipment required
t  Hot air blower -SAT 1416-, see equivalent → Anchor
t  Digital thermometer -SAT 4002-, see equivalent → Anchor
t  Kit (case) -T20022-, see equivalent → Anchor
t  Extractor kit -U 40100B-, see equivalent → Anchor
t  Kit (case) -U 40200A-, see equivalent → Anchor
t  Kit (case) -U 40300-, see equivalent → Anchor

   
Remove the outer track of the conical roller bearing
  Note
t  The procedure and tools needed to remove the secondary shaft rear bearings outer tracks, are identical in the gearbox casing and the clutch housing.
t  To remove outer track of clutch housing, first remove bushing for right hand side articulation flange seal → Chapter.
  E39-0016
Install the outer track of the conical roller bearing
  Note
The procedure and tools needed to install the secondary shaft rear bearings outer tracks, are identical in the gearbox casing and the clutch housing.
  E39-0017
Removing the roller bearing
  Note
The procedure and tools needed to remove the roller bearings are identical for both sides of the differential box.
–  Locate adapter -U 40300/13- on differential.
–  Place the bridge adaptor -U 40100/1- on adaptor -U 40300/13-, ensuring that the claws are inserted into the notches in the differential casing. Remove the bearing.
  Note
If the bearing cage breaks during the extraction then use the kit -T20022- to remove the inner ring of the bearing.
  E39-0173
Install the roller bearing
  Note
t  The procedure and tools needed to remove the roller bearings are identical for both sides of the differential box.
t  Before installing the bearing in the differential casing heat with electro-blower -SAT 1416- to 100 ºC. The temperature can be checked with digital thermometer -SAT 4002-.
–  Install the speedometer pinion on the planet carrier side.
–  Place adapter -U 40300/13- in a press.
–  Place differential assembly on the tool adapter -U 40300/13-.
–  Place the adapter -U 40300/11- with side B facing the bearing, on the differential assembly.
  E39-0019
Removing and fitting the elastic pin for the planet gear shaft
Removing
–  Cover conical roller bearing to avoid possible damage and the entry of shavings.
–  Expel pin with a chisel.
Installation
–  Fit to the differential casing as far as it will go.
  V39-1649
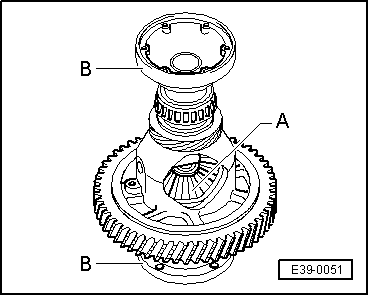
Fitting sun gear and planetary gears
–  Coat the thrust washers with gearbox oil and fit in the differential casing.
–  Fit the sun gears -A- and secure with flange shafts -B-.
–  Insert one planet gear and turn 180.
–  Fit the second satellite in the opposite position to the first.
–  In this position, turn the planetary gear towards the inside of the differential casing using flanged shafts, until they coincide with the holes on the planetary gear shaft.
–  Insert the satellite shaft until it moves the first satellite.
–  Fit the threaded units for securing articulation flanges, ensuring that they are properly seated.
–  Fit the satellite shaft into its final position and install a new elastic pin to secure it.
  E39-0051

Differential: Adjust > < Differential: Assembly survey