Leon Mk2
|
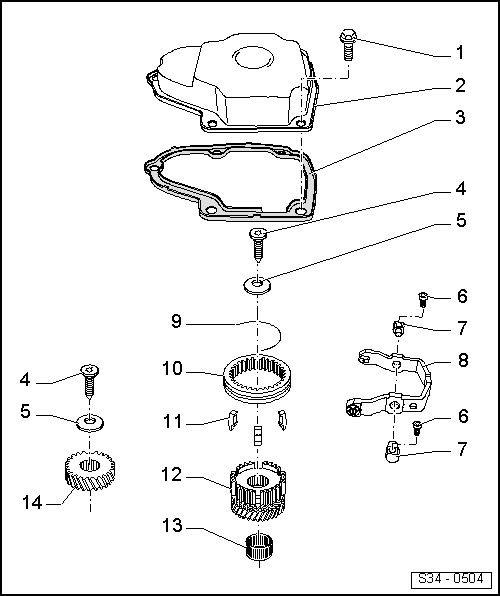
| 1 - | Hexagonal bolt |
| q | 18 Nm |
| q | To secure the cover on the gearbox casing |
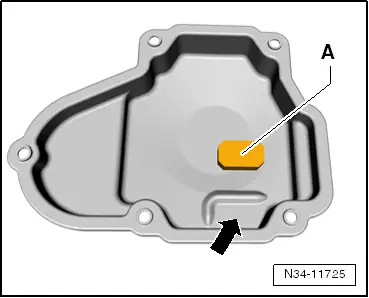
| 2 - | Gearbox housing cover |
 Note
Note| If the gearbox housing cover is installed with the gearbox in the vehicle, check and top up oil → Chapter. |
| q | From 11.10 with magnet → Fig. |
| 3 - | Seal |
| 4 - | Torx screw |
| q | 80 Nm + 90° turn |
| q | Holds plate spring in correct position with adjustment section of bolt head |
| q | Use thread tap to remove any remaining locking fluid from threaded holes for bolts securing synchronising hub and 5th gear wheel. Otherwise the bolts may shear. |
| q | Replace |
| 5 - | Dished washer |
| q | Installation position of plate springs → Anchor |
| 6 - | Bolt. |
| q | 25 Nm |
| q | For mounting bearing pin on transmission housing |
| 7 - | Bolts of the selector fork for 5th gear |
| q | 2 off |
| 8 - | 5th gear selector fork |
| q | Repairing → Chapter |
| q | Adjusting → Anchor |
| 9 - | Spring |
| 10 - | Mobile sleeve of 5th gear |
| q | Installation position → Anchor |
| q | Adjusting → Anchor |
| 11 - | Locking piece |
| q | 3 off |
| 12 - | Synchromesh assembly and pinion for 5th gear |
| q | With locking pieces |
| q | Installing → Anchor |
| q | Check for wear → Anchor |
| 13 - | Needle bearing |
| q | For 5th gear |
| 14 - | Sprocket of 5th gear |
| q | Installation position → Anchor |