SEAT Workshop Service and Repair Manuals
HOME
FEATURES
MENU
INDEX
ABOUT US
Removing and installing lower A-pillar trims >
< Required special tools, workshop equipment, test and measuring devices and auxiliary items
Leon Mk2
Body
Bodywork, Interior fitting work
Trim, noise insulation
Pillar trims
Removing and installing upper A-pillar trims
Removing and installing upper A-pillar trims
Removing and installing upper A-pillar trims
Note
Removal and installation are described for the left vehicle side. Follow same instructions for the right side as appropriate.
Removing
–
Remove roof grab handle if there is one
→ Chapter
.
–
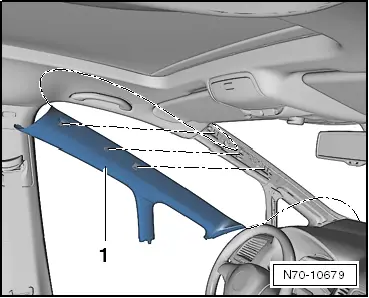
Pull trim
-1-
out of mountings in A-pillar in direction of interior, starting at top.
–
Pull trim out of mountings in area of dash panel.
–
Detach clip
-1-
with wedge -T10383/1-.
–
Fold the hider, upper section, A-pillar
-2-
inwards a little and pull out upwards.
–
Lift out hider, lower section, A-pillar,
-3-
upwards.
Body
Bodywork, Interior fitting work
Trim, noise insulation
Pillar trims
Removing and installing upper A-pillar trims
Removing and installing lower A-pillar trims >
< Required special tools, workshop equipment, test and measuring devices and auxiliary items

 Note
Note