Leon Mk2
|

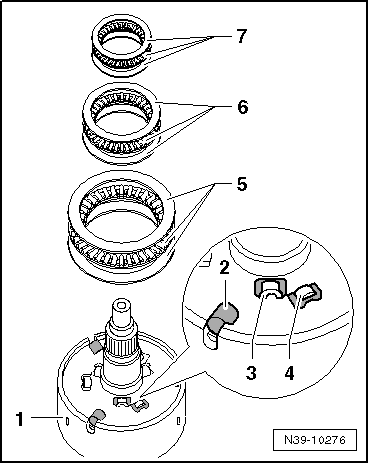
| 1 - | Multi-plate clutch |
| q | Overview → Fig. „„Assembly of multi-plate clutch““ |
| q | Removing and installing → Chapter>>>>>>>> |
| 2 - | Bolts |
| q | 6 Nm |
| 3 - | Haldex coupling pump -V181- |
| q | Removing and installing → Chapter>>>>>>>> |
| 4 - | O ring |
| q | Diameter 32 mm |
| q | For the pump for the Haldex clutch -V181- |
| q | Moisten with high performance oil for Haldex clutches and install |
| q | Always replace. |
| 5 - | O ring |
| q | Diameter 30 mm |
| q | For the pump for the Haldex clutch -V181- |
| q | Moisten with high performance oil for Haldex clutches and install |
| q | Always replace. |
| 6 - | End cover |
| q | 35 Nm |
| 7 - | O ring |
| q | For sealing cover |
| q | Moisten with high performance oil for Haldex clutches and install |
| q | Always replace. |
| 8 - | Oil filter bracket |
| 9 - | O ring |
| q | For oil filter bracket |
| q | Moisten with high performance oil for Haldex clutches and install |
| q | Always replace. |
| 10 - | O ring |
| q | For oil filter |
| q | Moisten with high performance oil for Haldex clutches and install |
| q | Always replace. |
| 11 - | Oil filter |
| q | For Haldex coupling |
| q | Removing and installing → Chapter>>>>>>>> |
| 12 - | Spring |
| 13 - | Housing for Haldex coupling |
| q | Removing and installing complete Haldex coupling → Chapter |
| q | Detaching from multi-plate clutch → Chapter |
| 14 - | Nut |
| q | 210 Nm |
| q | Apply locking fluid -D 000 600- when fitting |
| 15 - | Propshaft flange |
| q | Removing and installing → Chapter>>>>>>>> |
| 16 - | Oil seal for propshaft flange |
| q | Replace → Chapter |
| 17 - | Circlip |
| 18 - | Ball bearing |
| q | Removing and installing → Chapter>>>>>>>> |
| 19 - | All-wheel drive control unit -J492- |
| q | With valve that controls the opening of the clutch -N373- |
| q | With oil pressure and oil temperature sender -G437- |
| q | Removing and installing: Altea XL 2009 ►, Altea XL Freetrack 2008 ►, Altea XL Freetrack 2009 ► → Chapter |
| 20 - | Bolts |
| q | 6 Nm |
| 21 - | O ring |
| q | Moisten with high performance oil for Haldex clutches and install |
| q | Always replace. |