skoda Workshop Repair Guides

Skoda Workshop Service and Repair Manuals

Removing and installing the cylinder head > < Removing
Install
Install
l  The crankshaft - toothed belt sprocket is secured to the crankshaft with a screw and two washers.
l  The pistons must not be in TDC.
l  Lock the camshaft sprockets with camshaft lock -T10016- in the fit holes in the camshaft housing and secure them against turning → Fig..
  Note
When turning the camshaft the valves may touch the piston in TDC.
  WARNING
Wear protective gloves and goggles when working with gasket remover and degreasing agent!
–  Remove residual sealant on the cylinder head and on the camshaft housing using a chemical sealant remover.
–  Ensure that no dirt and sealant residues get into the cylinder head.
–  Degrease the sealing surfaces.
   
–  Apply a thin coating of sealant -D 188 003 A1- uniformly on the clean sealing surface of the camshaft housing (see grid surface in the illustration).
  Note
The sealant must not be applied too thickly, as otherwise excess sealant may penetrate into the oil bores and possibly cause engine damage.
  S15-0315
–  Make sure all roller rocker arms are correctly positioned on the valve stem ends -1- and on the relevant hydraulic balancing elements -2-.
–  Before installing the camshaft housing, screw two stud bolts (M6 x 70 mm) into the cylinder head.
  S15-0332
–  Carefully place the camshaft housing at right angles to the cylinder wall onto the cylinder head stud bolts -arrows- and dowel pins.
  S15-0323
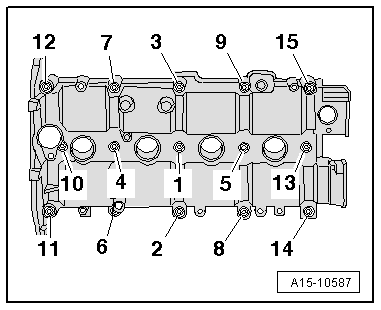
–  Tighten the new fixing screws of the camshaft housing diagonally and evenly from the inside to the outside. Tightening torque 10 Nm + torque a further 1/4 turn (90°).
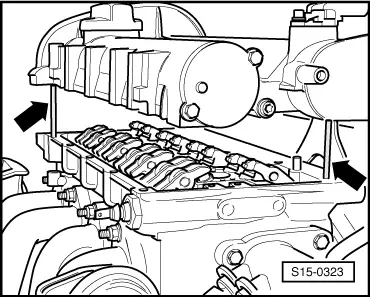
  WARNING
The camshaft housing must not tilt!
  Note
t  After installing the camshaft housing, allow the sealant to dry for about 30 minutes.
t  After installing new hydraulic balancing elements, the engine must not be started for about 30 minutes. The hydraulic balancing elements must „settle“ (otherwise the valves would strike the pistons).
The further assembly is carried out in reverse order to disassembly.
  A15-10587

Removing and installing the cylinder head > < Removing