|
Water Vapour Barrier, Replace
 Remove Remove
Front door inner panelling or rear door inner panelling –
see operation "Front Door Inner Panelling, Remove and Install" or
"Rear Door Inner Panelling, Remove and Install", completely remove
water vapour barrier.
 Install
|
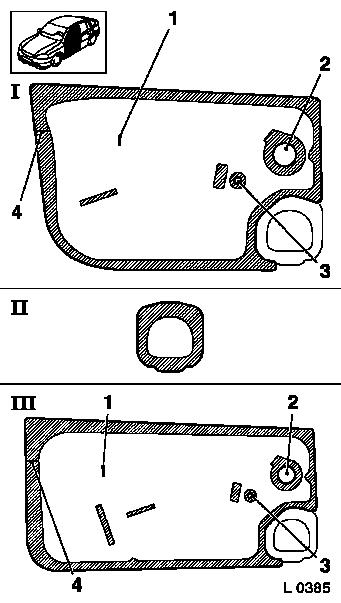
Front door: Cut water vapour barrier
to match the water vapour that has been removed and the contour of
the door. Cut-outs for door actuation (1 and 4) and cable insertion
(2). Cut-out for window crank (3) for vehicles with manual window
operation. Cut for vehicles without door loudspeaker foil (II).
|
I
|
shows front door, Models F35, F48, F69, F70
|
|
III
|
shows front door, Models F08, F07
|
Attach adhesive in accordance with hatching on door frame.
|
|
|
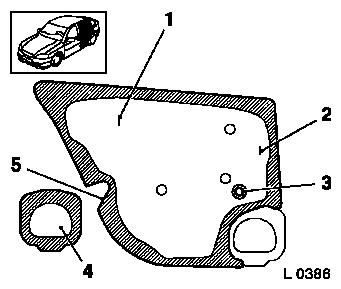
Rear door: Cut water vapour barrier to match the water vapour
that has been removed and the contour of the door. Cut-outs for
door actuation (1 and 5) and cable insertion (2). Cut-out for
window crank (3) for vehicles with manual window operation. Cut for
vehicles without door loudspeaker foil (4).
Attach adhesive in accordance with hatching on door frame.
Note: The protective
paper must be removed after applying the adhesive tape. Make
certain that the adhesive tape is free of bubbles and completely
sticks to the door frame.
Attach water vapour barrier. Ensure that the water vapour
barrier is not wrinkled when cemented. The water vapour barrier
must cover the entire cementing area. Pressing on with the doctor
blade is advisable.
|
|
Install
Front door inner panelling or rear door inner panelling.
Note: The Aftersales
department supplies the water vapour barrier (Part No. 90 510 299 /
Catalogue No. 22 37 971) as cut goods. Use adhesive tape (Part No.
90 241 170 / Catalogue No. 22 37 980) to cement the water vapour
barrier.
|
