|
Check engine pressure loss Y 17 DTL, Y 17 DT
| 1. |
Condition: engine warmed up (oil temperature at least
80°)
|
Important: On vehicles from model
year 04 with ESP - the steering angle sensor loses its basic
adjustment each time the battery is disconnected. It must be
recalibrated.
|
| 3. |
Disconnect battery
|
| 4. |
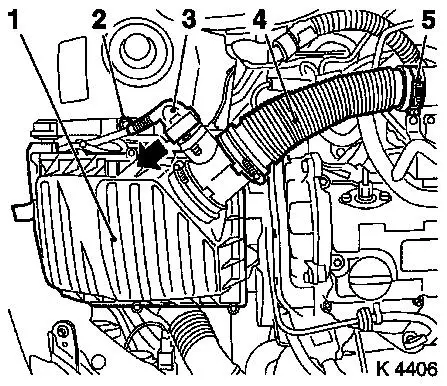
Remove air cleaner housing (1)
| • |
Remove wiring harness plug for hot film mass air flow meter
(3)
| – |
Release in direction of arrow
|
|
| • |
Remove air intake hose (4)
|
|
|
|
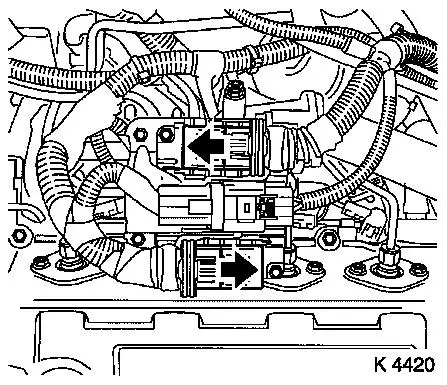
| 5. |
Remove 3 engine control unit wiring harness plugs
| • |
Release 2 wiring harness plugs in direction of arrow
|
|
|
|
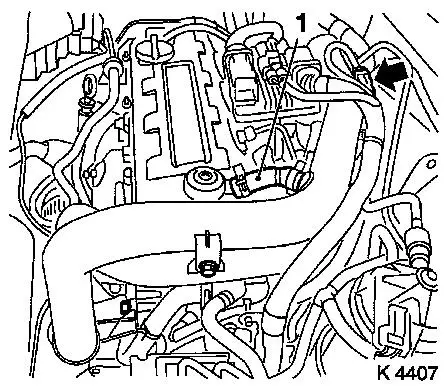
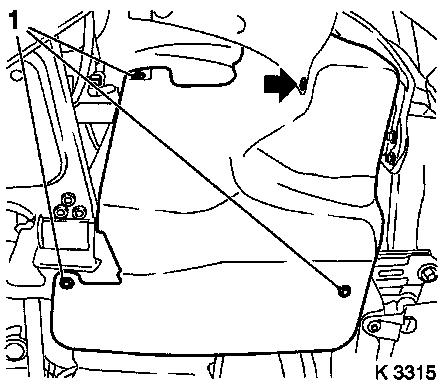
| 6. |
Remove air intake pipe
| • |
Remove vent hose (1)
| – |
From cylinder head cover
|
|
| • |
Detach air intake pipe from turbocharger
|
| • |
Detach combination plug (arrow)
|
| • |
Set air intake pipe to one side
|
|
|
|
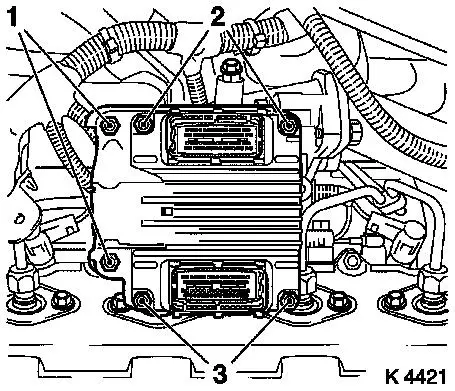
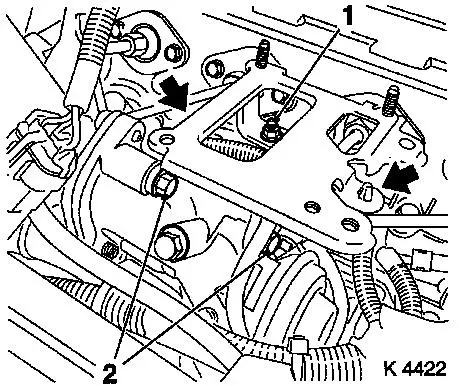
| 7. |
Remove engine control unit
| • |
Remove wiring harness plug bracket
|
| • |
Unscrew 2 bolts (2) and 2 nuts (3)
|
|
|
|
| 8. |
Remove engine control unit bracket
| • |
Unscrew 2 bolts (2) and nut (1)
|
| • |
Unclip wiring harness (arrows)
|
|
|
|
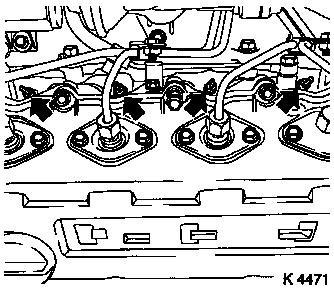
| 9. |
Remove 4 sheathed glow plug wiring harness connectors
| • |
from sheathed glow plugs
|
|
| 10. |
Remove 4 sheathed glow plugs (arrows)
|
|
|
| 12. |
Remove ribbed V-belt cover
|
|
|
| 13. |
Set no.1 cylinder to TDC
| • |
Set crankshaft to mark
| – |
Rotate crankshaft evenly until torsional vibration damper mark
is flush with pin on oil pump cover
|
|
|
| 14. |
Apply positioning marks (arrows)
| • |
To edge of crankshaft
Note: 180° offset
to no.1 cylinder ignition TDC mark (Zünd-OT-Zylinder-1)
|
|
| 16. |
Unscrew oil filler nozzle cover
|
Warning: Open coolant expansion
tank cover carefully and slowly. Risk of burning
|
| 17. |
Unscrew coolant expansion tank cover
|
| 18. |
Withdraw oil dipstick
|
| 19. |
Attach adapter and pressure loss tester to no.1 cylinder
|
| 20. |
Select gear and apply parking brake
Note: All wheels must
be in contact with ground
|
| 21. |
Check no.1 cylinder pressure loss
Note: Follow
manufacturer instructions
|
| 22. |
Check engine pressure loss
|
| 23. |
Switch transmission to neutral
|
| 24. |
Remove adapter from no.2 cylinder
|
| 25. |
Install 4 sheathed glow plugs
| • |
Use MKM-6104
| – |
Tightening torque 17.5 Nm
|
|
|
| 26. |
Attach 4 sheathed glow plug wiring harness connectors
|
| 27. |
Fit suction tube from air cleaner to turbocharger
| • |
Attach engine vent hose
|
|
| 29. |
Screw in coolant expansion tank cover
|
| 30. |
Screw in oil filler nozzle cap
|
| 31. |
Attach engine control unit bracket
| • |
Tighten 2 bolts and nut
|
|
| 32. |
Install engine control unit
| • |
Install engine control unit
| – |
Tighten 2 bolts, 2 nuts
|
| – |
Tightening torque 5.9 Nm
|
|
| • |
Install wiring harness plug bracket
|
|
| 33. |
Attach 3 engine control unit wiring harness connectors
|
| 34. |
Install air cleaner housing
| • |
Fasten air intake hose.
|
| • |
Connect wiring harness plug to hot film mass air flow meter
|
|
| 36. |
Install ribbed V-belt cover
|
| 39. |
Calibrate steering angle sensor
| • |
Switch on ignition
Note: Rotate the
steering wheel one time from its right-hand to its left-hand
stop.
|
|
| 40. |
Program volatile memories
|
|
