|
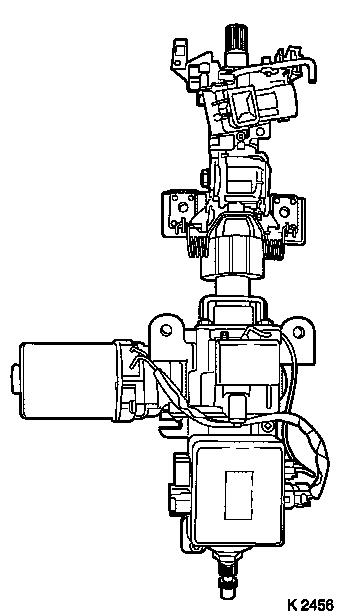
EPS Steering Column, Remove and Install
Important: The EPS
steering column must not be disassembled. This is only available as
a complete unit from the Aftersales department.
 Remove Remove
| 1. |
Disconnect ground lead from battery. Wait 1 minute until the
capacitor has discharged.
|
| 2. |
Remove airbag unit (driver's side) 
Note: For Tigra-B
(model R97)
|
| 3. |
Set steering to straight-ahead position and lock with steering
lock.
|
| 5. |
Vehicles with EPS steering column, adjustable Remove handle of
EPS steering column angular adjustment lever.
Note: Figure shows
adjustable EPS steering column!
|
|
|
| 6. |
Remove steering column panelling
Note: For Tigra-B
(model R97)
|
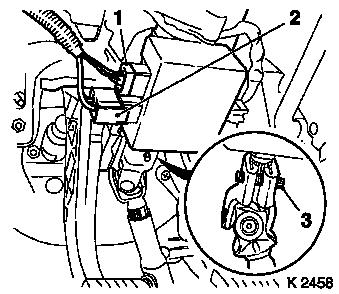
| 7. |
Disconnect wiring harness plug for airbag contact unit (1)
|
| 8. |
Detach airbag contact unit
Note: For Tigra-B
(model R97)
|
| 9. |
Detach indicator light switch (2) and windscreen wiper switch
(3) from bracket
Note: For Tigra-B
(model R97)
|
| 10. |
Disconnect wiring harness plug from steering and ignition lock
contact component (4) and wiring harness plug from immobiliser
control unit (5)
|
| 11. |
Remove storage compartment panel, driver's side .
Note: For Tigra-B
(model R97)
|
|

|
| 12. |
Remove inner panelling for lower driver's side instrument panel
padding
|
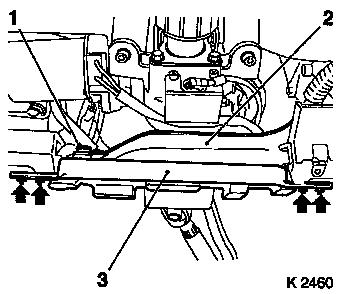
| 13. |
Air duct, front footwell, driver's side (3)
|
| 14. |
Remove crossmember (1), instrument panel, driver's side
footwell
| • |
Unscrew and remove 4 fastening bolts
|
|
| 15. |
Cut out instrument panel padding web (2) at footwell, driver's
side, at markings (arrows).
Note: Illustrations
show left hand drive vehicle! Proceed by analogy for vehicles with
right hand drive!
|
|

|
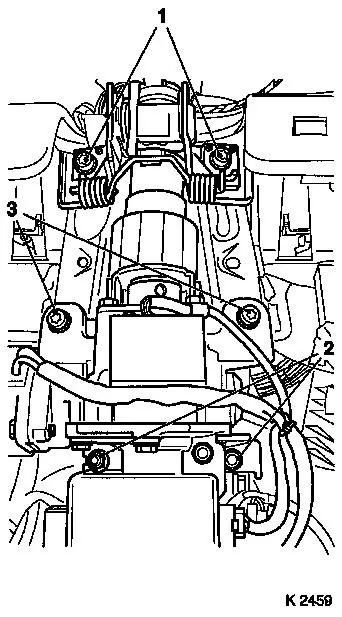
| 16. |
Disconnect wiring harness plugs (1) and (2) from EPS control
unit
|
| 17. |
Remove upper clamp bolt (3) of the steering intermediate
shaft
| • |
Push steering intermediate shaft together and remove from
steering shaft.
Note: Unlock steering
lock for better access to clamp bolt
|
|
|
|
Important: Vehicles with EPS
steering column, adjustable! Ensure that the tilt adjustment of the
EPS steering column is locked!
|
| 18. |
Unscrew and remove bolts (1).
Note: Illustration
shows vehicle with left hand drive, EPS-steering column,
adjustable.
|
| 19. |
Unscrew and remove nuts (2), EPS steering column.
|
| 20. |
Unscrew and remove bolts (3) EPS steering column
|
Important: Do not exert bending,
shear or transverse force on the EPS steering column!
|
| 21. |
Carefully remove EPS steering column
|
|
|
 Install
| 22. |
Transfer attaching parts when replacing EPS steering column
| • |
Transfer EPS control unit
|
| • |
Transfer immobiliser control unit
Note: For Tigra-B
(model R97)
|
| • |
Transfer lock cylinder, steering and ignition lock
Note: For Tigra-B
(model R97)
|
| • |
Transfer contact component, steering and ignition lock
Note: For Tigra-B
(model R97)
|
|
Important: Vehicles with EPS
steering column, adjustable: the tilt adjustment of a new EPS
steering column is pre-adjusted! Do not release the lock on the
removed EPS steering column!
|
| 23. |
Insert EPS steering column
| • |
Screw in bolts (3)
Note: Do not tighten
bolts (3) yet!
|
|
| 24. |
Screw in nuts (2)
Note: Do not tighten
nuts (2) yet!
|
| 25. |
Screw bolts (1) into shear plate
Note: Do not tighten
bolts (1) yet
Note: Illustration
shows vehicle with left hand drive, EPS-steering column,
adjustable.
|
| 26. |
Tighten nuts (2), tightening torque 22
Nm . Tightening torque 22 Nm.
|
| 27. |
Tighten bolts (3) 22 Nm
|
| 28. |
Vehicles with EPS steering column, adjustable: unlock tilt
adjustment!
|
| 30. |
Vehicles with EPS steering column, adjustable – lock
angular adjustment.
|
|
|
| 31. |
Connect both wiring harness plugs with EPS control unit
|
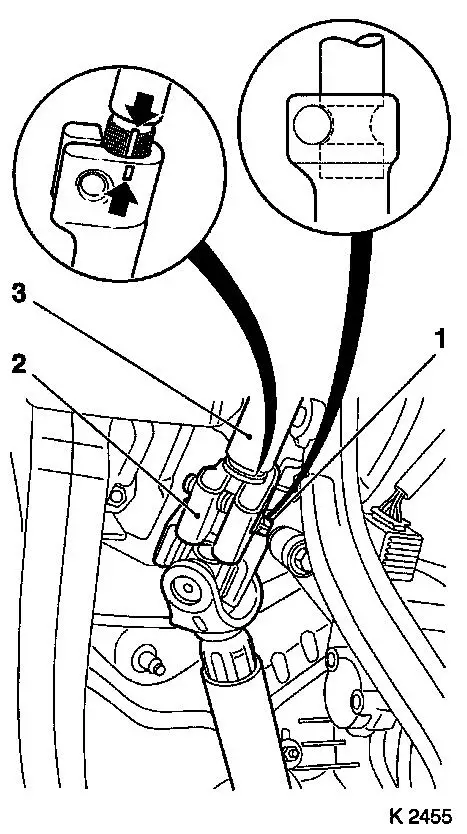
| 32. |
Clean thread for upper clamp bolt (1) in steering intermediate
shaft and clean clamp bolt (1).
|
| 33. |
Push upper universal joint of steering intermediate shaft (2)
on to steering spindle (3) -
Note: Toothing of
steering shaft and steering intermediate shaft only align in one
position! Comply with marking (arrows)!
|
| 34. |
Insert upper clamp bolt (1) of steering intermediate shaft on
steering shaft with locking compound
| • |
Tighten upper clamp bolt (1) 24 Nm +
60°
Note: Ensure that bore
in steering intermediate shaft aligns with groove in steering
shaft!
|
|
|
|
| 35. |
Install footwell instrument panel crossmember (3) at driver's
side – 4 fastening nuts (arrows).
|
| 36. |
Install air duct, front footwell, driver's side (2)
| • |
Clip in body-bound rivet (1)
Note: Illustration
shows left hand drive vehicle. Proceed by analogy for vehicles with
right hand drive!
|
|
|
|
| 37. |
Install inner panelling for lower driver's side instrument
panel padding
|
| 38. |
Install storage compartment panel, driver's side
Note: For Tigra-B
(model R97)
|
| 39. |
Connect wiring harness plug for immobiliser control unit and
steering and ignition lock contact component
|
| 40. |
Install indicator light and windscreen wiper switch to bracket,
indicator light and windscreen wiper switch
Note: For Tigra-B
(model R97)
|
| 41. |
Check the straight-ahead position of the front wheels
visually.
| • |
Lock steering shaft with steering lock.
|
|
| 42. |
Bring airbag contact unit to central position and install
Note: For Tigra-B
(model R97)
|
| 43. |
Install steering column panelling
Note: For Tigra-B
(model R97)
|
| 44. |
Vehicles with adjustable EPS steering column: attach tilt
adjustment handle, EPS steering column
|
| 45. |
Install steering wheel
|
| 46. |
Install airbag unit (driver's side)
Note: For Tigra-B
(model R97)
|
| 47. |
Connect ground cable to battery.
|
| 48. |
Check straight-ahead position and adjust if necessary
|
| 49. |
Check function of horn, screen wiper switch and signal
switch.
|
| 50. |
Check function of steering and ignition lock.
|
| 51. |
Check function of airbag telltale
|
| 52. |
Check function of EPS steering column.
|
| 53. |
Program volatile memories
|
|
