volkswagen Workshop Repair Guides

Volkswagen Workshop Service and Repair Manuals

Checking oil pressure and oil pressure switch > < Renewing valve stem seals (with cylinder head fitted)
4 Cylinder Fuel injection Engine Mechanics (1.6L & 1.4L)
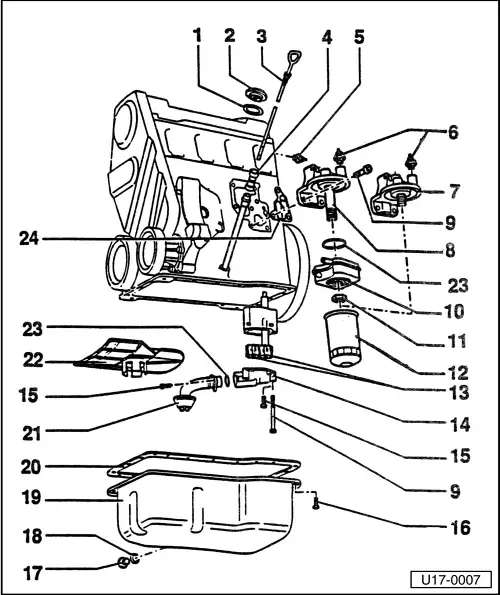
Removing and installing parts of lubrication system

Notes:

  • ◆ If when repairing an engine, metal shavings or a large quantity of small metal particles caused, for example, by partial seizure of crankshaft and conrod bearings, are found in the engine oil, to prevent consequential damage, thoroughly clean oil passages.
  • ◆ The oil level must not be above the max. mark - danger of damage to catalyst! Marking => Fig. 3
  • ◆ Checking oil pressure .

Oil system capacity:

    without oil filter 3,5 ltr.

    with oil filter 4.0 ltr.

Engine oil specifications:

Use engine oil to VW standard 501 00 or 502 00. The 502 00 is a higher performance oil with better lubricity at high temperatures.

 
U17-0007
  • Seal
    • ◆ Renew if damaged.
  • Cap
  • Dipstick
    • ◆ The oil level must not be above the max. mark!
    • ◆ Area above shaded zone up to max.
      mark: Do not top up with engine oil!
    • ◆ Oil level in shaded zone: Engine oil can be topped up.
    • ◆ Marking =>Fig. 3
  • Guide
    • ◆ Pull off to draw out oil.
  • Oil pressure switch (F22)
    • ◆ Blue is 0.25 bar.
    • ◆ Brown is 0.30 bar.
    • ◆ Tightening torque is 25 Nm.
    • ◆ Checking => Page 17-8.
    • ◆ If sealing ring is leaking nip open and replace.
 
U17-0007
  • Oil pressure switch (F1)
    • ◆ White is 1.8 bar.
    • ◆ Tightening torque is 25 Nm.
    • ◆ Checking => Page 17-9.
    • ◆ If sealing ring is leaking nip open and replace.
  • Oil filter bracket
    • ◆ For engine code: AGY (1.4 L).
  • Oil filter bracket
    • ◆ For engine code: AFX (1.6 L).
  • 20 Nm.
  • Oil cooler
    • ◆ For engine code: AFX (1.6 L).
    • ◆ Coat contact area to flange, outside the seal, with AMV 188 100 02.
    • ◆ Ensure clearance to adjacent components.
    • ◆ See note => Page 17-1.
  • 25 Nm
  • Oil filter
    • ◆ Loosen with strap wrench.
    • ◆ Tighten by hand.
    • ◆ Observe installation instructions on oil filter.
 
U17-0007
  • Gears
    • ◆ Checking backlash => Fig. 1
    • ◆ Checking axial clearance => Fig. 2
  • Oil pump cover pressure relief valve
    • ◆ Opening pressure: 5.7...6.7 bar.
  • 10 Nm
  • 20 Nm
    • ◆ Only loosen and tighten the bolts flywheel end with jointed wrench 3185
  • Oil drain plug
    • ◆ Tightening torque is 30 Nm.
  • Seal
    • ◆ Renew.
  • Sump
    • ◆ Clean sealing surface before installing.
 
U17-0007
  • Gasket
    • ◆ Renew.
    • ◆ Before fitting gasket coat sump/cylinder block with "D2".
  • Suction pipe
    • ◆ Clean strainer if soiled.
  • Baffle plate
    • ◆ To remove, remove oil pump cover or suction pipe.
  • O-ring
    • ◆ Renew if damaged.
  • Gasket
    • ◆ Renew.
 
V17-0005

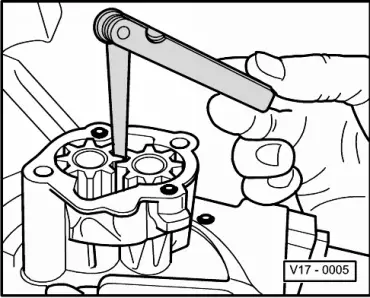
→ Fig.1    Checking oil pump backlash

  • New: 0.05 mm.
  • Wear limit: 0.20 mm.
 
V17-0006

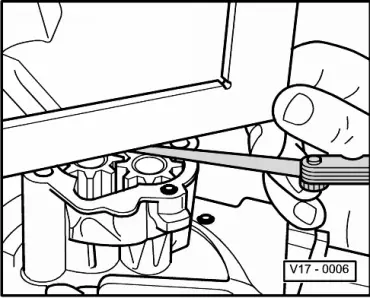
→ Fig.2    Checking oil pump axial clearance

  • Wear limit: 0.20 mm.
 
N17-0037

→ Fig.3    Marking on oil dipstick

  •     1 -    Maximum mark.
  •     2 -    Minimum mark.
  •     a -    Area above hatched field up to max. mark:
    Do not top up with engine oil.
  •     b -    Oil level within hatched field:
    Can be topped up with engine oil.
  •     c -    Area from min. mark up to hatched field:
    Fill with max. 0.5 ltr. of engine oil.

Checking oil pressure and oil pressure switch > < Renewing valve stem seals (with cylinder head fitted)