Golf Mk2
| Repairing rear brake caliper |
 Note
Note| t | Apply thin coat of brake cylinder paste to brake cylinder, piston and seals. |
| t | When carrying out repairs install all parts supplied in repair kit. |
| t | New brake calipers are filled with brake fluid and are pre-bled. |
| t | When carrying out repairs it is essential to appropriately pre-bleed the brake calipers (without brake pads) before installing in the vehicle → Fig.. |

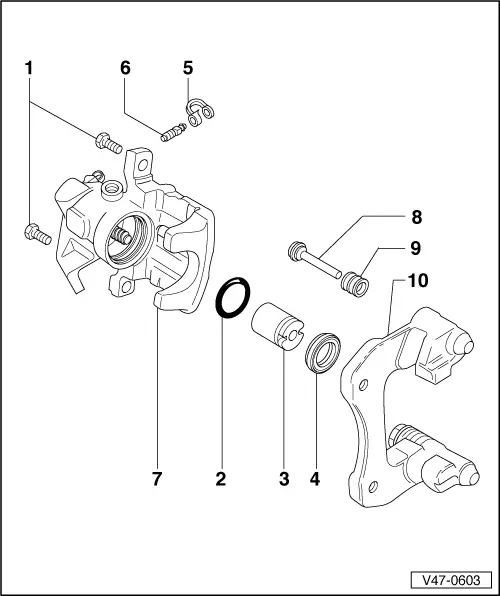
| 1 - | Self-locking bolts, 35 Nm |
| q | Renew. |
| q | When loosening and tightening, counter hold on guide pin. |
| 2 - | Oil seal |
| q | Remove with a plastic wedge → Fig.. |
| 3 - | Piston with automatic adjustment |
| q | Remove from brake caliper housing: |
| q | Vehicles up to 07.87 → Fig.. |
| q | Vehicles as of 08.87 → Fig.. |
| q | Installing into brake caliper housing → Fig.. |
| 4 - | Protective cap |
| q | Position with outer sealing lip onto piston → Fig.. |
| q | Insert with inner sealing lip into groove in brake caliper housing → Fig.. |
| q | Do not damage sealing lips when positioning or inserting. |
| 5 - | Dust cap |
| 6 - | Bleed valve |
| q | Apply thin coat of brake cylinder paste to threads before screwing in. |
| 7 - | Brake caliper housing with lever for handbrake cable |
| q | If a leak exists at the handbrake cable lever, renew brake caliper housing. |
| q | After repairing, pre-bleed brake caliper housing → Fig. |
| 8 - | Guide pin |
| q | Lubricate before installing protective cap |
| 9 - | Protective cap |
| q | Insert onto brake carrier and guide pin |
| 10 - | Brake carrier with guide pin and protective cap |
| q | Supplied as replacement part, assembled with sufficient grease on guide pins. |
| q | If protective caps or guide pins are damaged, install repair kit. Use grease sachet supplied to lubricate guide pins. |
|

|
|

|
 Note
Note
|

|
|

|
 Note
Note
|

|
 Note
Note
|

|

