Running gearRepairing drive shaft

Note
| t
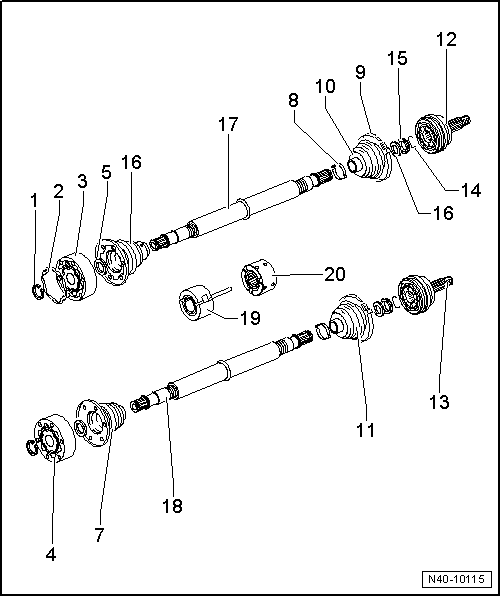
| Grease filling high-temperature grease -G 052 133 A2-: Outer CV joint: 90 g, inner CV joint: 120 g |
| t
| Greasing outer joint: press half of the grease into the joint and the other half evenly into the bellows. |
| t
| Greasing inner joint: Press half of the grease into the joint from both sides, the other half evenly into the bellows. |
| t
| Regrease joint if required when renewing boot. |
|
q
| Expand and compress with circlip pliers -VW 161 A-. |
|
q
| Renewing. Pull off protective foil and stick into joint. |
|
q
| Only on 100 mm Ø constant velocity joints. |
| 3 - | Inner constant velocity joint Ø 100 mm |
|
q
| For vehicles with output of 66 kW and above. |
|
q
| Different material for 16V vehicles. |
|
q
| As of 08.89 also for vehicles over 62 kW. |
| 4 - | Inner constant velocity joint Ø 94 mm |
|
q
| For vehicles with output up to 65 kW. |
|
q
| Installation position: larger Ø (concave side) contacts constant velocity joint. |
| 6 - | CV joint boot for 100 mm Ø CV joint |
|
q
| Check for splits and chafing. |
|
q
| Installation position for left shaft → Fig. |
|
q
| Installation position for right shaft → Fig.. |
|
q
| Coat cap sealing surface with sealant -D 454 300 A2-. |
| 7 - | CV joint boot for 94 mm Ø CV joint |
|
q
| Check for splits and chafing. |
|
q
| Renew, separate closed metal rings with metal saw. |
|
q
| Modified as of 01.90 → Fig.. |
| 10 - | CV joint boot for 90 mm Ø CV joint |
|
q
| Check for splits and chafing. |
|
q
| Allow air to enter joint protective boot briefly to balance pressure before tightening small clamp in place → Fig.. |
| 11 - | CV joint boot for 81 mm Ø CV joint |
|
q
| Check for splits and chafing. |
|
q
| Allow air to enter joint protective boot briefly to balance pressure before tightening small clamp in place → Fig.. |
|
q
| Modified as of 01.90 → Fig.. |
| 12 - | Outer constant velocity joint Ø 90 mm |
|
q
| For vehicles with output of 66 kW and above. |
|
q
| Different material for 16V vehicles. |
|
q
| Modification: As of 08.87 contact shoulder for wheel bearing modified → Fig.. |
|
q
| Installing: drive onto shaft with plastic hammer until compressed circlip seats |
| 13 - | Outer constant velocity joint Ø 81 mm |
|
q
| For vehicles with output up to 65 kW. |
|
q
| Modification: As of 08.87 contact shoulder for wheel bearing modified → Fig.. |
|
q
| Installing: drive onto shaft with plastic hammer until compressed circlip seats |
|
q
| Insert in groove in shaft. |
|
q
| Outer Ø (concave side) contacts thrust washer. |
| 17 - | Drive shaft for vehicles with output of 66 kW and above |
|
q
| Constant velocity joint splines 4 mm longer than shafts for lower-output engines, measured from dished spring support to retaining ring groove. |
|
q
| As of 08.89 also installed in vehicles over 62 kW. |
| 18 - | Drive shaft for vehicles with output up to 65 kW |
|
q
| As of 08.89 also installed in vehicles up to 59 kW. |
| 19 - | Damper weight (two-piece) |
|
q
| Installed on right shaft in vehicles with 51 kW engines and vehicles with diesel engine. |
|
q
| Removing and installing → Fig. |
|
q
| Installation position → Fig.. |
| 20 - | Damper weight (one-piece) |
|
q
| Installed as of 04.88 (standard). |
|
q
| Use damper weight → Item as spare part. |
|
q
| Installation position → Fig.. |
| Removing and installing right drive shaft damper weight |
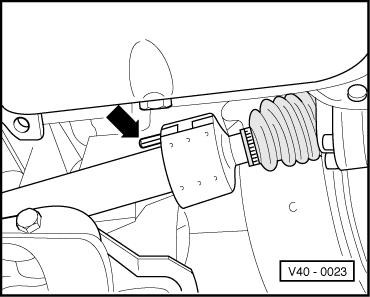
| The damper consists of two halves. Both halves are joined to one another by spring pins -arrow-. |
Note | t
| Before driving in spring pin, protect shaft paint finish against damage. |
| t
| Adhesive tape is applied on inner diameter to prevent axial movement. Before re-installing damper weight, check adhesive effect of adhesive tape. If necessary, renew adhesive tape or apply another adhesive. |
|
|
|
| Installation position of damper weight |
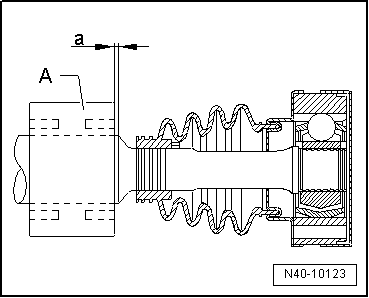
| (In drive shafts with CV joint boot without vent bore) |
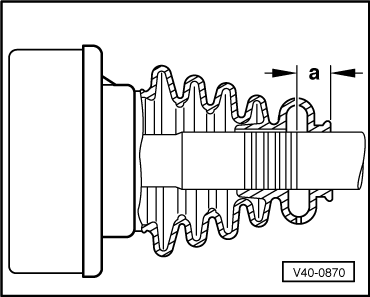
| When installing damper weight -A-, prescribed installation position must be ensured. Adherence to dimension a = 4 mm, measured from conical part of shaft to damper weight, is necessary to do this. |
|
|
|
| Installation position of damper weight |
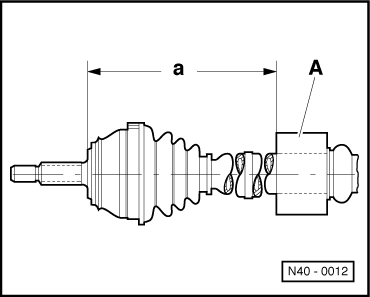
| (In drive shafts with ventilated CV joint boot) |
| When installing damper weight -A-, prescribed installation position must be ensured. Dimension a = 478 mm must be adhered to. |
Note | If damper weight is damaged, replace with two-piece damper weight. |
|
|
|
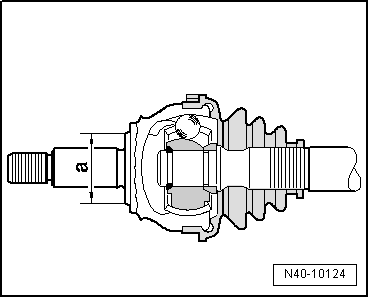
| CV joint with modified contact shoulder |
|
|
|
| As of 08.87 | Dimension a = Ø 53 mm |
| Up to 08.87 | Dimension a = Ø 50 mm |
| Previous drive shaft/outer CV joint version (small contact shoulder) must not be installed in vehicles as of model year 1988, as the CV joint-wheel bearing contact area is then too small. |
| Previous drive shaft/outer CV joint version will be discontinued when consumed. |
|
|
|
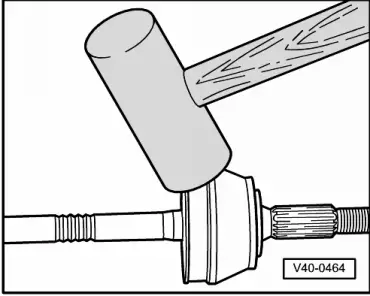
| Drive joint off drive shaft with a firm blow from an aluminium hammer. |
|
|
|
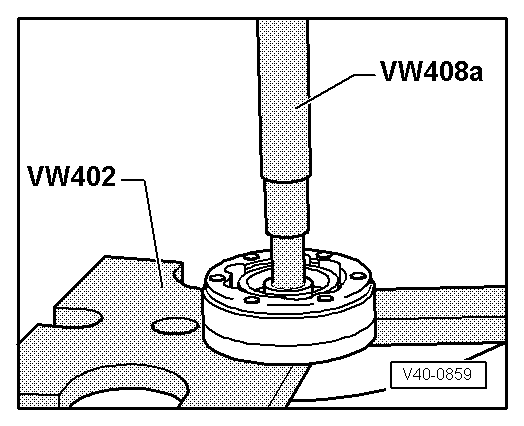
| Support ball hub when performing this step. |
|
|
|
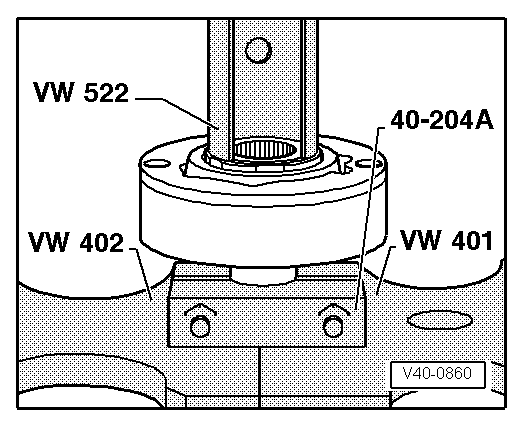
| Press on joint to stop. Insert retaining ring. |
Note | Chamfer on the inner circumference of ball hub (splines) must face the contact shoulder of the drive shaft. |
|
|
|
| Installing CV joint boot on left drive shaft |
| –
| Vehicles with output of 66 kW and more: Before installing CV joint boot on drive shaft, mark dimension a = 17 mm with e.g. paint or adhesive tape. Under no circumstances should paint finish be damaged with a sharp tool. |
|
|
|
| Installing CV joint boot on right drive shaft |
| –
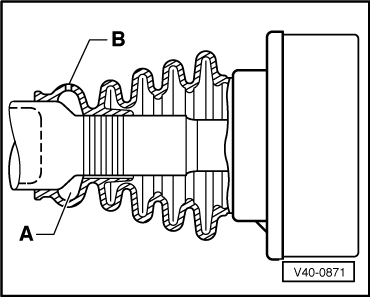
| Vehicles with output of 66 kW and above. The large diameter of vent chamber -A- must fit on the larger diameter. |
|
|
|
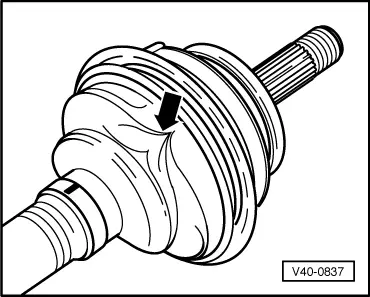
| The boot is frequently pressed in when installed on the joint body. This creates a partial vacuum inside the boot which draws in a fold -arrow- when the car is driven. Therefore, after fitting boot, lift boot at small diameter end to equalise pressure. |
|
|
|
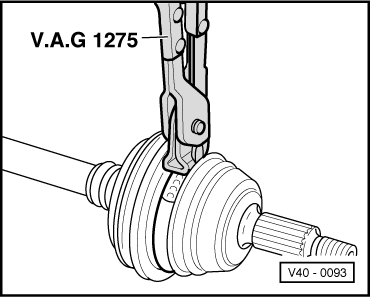
| Tension hose clip or clamp with hose clip pliers -V.A.G 1275-. |
|
|
|
| Modified CV joint boot and hose clip |
| –
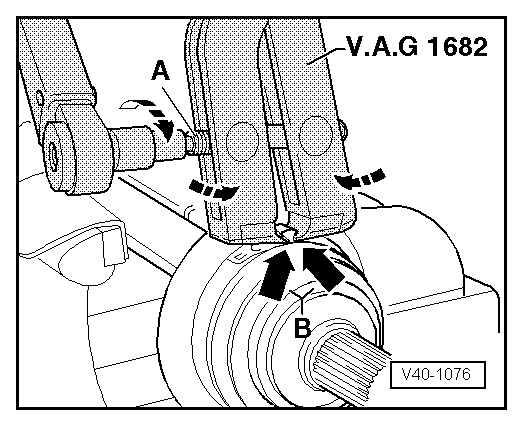
| Apply clamp tensioner -V.A.G 1682- as shown in figure. Ensure jaws of tensioner contact corners -arrows B- of hose clamp. |
| –
| Tighten hose clip by turning spindle -A- with torque wrench (take care to keep clamp tensioner straight). |
Note | t
| Hose clip can only be tensioned with clamp tensioner -V.A.G 1682-. |
| t
| Tightening torque: 25 Nm. |
| t
| Use torque wrench with setting range of 5…50 Nm (e.g. -V.A.G 1331-). |
| t
| Ensure that thread of tensioner spindle moves freely. If necessary lubricate with MoS2 grease. |
| t
| If the thread is stiff (e.g. due to dirt), the required clamping force will not be attained at the hose clip with the specified tightening torque. |
| t
| Tensioning hose clip at small diameter of boot is carried out in the same way. |
|
|
|
|
|
|
|
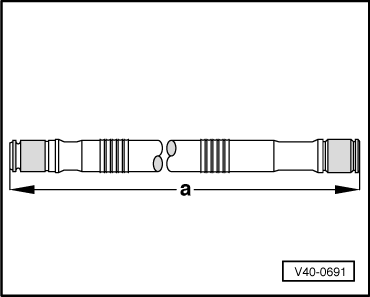
| Gearbox version | Length dimension -a- (mm) | Remarks |
| | Left | Right | |
| Manual gearbox 020 → Note and 02A | 443 | 677.2 | Left full shaft
right tubular shaft |
| Manual gearbox 084 and 085 | 465 | 677.2 | Left full shaft
right tubular shaft |
| Automatic gearbox | 443 | 677.2 | Left full shaft
right tubular shaft |
| Golf syncro manual gearbox 009 and 02C front axle, rear axle | 443
543.6 | 513.5
404.5 | Left/right full shaft
left/right full shaft |
| 1)
| Drive shafts for GTI/GLI vehicles have 4 mm longer splines from contact shoulder for dished spring to groove for circlip. |
|
|
|
01 Steering & suspension