
Golf Mk4
| Removing and installing rear lid lock |
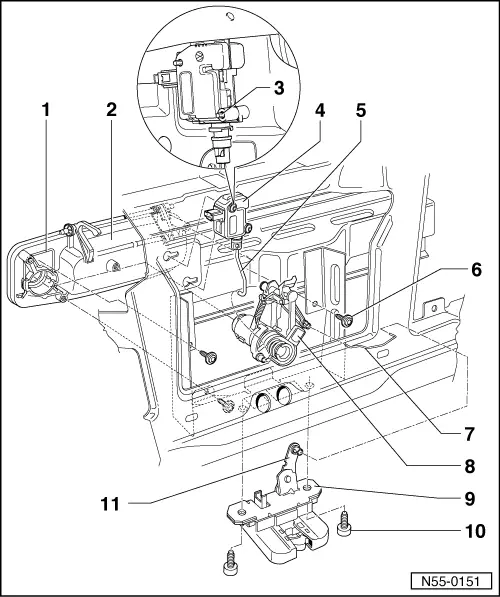
| 1 - | Retaining clip |
| 2 - | Handle |
| q | Removing: |
| – | Unclip rear lid trim (handle is secured by means of cross-head screw). |
| – | Unclip pull rod → Item, lever out retaining clip → Item and take lock cylinder housing out of handle. |
| – | Separate connector for luggage compartment light and, if necessary, unclip actuator rod for central locking. |
| – | Unscrew Torx screws → Item and take handle out of rear lid. |
| 3 - | Securing bolt for positioning motor |
| q | Loosen and tighten using socket driver -T10010- |
| 4 - | Central locking positioning motor |
| q | Removing: |
| – | Separate connector from positioning motor. |
| – | Unscrew positioning motor using socket driver -T10010- and release from rear lid. |
| 5 - | Pull rod |
| 6 - | Torx screw |
| 7 - | Actuator rod |
| q | Press relay lever → Item against stop and insert actuator rod stress-free |
| 8 - | Lock cylinder housing |
| q | Removing: |
| – | Unclip rear lid trim (handle is secured by means of cross-head screw). |
| – | Unclip pull rod → Item, lever out retaining clip → Item and take lock cylinder housing out of handle. |
| 9 - | Lock |
| q | Removing |
| – | Remove rear lid trim → General body repairs, interior; Rep. Gr.70. |
| – | Separate connector from lock. |
| – | Unclip actuator rod → Item, remove bolt → Item and take lock out of rear lid. |
| q | Installing - only with engaged rotary latch |
| 10 - | Oval-head countersunk bolt |
| q | 20 Nm |
| 11 - | Relay lever |