
Golf Mk4
| Assembly overview for central locking and convenience system |
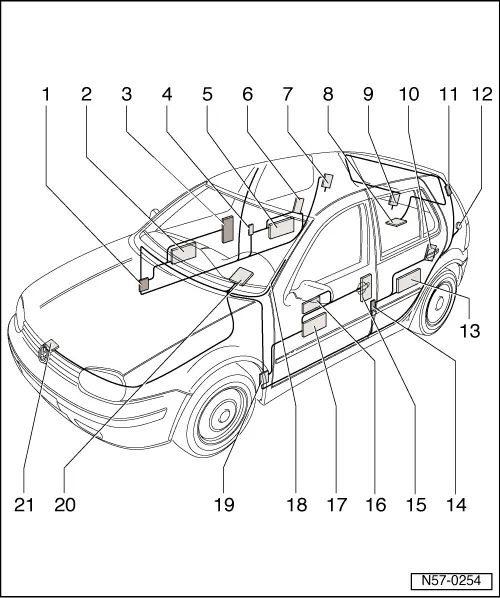
| 1 - | Coupling station |
| q | Installation position: Lower A-pillar, covered by trim in footwell |
| – | Remove A-pillar lower trim → General body repairs, interior; Rep. Gr.70. |
| 2 - | Front right door control unit |
| q | For convenience system only |
| q | Integrated into window regulator motor |
| q | Removing: |
| – | Removing door trim → General body repairs, interior; Rep. Gr.70. |
| – | Removing front assembly carrier → Chapter. |
| – | Unbolt window regulator motor → Chapter. |
| 3 - | Front right door lock |
| q | Door lock is secured to assembly carrier |
| q | The electric central locking is integrated in the door lock module |
| q | Removing: |
| – | Removing door trim → General body repairs, interior; Rep. Gr.70. |
| – | Removing front assembly carrier → Chapter. |
| – | Removing door lock → Chapter. |
| 4 - | Coupling station |
| q | Installation position: B-pillar |
| – | Removing B-pillar lower trim → General body repairs, interior; Rep. Gr.70. |
| 5 - | Rear right door control unit |
| q | For convenience system only |
| q | Integrated into window regulator motor |
| q | Removing: |
| – | Removing door trim → General body repairs, interior; Rep. Gr.70 |
| – | Unbolt window regulator motor → Chapter. |
| 6 - | Rear right door lock |
| q | Door lock is secured to assembly carrier |
| q | The electric central locking is integrated in the door lock module |
| q | Removing: |
| – | Removing door trim → General body repairs, interior; Rep. Gr.70 |
| – | Removing door lock → Chapter |
| 7 - | Motor for tank flap lock -V155- |
| q | Installation position: Under C-pillar trim |
| q | To remove, the luggage compartment trim must first be detached up to the wheel housing → General body repairs, interior; Rep. Gr.70. |
| q | Can be unscrewed using socket driver -T10010-socket driver -T10010- |
| 8 - | Rear lid lock |
| q | Bolted to rear lid |
| q | Removing: |
| – | Remove rear lid trim → General body repairs, interior; Rep. Gr.70. |
| – | Unscrew rear lid lock. |
| 9 - | Rear lid positioning motor |
| q | Bolted to rear lid |
| q | Can be unscrewed using socket driver -T10010- |
| 10 - | Rear left door lock |
| q | Door lock is secured to assembly carrier |
| q | The electric central locking is integrated in the door lock module |
| q | Removing: |
| – | Removing door trim → General body repairs, interior; Rep. Gr.70. |
| – | Removing door lock → Chapter. |
| 11 - | Coupling station |
| q | Installation position: In area of roof cross member, covered by roof trim |
| – | Removing roof trim → General body repairs, interior; Rep. Gr.70. |
| 12 - | Anti-theft alarm horn |
| q | Installation position: In area of C-pillar covered by C-pillar trim |
| 13 - | Rear left door control unit |
| q | For convenience system only |
| q | Integrated into window regulator motor |
| q | Removing: |
| – | Removing door trim → General body repairs, interior; Rep. Gr.70. |
| – | Removing rear assembly carrier → Chapter. |
| – | Unbolt window regulator motor → Chapter. |
| 14 - | Coupling station |
| q | Installation position: B-pillar |
| – | Removing B-pillar lower trim → General body repairs, interior; Rep. Gr.70. |
| 15 - | Front left door lock |
| q | Door lock is secured to assembly carrier |
| q | The electric central locking is integrated in the door lock module |
| q | Removing: |
| – | Removing door trim → General body repairs, interior; Rep. Gr.70. |
| – | Removing front assembly carrier → Chapter. |
| – | Removing door lock → Chapter. |
| 16 - | Controls |
| q | Installed in door trim |
| q | Removing: |
| – | Removing door trim → General body repairs, interior; Rep. Gr.70. |
| 17 - | Front left door control unit |
| q | For convenience system only |
| q | Integrated into window regulator motor |
| q | Removing: |
| – | Removing door trim → General body repairs, interior; Rep. Gr.70. |
| – | Removing front assembly carrier → Chapter. |
| – | Unbolt window regulator motor → Chapter. |
| 18 - | Aerial for radio remote control |
| q | Under left A-pillar trim |
| q | Removing: |
| – | Removing A-pillar trim → General body repairs, interior; Rep. Gr.70. |
| 19 - | Coupling station |
| q | Installation position: Lower A-pillar, covered by trim in footwell |
| – | Removing A-pillar bottom left trim → General body repairs, interior; Rep. Gr.70 |
| 20 - | Central module |
| q | Bolted to bracket on steering column under dash panel |
| q | To remove, remove lower steering column trim first → General body repairs, interior; Rep. Gr.68 |
| 21 - | Bonnet lock |
| q | Contact switch for anti-theft alarm |
| q | Installation position: In lock carrier |
| – | Removing bonnet lock → Chapter |