volkswagen Workshop Repair Guides

Volkswagen Workshop Service and Repair Manuals

Exterior equipment > < Removing
Installing
Installing
   
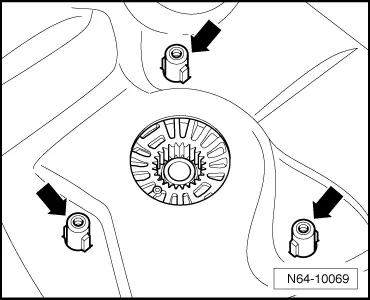
–  Insert threaded sleeves -arrows- for new cable reel through opening in assembly carrier.
–  Separate cable ties on cable reel and remove.
  N64-10069
–  Engage cable reel -1- in assembly carrier by applying light pressure.
  Note
Do not remove securing plate -2- from cable reel.
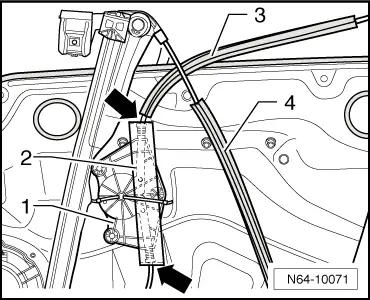
–  Place Bowden cable with long sleeve -3- beneath diagonal Bowden cable -4-.
–  Guide sleeve of Bowden cables in cable reel -1--arrows-.
–  Guide Bowden cable with short sleeve in Bowden cable mounting of front guide rail.
Do not feed Bowden cable on guide roller yet.
–  Guide Bowden cable with long sleeve in Bowden cable mounting of rear guide rail.
Do not feed Bowden cable on guide roller yet.
  Note
The Bowden cable ends should now be located at the top of the window regulator as the clamping jaws can only be installed in the upper position in the guide rails. If necessary, pull Bowden cable out of cable reel slightly.
Installation of carrier with clamping jaws
–  Place carrier with clamping jaw on side of guide rail. Clamping jaw should point towards top of window regulator.
  N64-10071
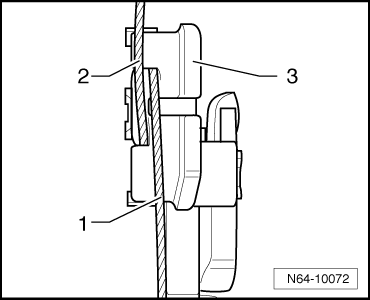
–  Insert crimped Bowden cable ends in carrier -3-.
–  First insert bottom Bowden cable -1- in upper deep groove.
–  Then insert top Bowden cable -2- in lower shallow groove.
  Note
The Bowden cables should be crossed over.
  N64-10072
–  Fold up carrier with clamping jaw -1- in -direction of arrow- towards guide rail -2-.
–  Install second carrier with clamping jaw -1- as described.
Feeding Bowden cable onto guide roller
  N64-10073
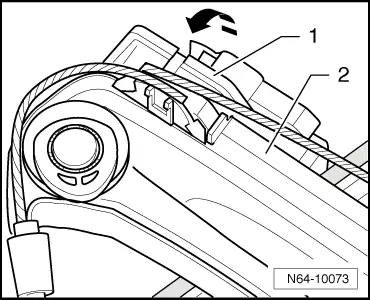
–  Check the 4 ends of the Bowden cable sleeve are seated correctly in the mountings -arrow-.
–  Place Bowden cable -1- on eccentric cams of guide rollers -2- as shown in diagram.
–  All eccentric cams should be turned to the smallest stroke, otherwise it will be difficult to fit the Bowden cable to the last guide roller.
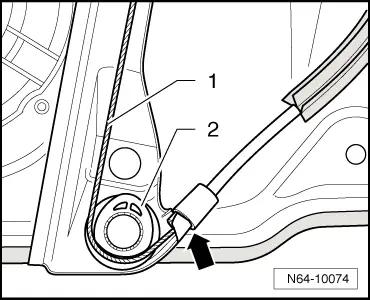
  N64-10074
–  Remove securing plate -2- off cable reel -1-.
–  Pull both carriers with clamping jaws to bottom end of guide rails. As this is done, the Bowden cable will be fed automatically into the groove of the guide rollers.
–  Check position of Bowden cable.
The Bowden cable should be located correctly in the groove of all 4 guide rollers.
–  Move carrier with clamping jaws up and down on guide rails several times to check correct function.
Vehicles with electric window regulators
–  Place foam underlay elements included in the repair set between window regulator motor and assembly carrier.
–  Install window regulator motor.
–  Tighten bolts to 3.5 Nm.
Vehicles with mechanical window regulators
  N64-10071
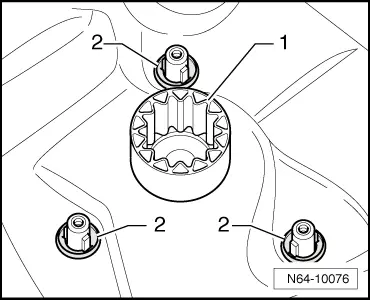
–  Fit relay element for cable reel -1-.
–  Install seals -2-.
  N64-10076
–  Install crank -2-. If necessary, align relay element for cable reel and crank. To do this, the relay element should be turned until the crank and relay element are correctly positioned in relation to each other.
–  Tighten bolts -1- to 3.5 Nm.
Continued for all vehicles
–  Install assembly carrier with window regulator → Chapter.
–  Slide door window in clamping jaws without additional force and align to rear window guide.
–  Tighten bolts of clamping jaws to 10 Nm.
  N64-10075

Exterior equipment > < Removing