volkswagen Workshop Repair Guides

Volkswagen Workshop Service and Repair Manuals

Removing and installing sealing flange and dual mass flywheel/drive plate > < Part II: Crankshaft drive
Removing and installing poly V-belt
Special tools and workshop equipment required
t  Hexagon bolt M8x45
Removing
  Note
Before removing the poly V-belt mark the direction of rotation. When installing belt ensure it is correctly seated in pulleys.
–  Remove engine cover.
–  Mark direction of rotation of poly V-belt.
   
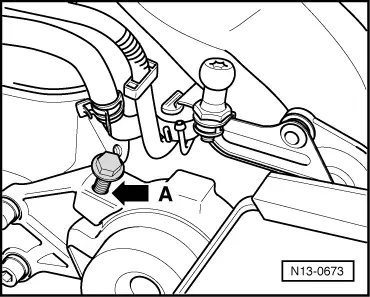
–  Screw bolt M8x45 into threaded hole -A- of tensioning element until poly-V belt is relieved of tension.
  Note
Screw in bolt only far enough to remove poly-V belt, otherwise housing of tensioning element may become damaged.
–  Remove right insulation tray: → General body repairs, exterior; Rep. Gr.50
–  Remove poly-V belt.
Installing
–  Installation is carried out in the reverse sequence of removal.
  Note
t  
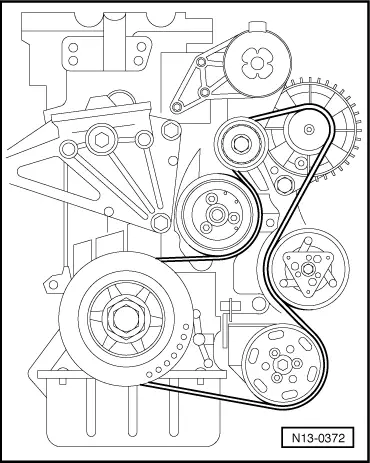
Before installing poly V-belt, ensure that all ancillaries (alternator, air conditioner compressor, PAS vane pump) are secured tightly.
t  When fitting poly V-belt, check direction of belt rotation and proper seating of belt in pulleys.
  N13-0673
–  Fit poly V-belt.
–  Unscrew M8 bolt again from tensioning element!
After completing repairs always:
–  Start engine and check belt running.
–  Install right insulation tray: → General body repairs, exterior; Rep. Gr.50
–  Fit engine cover.
  N13-0372

Removing and installing sealing flange and dual mass flywheel/drive plate > < Part II: Crankshaft drive