Volkswagen Workshop Service and Repair Manuals
HOME
FEATURES
MENU
INDEX
ABOUT US
Assembly overview - air filter >
< Assembly overview - gas pressure regulator
Golf Mk4
Power unit
4-cyl. injection engine (natural gas)
Mixture preparation system, electronic inj.,Gas / Repairing injection system
Removing and installing gas pressure regulator
Removing and installing gas pressure regulator
Removing and installing gas pressure regulator
Special tools and workshop equipment required
t
9/16” combination spanner -VAS 5302/12-
Removing
Observe safety precautions
→ Chapter
.
Observe rules for cleanliness
→ Chapter
.
–
Open luggage compartment floor
→ General body repairs, interior; Rep. Gr.70
.
WARNING
Danger of explosion! Before loosening fuel line connections render the system pressure-free.
–
Start engine and wait until the engine control unit has switched to natural gas operation (observe display in dash panel insert).
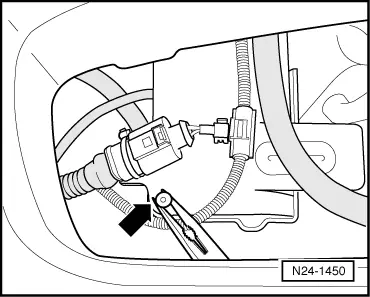
–
Detach connectors
-1-
and
-2-
.
–
Now wait until the engine control unit has switched to petrol operation (observe display in dash panel insert).
–
Switch off engine when the engine control unit has switched to petrol operation.
–
Remove grille on right in lower bumper.
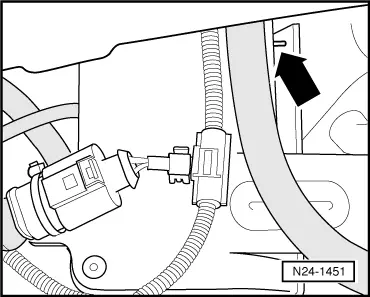
–
Pull out the lower spreader rivet
-arrow-
.
–
Pull out the upper spreader rivet
-arrow-
.
–
Pull gas pressure regulator cap off downwards.
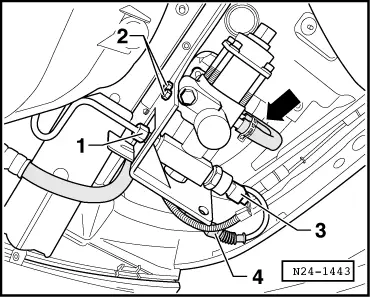
–
Disconnect high pressure line
-1-
.
–
Disconnect low pressure line from above.
–
Release coolant line
-arrow-
and pull off gas pressure regulator.
–
Detach electric connectors
-3-
and
-4-
.
–
Remove bolts
-2-
and take gas regulator off downwards.
Installing
Installation is carried out in the reverse order. When installing, note the following:
–
Tighten nut
-1-
finger tight and then turn
1
/
4
turn further.
Note
On no account must the nut be tightened further than specified, otherwise the special connection will be damaged and the gas line must be renewed.
–
Then a leak test of the high pressure regulator connection must performed by a qualified competent person
→ Chapter
.
Power unit
4-cyl. injection engine (natural gas)
Mixture preparation system, electronic inj.,Gas / Repairing injection system
Removing and installing gas pressure regulator
Assembly overview - air filter >
< Assembly overview - gas pressure regulator
 WARNING
 Note
Note
 Note
Note