volkswagen Workshop Repair Guides

Volkswagen Workshop Service and Repair Manuals

Reworking valve seats > < Checking semi-automatic toothed belt tensioning roller
4cyl. Injection Engine, (2.0 ltr. Engine) (Mexico)
Servicing valve gear

Notes:

  • ◆ Cylinder heads which have cracks between the valve seats or between valve seat inserts and the spark plug thread can be used further without reducing service life, provided the cracks do not exceed a maximum of 0.3 mm in width, or when no more than the first four spark plug threads are cracked.
  • ◆ When new tappets have been installed the engine must not be started for about 30 minutes. (Otherwise valves will contact pistons) then finally, rotate crankshaft two complete revolutions.
 
M15-0097
  • Camshaft sprocket
    • ◆ With camshaft timing adjustment
    • ◆ Under no circumstances should the bolts be loosened.
    • ◆ Renew complete
  • Seal
    • ◆ To remove and install, remove bearing cap
    • ◆ Do not oil sealing lips of sealing ring.
    • ◆ Removing and installing toothed belt from camshaft sprocket
  • 20 Nm
  • Bearing cap
    • ◆ Installation position => fig. 3
    • ◆ Installation sequence
      =>Page15-44 , removing and installing camshaft
    • ◆ Coat contact surfaces of bearing cap 1 lightly with sealing compound AMV 174 004 01.
 
M15-0097
  • Camshaft
    • ◆ With sender wheel for Hall sender
    • ◆ Checking axial clearance => Fig. 2
    • ◆ Removing and installing
    • ◆ Check radial clearance with Plastigage
      Wear limit: 0.1 mm
    • ◆ Run-out: max. 0.05 mm
  • Bucket tappet
    • ◆ Do not interchange
    • ◆ With hydraulic valve clearance compensation
    • ◆ Checking => Page 15-47
    • ◆ Store with cam contact surface downwards
    • ◆ Before installing check camshaft axial clearance
      => Fig. 2
    • ◆ Oil contact surface
  • Cotters
 
M15-0097
  • Valve spring upper plate
  • Valve spring
    • ◆ Removing and installing:
      Cylinder head
      Removed: with 2037
      Installed: => Page 15-52 , Renewing valve stem seals
  • Valve stem seal
  • Valve guide
    • ◆ Checking => Page 15-49
    • ◆ Renew => Page 15-50
    • ◆ Repair version with shoulder
  • Cylinder head
    • ◆ Reworking sealing surface
      => Fig.1
    • ◆ Reworking valve seats
      => Page 15-40
 
M15-0097
  • Valves
    • ◆ Do not rework, only lapping in is permitted
    • ◆ Valve dimensions => fig. 4
  • Filter element
    • ◆ Pull off with hooks
    • ◆ clean if soiled
  • Sealing plug, 12 Nm
    • ◆ Renew
  • 130 Nm
    • ◆ To loosen and tighten use counter-bracket T10172 with pin T10172/3.
  • O-ring
    • ◆ Renew
  • Sealing plug, 25 Nm
 
V15-0671

→ Fig. 1     Reworking cylinder head sealing surface

Cylinder head reworking dimension:
     a = At least 132.6 mm

Note:

When the sealing surface has been reworked, the valves must be set deeper by the same amount.

 
V15-0456

→ Fig. 2     Checking camshaft axial clearance

Special tools, testers, measuring instruments and auxiliary items required

  • ◆ Universal dial gauge bracket VW 387
  • ◆ Dial gauge

Check with bucket tappets removed and with first and last bearing caps fitted.

Wear limit: max. 0.15 mm

 
V15-0098

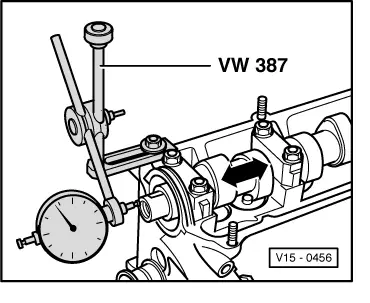
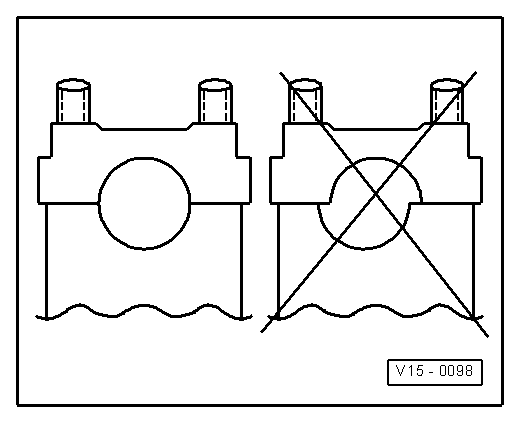
→ Fig. 3     Fitting position of camshaft bearing caps

Note offset. Before installing camshaft fit bearing caps and determine fitting position.

 
V15-0024

→ Fig. 4     Valve dimensions

Note:

Valves must not be reworked. Only lapping in is permitted.

Dimension

Inlet valve

Exhaust valve

øa

mm

39,5 ±0,15

32,9 ±0,15

øb

mm

6,98 ±0,007

6,96 ±0,007

c

mm

91,85

91,15

α

45

45

Reworking valve seats > < Checking semi-automatic toothed belt tensioning roller