volkswagen Workshop Repair Guides

Volkswagen Workshop Service and Repair Manuals

Removing and installing poly V-belt > < Additional information and assembly work on models with an air conditioning system
4cyl. Injection Engine, (2.0 ltr. Engine) (Mexico)
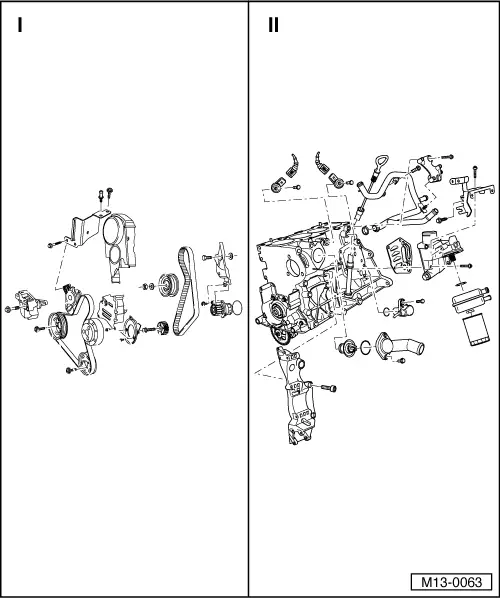
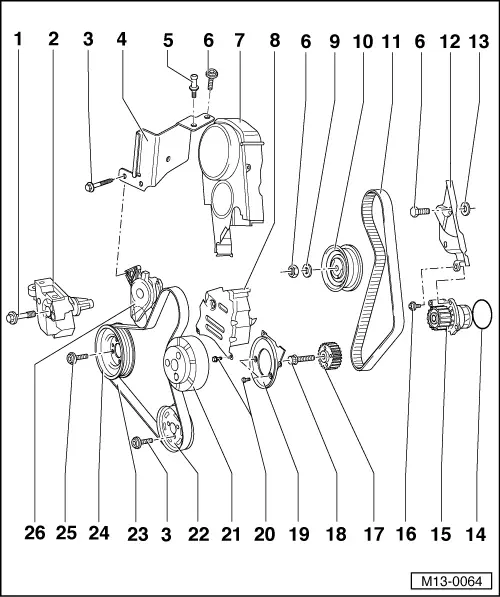
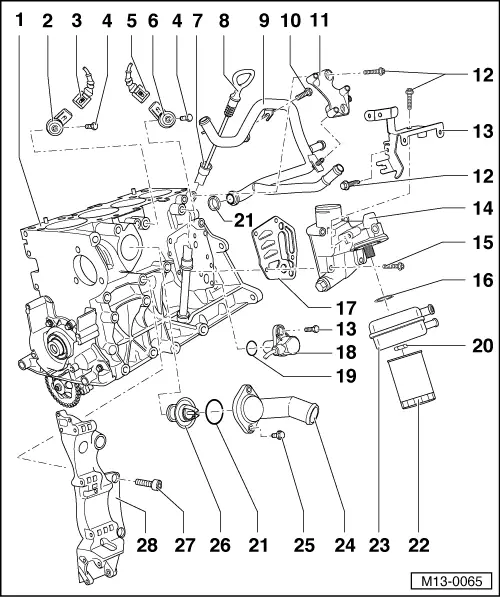
Dismantling and assembling the engine
 
M13-0063

Note:

If when repairing an engine, metal shavings or large amounts of small metal particles are found in the engine oil, caused for example by partial seizure of crankshaft or conrod bearings. Perform the following work sequences to prevent consequential damage once repairs are complete:

  • ‒ Thoroughly clean oil passages
  • ‒ Renew oil spray jets
  • ‒ Renew oil cooler
  • ‒ Renew oil filter

I    

II    

 
M13-0064

Part I

  • 45 Nm
  • Engine bracket
  • 25 Nm
  • Bracket
  • 10 Nm
    • ◆ For engine cover
  • 20 Nm
  • Toothed belt guard, upper part
  • Toothed belt guard, centre section
  • Washer
  • Tensioning roller
    • ◆ Checking semi-automatic toothed belt tensioning roller
 
M13-0064
  • Toothed belt
    • ◆ Mark direction of rotation before removing
    • ◆ Check for wear
    • ◆ Do not kink
    • ◆ Removing and installing, tensioning=> page 15-7 .
  • Rear toothed belt guard
  • Washer
    • ◆ Note Part No.
  • O-ring
    • ◆ Renew
  • Coolant pump
    • ◆ Check for ease of movement
    • ◆ If damaged or leaking renew complete
    • ◆ Removing and installing => page 19-22
 
M13-0064
  • 15 Nm
  • Crankshaft toothed belt sprocket
  • 90 Nm + 1/4 turn (90 °) further
    • ◆ Renew
    • ◆ Threads and shoulder must be free of oil and grease
    • ◆ Use counterhold tool 3415 to loosen and tighten
  • Toothed belt guard, lower part
  • 10 Nm
    • ◆ Renew
  • Electro-magnetic coupling
    • ◆ Air conditioner compressor
  • Belt pulley
    • ◆ For power assisted steering pump
 
M13-0064
  • Poly V-belt
    • ◆ Mark direction of rotation before removing
    • ◆ Check for wear
    • ◆ Do not kink
    • ◆ Removing and installing => page 13-11
  • Belt pulley/vibration damper
    • ◆ Can only be installed in one position. Holes are offset
    • ◆ Note position when installing toothed belt => Page 15-7 , Removing, installing and tensioning toothed belt
  • 25 Nm
  • Tensioning element for ribbed belt
    • ◆ Turn with open jaw spanner to slacken ribbed belt => page 13-11
 
M13-0065

Part II

  • Cylinder block
    • ◆ Removing and installing sealing flange and flywheel/drive plate
      => page13-14
    • ◆ Removing and installing crankshaft => page 13-31
    • ◆ Dismantling and assembling piston and conrod
  • Knock sensor 1 (G61)
    • ◆ Gold plated contacts
  • Connector
    • ◆ For knock sensor 1 (G61)
    • ◆ Gold plated contacts
  • 20 Nm
    • ◆ Torque setting influences the function of knock sensor
 
M13-0065
  • Connector
    • ◆ For knock sensor 2 (G66)
    • ◆ Gold plated contacts
  • Knock sensor 2 (G66)
    • ◆ Gold plated contacts
  • Dipstick guide
  • Dipstick
    • ◆ The oil level must not exceed the max. mark!
    • ◆ Markings , fig.1
  • Coolant pipe
    • ◆ Coolant hose connection diagram => Page 19-11
  • 25 Nm
  • Bracket
    • ◆ For ignition coil
 
M13-0065
  • 10 Nm
  • Bracket
  • Oil filter bracket
    • ◆ Dismantling and assembling => page 17-8
  • 15 Nm + 1/4 turn (90 °) further
    • ◆ Renew
  • Seal
    • ◆ Renew
  • Seal
    • ◆ Renew
  • Engine speed sender
  • Seal
    • ◆ Renew if damaged
  • 25 Nm
 
M13-0065
  • Seal
    • ◆ Renew
  • Oil filter
    • ◆ Loosen with strap wrench
    • ◆ Tighten by hand
    • ◆ Note instructions on filter when installing
  • Oil cooler
    • ◆ Coat contact surfaces to oil filter bracket outside the seal with AMV 188 100 02
    • ◆ Ensure clearance to adjacent components
    • ◆ See notes
  • Union
  • 15 Nm
 
M13-0065
  • Coolant thermostat
    • ◆ Checking: Heat up thermostat in water
    • ◆ Starts to open at approx. 86 °C
    • ◆ Opening stroke min. 7 mm
    • ◆ Removing and installing => page 19-25
  • Hexagon socket head bolt
    • ◆ Torque setting:

=> Heating and air conditioner; Repair group 87; Air conditioner; Removing and installing compressor bracket

  • Bracket
    • ◆ For poly V-belt tensioning roller, alternator, power assisted steering vane pump and air conditioner compressor

=> Heating and air conditioner; Repair group 87; Air conditioner; Removing and installing compressor bracket

Removing and installing poly V-belt > < Additional information and assembly work on models with an air conditioning system