Volkswagen Workshop Service and Repair Manuals
HOME
FEATURES
MENU
INDEX
ABOUT US
Installing valve body >
< Overview - valve chest
Golf Mk5
Power transmission
6-speed automatic gearbox 09G
Automatic gearbox, gears, control
Removing and installing valve body
Removing valve body
Removing valve body
Removing valve body
Special tools and workshop equipment required
t
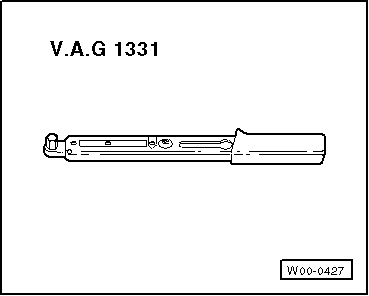
Torque wrench -V.A.G 1331-
t
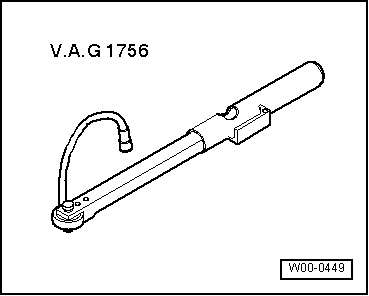
Angle wrench -V.A.G 1756-
–
Remove oil pan
→ Chapter
.
–
Remove ATF strainer
→ Chapter
.
–
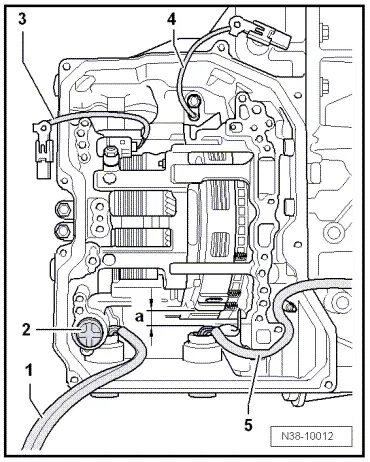
Pull connectors off solenoid valves
→ Item
through
→ Item
.
A flat-blade screwdriver with a shaft diameter of 2.5 mm is well suited to release connector housing on solenoid valves.
Caution
If connector or connector housing is damaged, the wiring harness or solenoid valve must be renewed.
–
Separate connectors
→ Item
and
→ Item
.
–
Unbolt retainer for connectors
→ Item
and
→ Item
.
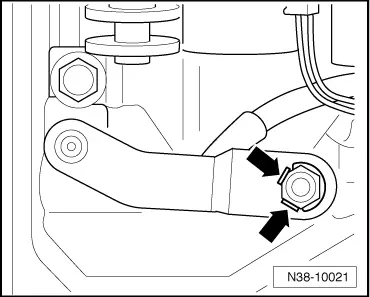
–
Unscrew gearbox oil temperature sender -G93-
→ Item
and carefully pull out of valve body.
–
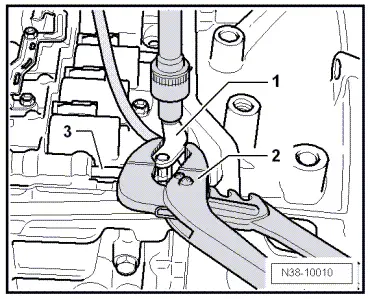
Bend back securing tab on selector lever, if fitted.
–
Remove selector lever
-1-
from selector shaft.
–
In the process, carefully grip selector lever
-1-
with pliers
-2-
so that torque is not transferred to multifunction switch -F125-.
–
Note spool valve
-A-
on valve body into which selector lever engages so that this is not damaged.
The spool valve is very
»sensitive«
. Even the slightest damage will lead to faults in operation.
–
Therefore, always push spool valve into valve body, secure against falling out and never interchange.
–
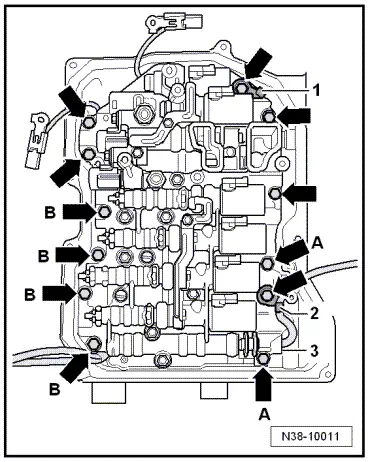
Loosen marked bolts (Qty. 12)
-arrows-
.
Caution
If other bolts are loosened, the valve body will warp.
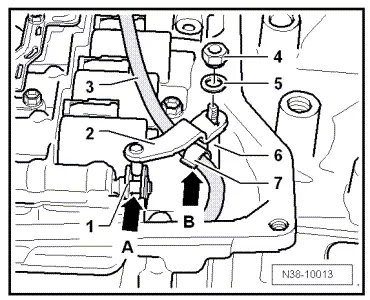
–
Unbolt brackets
-1-
and
-2-
.
–
Unbolt valve body and remove.
–
When removing valve body, observer damper piston
-2-
.
–
Remove piston with spring.
Power transmission
6-speed automatic gearbox 09G
Automatic gearbox, gears, control
Removing and installing valve body
Removing valve body
Installing valve body >
< Overview - valve chest
 Caution