
Golf Mk5
| Assembly overview - differential |
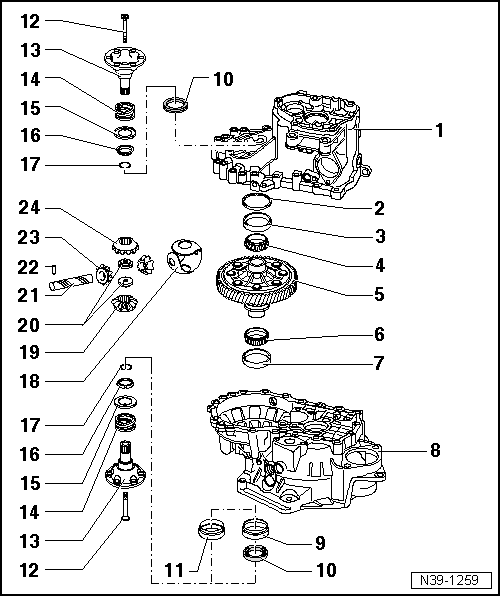
| 1 - | Gearbox housing |
| 2 - | Shim |
| q | For differential |
| q | Determining thickness → Chapter |
| 3 - | Tapered roller bearing outer race |
| q | Pulling out → Fig. |
| q | Pressing in → Fig. |
| 4 - | Tapered roller bearing inner race |
| q | Pulling off → Fig. |
| q | Pressing on → Fig. |
| 5 - | Differential cage |
| q | With final drive gear |
| q | Differential cage adapted to one-piece thrust washer → Fig. |
| q | Allocation → Electronic parts catalogue (ETKA) |
| 6 - | Tapered roller bearing inner race |
| q | Pulling off → Fig. |
| q | Pressing on → Fig. |
| 7 - | Tapered roller bearing outer race |
| q | Pressing out → Fig. |
| q | Pressing in → Fig. |
| 8 - | Clutch housing |
| 9 - | Sleeve |
| q | To support oil seal → Item. |
| q | Removing and installing → Chapter |
| 10 - | Seal |
| q | Renewing oil seal for left flange shaft with gearbox installed → Chapter |
| q | Renewing seal for right flange shaft with gearbox installed (two-part seal and sleeve for right flange shaft) → Chapter |
| 11 - | One-piece seal and sleeve |
| q | If seal is damaged, renew seal and sleeve together → Chapter |
| 12 - | Countersunk bolt, 25 Nm |
| q | Screw into threaded piece → Item |
| 13 - | Flange shaft |
| q | Removing and installing → Chapter |
| 14 - | Compression spring for flange shaft |
| 15 - | Thrust washer |
| q | Installation position → Fig. |
| 16 - | Tapered ring |
| q | With grooves to engage in thrust washer |
| q | Installation position: taper towards differential cage |
| 17 - | Retaining ring |
| q | Holds tapered ring, thrust washer and spring in position when flange shaft is removed |
| 18 - | One-piece thrust washer |
| q | Coat with gear oil when installing |
| q | One-piece thrust washer has shoulder in some gearboxes → Fig. |
| 19 - | Sun wheel |
| q | Installing → Fig. |
| 20 - | Threaded piece |
| q | Installing → Fig. |
| 21 - | Differential pinion pin |
| q | Drive out using drift |
| q | Installing → Fig. |
| 22 - | Spring pin |
| q | For securing differential pinion pin |
| q | Spring pins of different lengths have been installed |
| q | Spring pin identification → Fig. |
| q | Removing and installing short spring pin → Fig. |
| q | Long spring pin is sheared off when removed → Fig. |
| q | Installing long spring pin → Fig. |
| 23 - | Planet pinion |
| q | Installing → Fig. |
| 24 - | Sun wheel |
| q | Installing → Fig. |