volkswagen Workshop Repair Guides

Volkswagen Workshop Service and Repair Manuals

Installing > < Dismantling and assembling procedure
Removing
Removing
–  First modify gearbox support -3221-.
   
–  Drill a 11.0 mm Ø hole -arrow-.
  A34-0292
–  Secure gearbox to Gearbox support -3221--arrows-.
–  Place drip tray -V.A.G 1306- underneath.
–  Drain gear oil.
  A34-0293
–  Remove clutch release lever -A- together with release bearing and guide sleeve -arrows-.
–  Remove right flange shaft securing bolt -B-.
–  Screw two bolts into flange and counterhold flange shaft using a lever.
–  Remove flange shaft along with spring, thrust washer and tapered ring.
  A34-0294
–  Unbolt gearbox housing cover -arrow- and carefully pull it off.
  N34-10164
–  Pull out pivot pin -1- for 5th and 6th gear selector fork -2- and remove selector fork.
  N34-10166
–  Remove bolts -A- for inner bearing races from input and output shafts, engaging 5th gear -arrow 1- and 1st gear -arrow 2- and -arrow 3-.
–  Input shaft and output shaft are locked when both gears are engaged. Both bolts can now be loosened.
  Note
If shafts are not to be renewed, carefully clean residual locking material out of threaded holes using a thread chaser.
  N34-1513
–  Pull off gear wheel for 6th gear with inner race of cylindrical roller bearing for output shaft.
A-Two arm puller - Kukko 20/10-
B-Hexagon socket head bolt -M 8 x 15-
  N34-10165
–  Tighten splitter - Kukko 17/1--A- behind constant mesh teeth of synchromeshed gear for 6th gear (not dog teeth) -arrow-.
A-Splitter - Kukko 17/1-
B-Hexagon socket head bolt -M 8 x 15-
C-Puller - Kukko 18/1-
–  Pull off gear wheel for 6th gear with cylindrical roller bearing inner race for input shaft and thrust washer.
–  Remove locking collar for 5th and 6th gears with locking pieces.
  N34-10168
–  Tighten splitter - Kukko 17/1--A- below synchro-ring for 5th gear -1-. This presses synchro-ring against synchro-hub -2-.
A-Splitter - Kukko 17/1-
B-Hexagon socket head bolt -M 8 x 15-
C-Puller - Kukko 18/1-
–  Pull off synchro-hub for 5th and 6th gears with inner race for 6th gear needle bearing and 5th gear synchro-ring.
  Note
The synchro-ring for 5th gear must always be renewed after it is pulled off.
–  Remove flange shaft securing bolt by screwing two bolts into flange and counterholding flange shaft with a lever.
  N34-10174
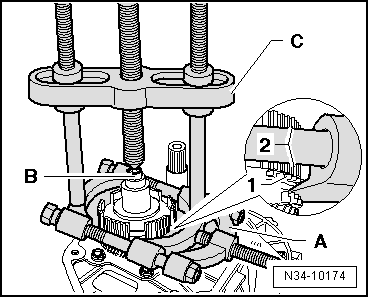
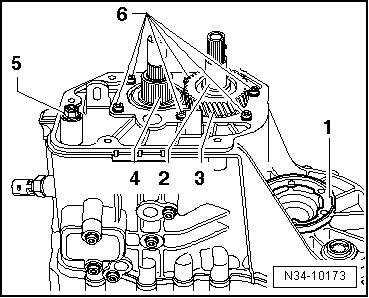
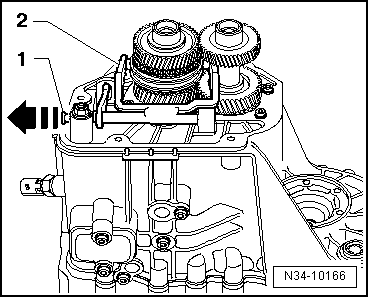
–  Pull out flange shaft -1- with spring.
–  Remove sleeve -2-, gear wheel for 5th gear -3- and synchromeshed gear for 5th gear with needle bearing -4-.
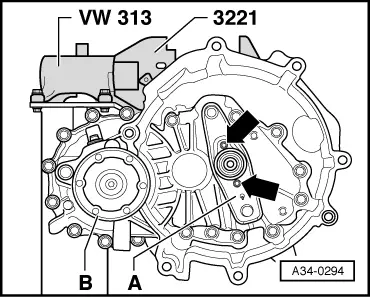
–  Unscrew hexagon flange nut -5- for securing reverse gear selector mechanism.
–  Remove bearing mounting securing bolts -6- from input and output shafts.
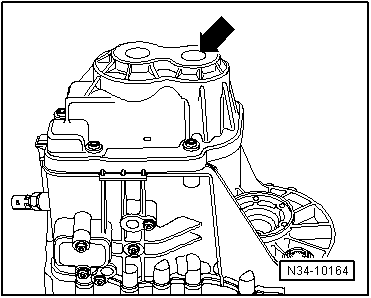
–  Turn gearbox in support bracket so that clutch housing is upwards.
–  Remove securing bolts from clutch housing side for securing clutch housing to gearbox housing.
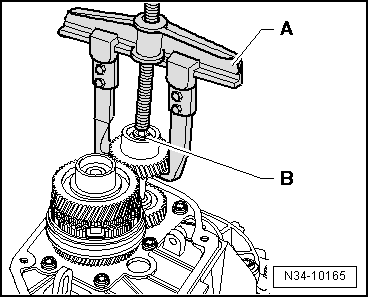
–  Remove clutch housing, if necessary carefully levering up all around along protruding housing flange and alternating between sides, being careful not to damage sealing surfaces.
–  Do not cant the clutch housing. This prevents damage to roller bearings and their bearing seats on the input and output shafts.
  N34-10173
–  Remove differential -A- from gearbox housing.
  N34-10172
–  Remove selector shaft with selector cover -A-. Place selector shaft in neutral. Then remove bolts -arrows- and pull selector shaft out of gearbox housing.
–  Remove pivot pins -B- located on underside of gearbox.
–  Screw out reversing light switch -F4--C-.
  N34-10170
–  Remove bolt -A- for securing reverse gear wheel shaft.
–  Remove pivot pins -B- located on bottom of gearbox.
  Note
Do not remove cover plate -arrow- when dismantling gearbox.
  A34-0300
–  Press out input shaft, output shaft with bearing mounting, selector mechanism (selector forks) and reverse gear together.
  Note
t  Position gearbox housing so that dowel sleeves in the gearbox will not be damaged.
t  When pressing out, get help from second mechanic to ensure components do not fall out.
–  Press input shaft and output shaft off bearing mounting with deep groove ball bearing.
  N34-1518

Installing > < Dismantling and assembling procedure