Golf Mk5
| Assembly overview - fuel tank |

| 1 - | Cap |
| 2 - | 1.5 Nm |
| 3 - | Earth connection |
| q | Check for secure seating. |
| 4 - | 10 Nm |
| 5 - | Cable guide |
| 6 - | Fuel tank |
| q | When removing, support using engine and gearbox jack -V.A.G 1383/A-. |
| q | Removing and installing → Chapter. |
| q | Emptying fuel tank → Chapter |
| 7 - | 25 Nm |
| q | Renew. |
| 8 - | Heat shield |
| q | For fuel tank. |
| 9 - | Clamping washer |
| 10 - | Securing strap |
| q | Note installation position. |
| 11 - | Bracket |
| q | For exhaust system. |
| 12 - | Seal |
| q | Renew if damaged. |
| q | Moisten with fuel when installing. |
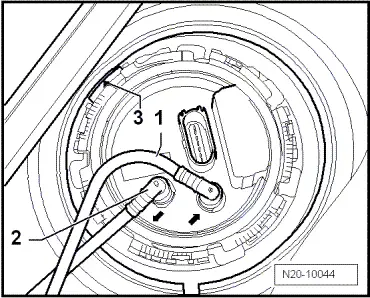
| 13 - | Fuel delivery unit |
| q | With fuel gauge sender (G). |
| q | Clean strainer if soiled. |
| q | Note installation position of flange on fuel tank → Fig.. |
| q | Removing and installing → Chapter. |
| q | Checking fuel pump → Chapter. |
| q | Removing and installing fuel sender → Chapter. |
| 14 - | Locking ring, 110 Nm |
| q | Check for secure seating. |
| q | Remove and install using wrench -T10202-. |
| 15 - | Supply line |
| q | To fuel filter → Item. |
| q | Clipped onto fuel tank. |
| q | Check for secure seating. |
| q | Black. |
| q | To pull off flange, press release button on connecting piece. |
| 16 - | Return line |
| q | From fuel cooler. |
| q | Blue or with blue marking. |
| q | Clipped onto fuel tank. |
| q | Check for secure seating. |
| q | To pull off flange, press release button on connecting piece. |
| 17 - | Tank flap unit |
| q | With rubber cup. |
| q | Removing and installing → General body repairs, exterior; Rep. Gr.55. |
 Note
Note